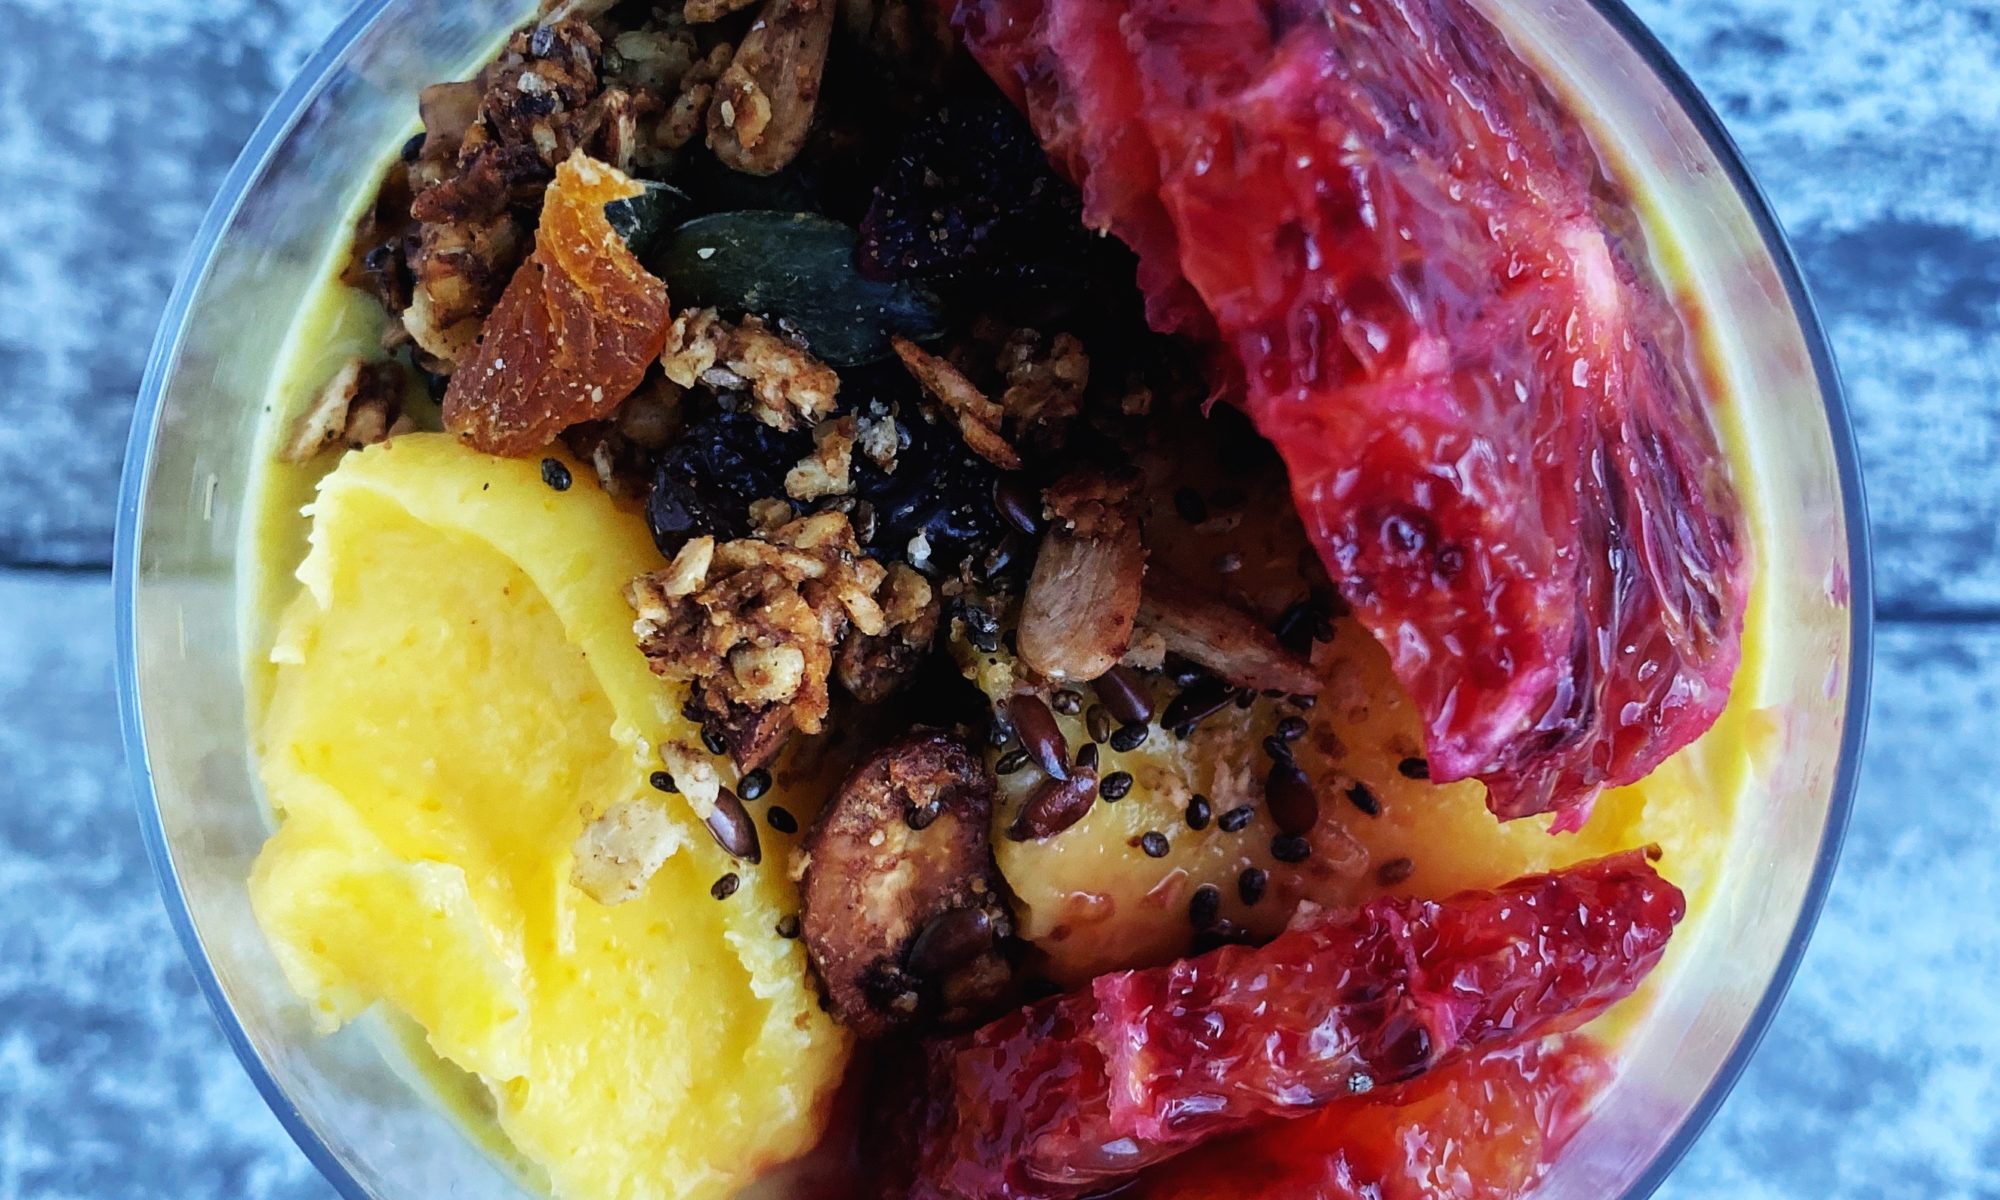
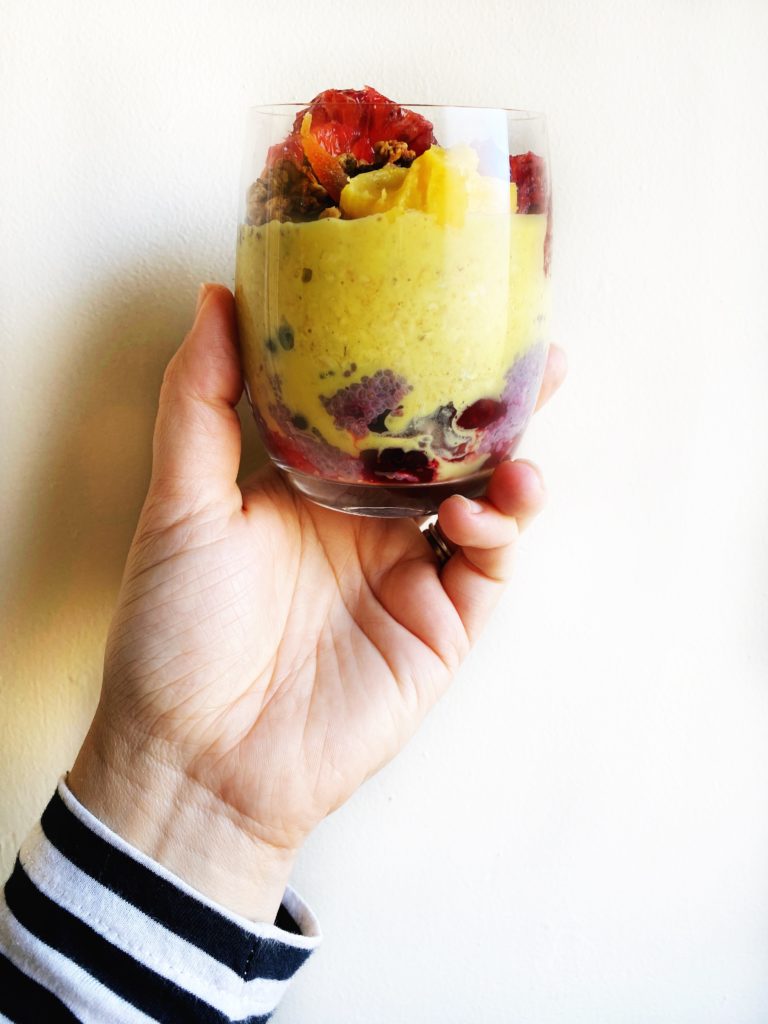
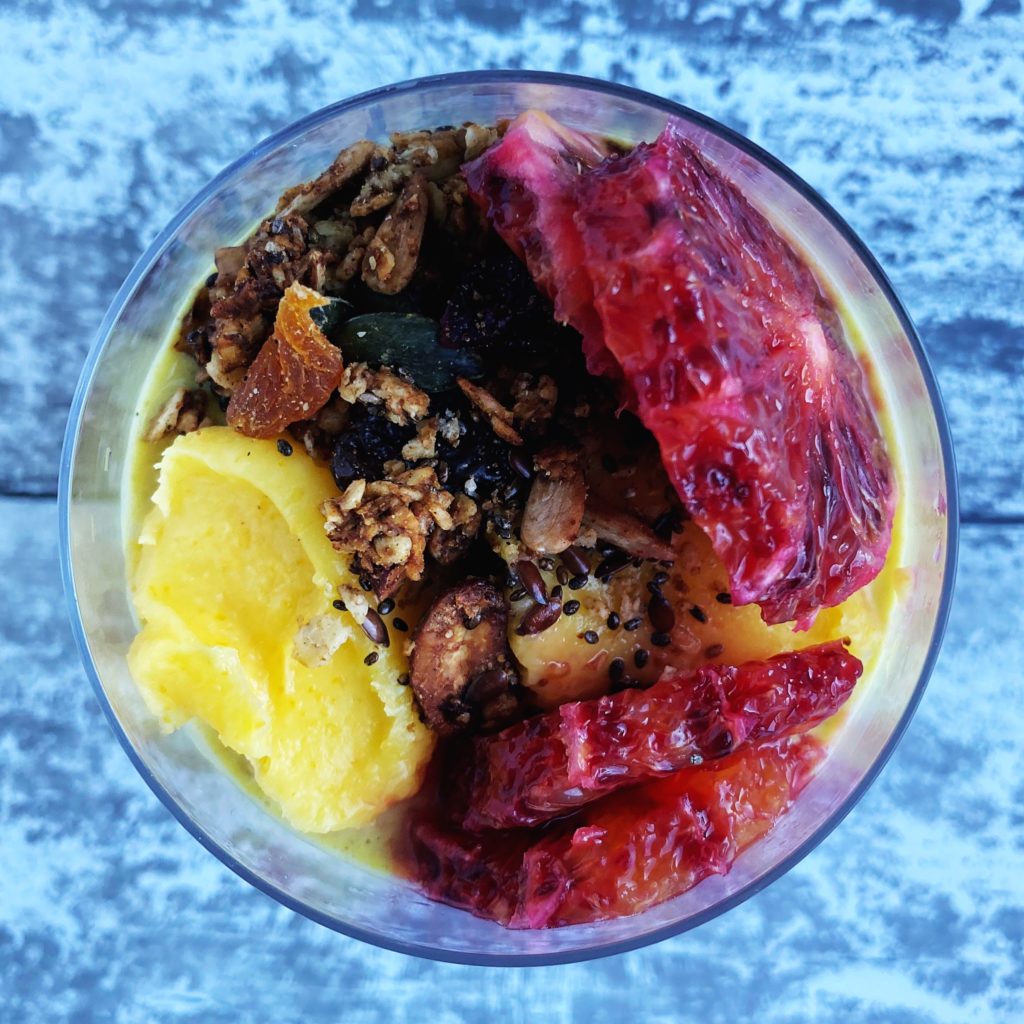
These little chia and oat pots are perfect for breakfast (and they make a fabulous healthy pudding too)! You can prepare the two layers in separate bowls the night before, then just put it together in the morning with some crunchy granola, juicy fruit and silky curd (find the recipe for my favourite kumquat curd here). If you don’t have curd you could use a dollop of yogurt instead.
Chia seeds are a powerhouse of nutrients. Packed full of fibre, antioxidants, minerals and heart healthy omega 3 fatty acids. Oats are brilliant too of course! This humble grain is one of the most nutrient dense foods you can eat and can lower cholesterol levels, improve blood sugar control and contains a powerful soluble fibre which is great for your digestive system!
I love this combination of berry chia, turmeric oats, zingy sweet citrus and toasty granola. But of course you can tweak the recipe to use your favourite fruit or flavours. How about rhubarb compote in the chia layer and making the creamy oat layer taste like custard with some vanilla? Then top with yogurt, granola and more rhubarb? Or do you like tropical flavours? How about a passionfruit chia layer, coconut milk in the oats and top with mango slices and toasted coconut flakes? Are you a chocoholic? Raspberries in the chia layer, cacao powder in with the oats then top with pieces of dark chocolate, fresh raspberries and toasted hazelnuts? The possibilities are endless.
Let us know your favourite chia and oat pot flavour combos in the comments. Liz x
*as always, bold words are clickable and will take you to the product or recipe on our website so that you can easily add ingredients to your order or find the recipe I refer to
Mix the first 4 ingredients in a bowl, leave to stand for a few minutes and mix again. Then cover and refrigerate (or use right away if you are making this in the morning).
Mix the next 4 ingredients in a separate bowl, cover and refrigerate over night to allow it to thicken (or you can serve it after a quick 10 minute soak if you are making this in the morning).
Serve in a couple of simple glasses. Divide the chia and berry mixture between two glasses, then add the turmeric porridge mixture. Top with a tbsp of kumquat curd, peeled slices of blood orange and a couple of tbsp of granola.
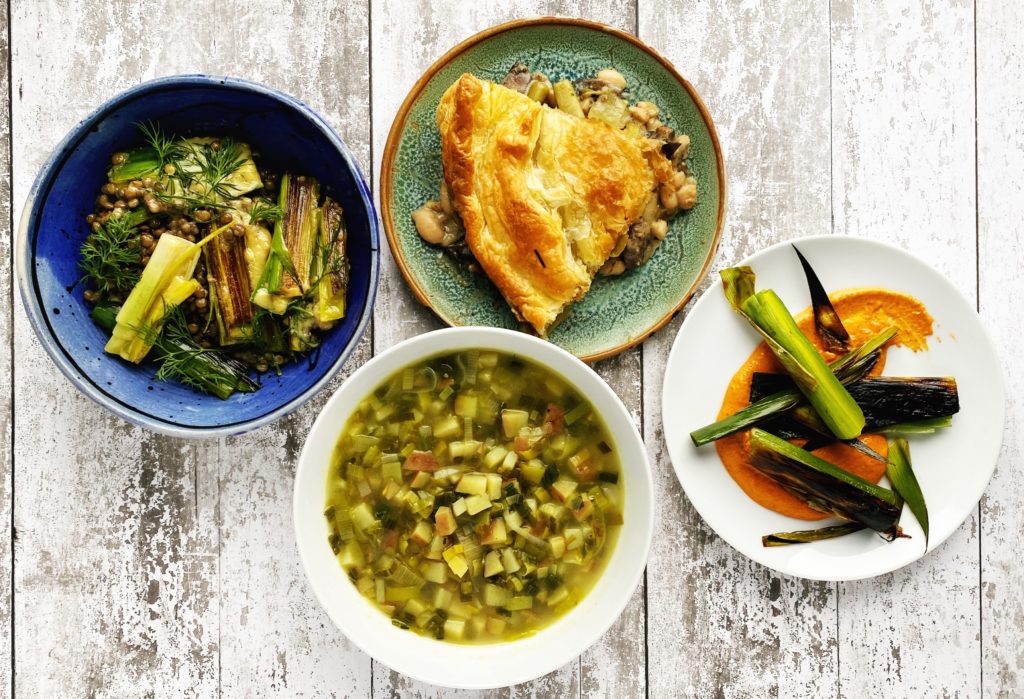
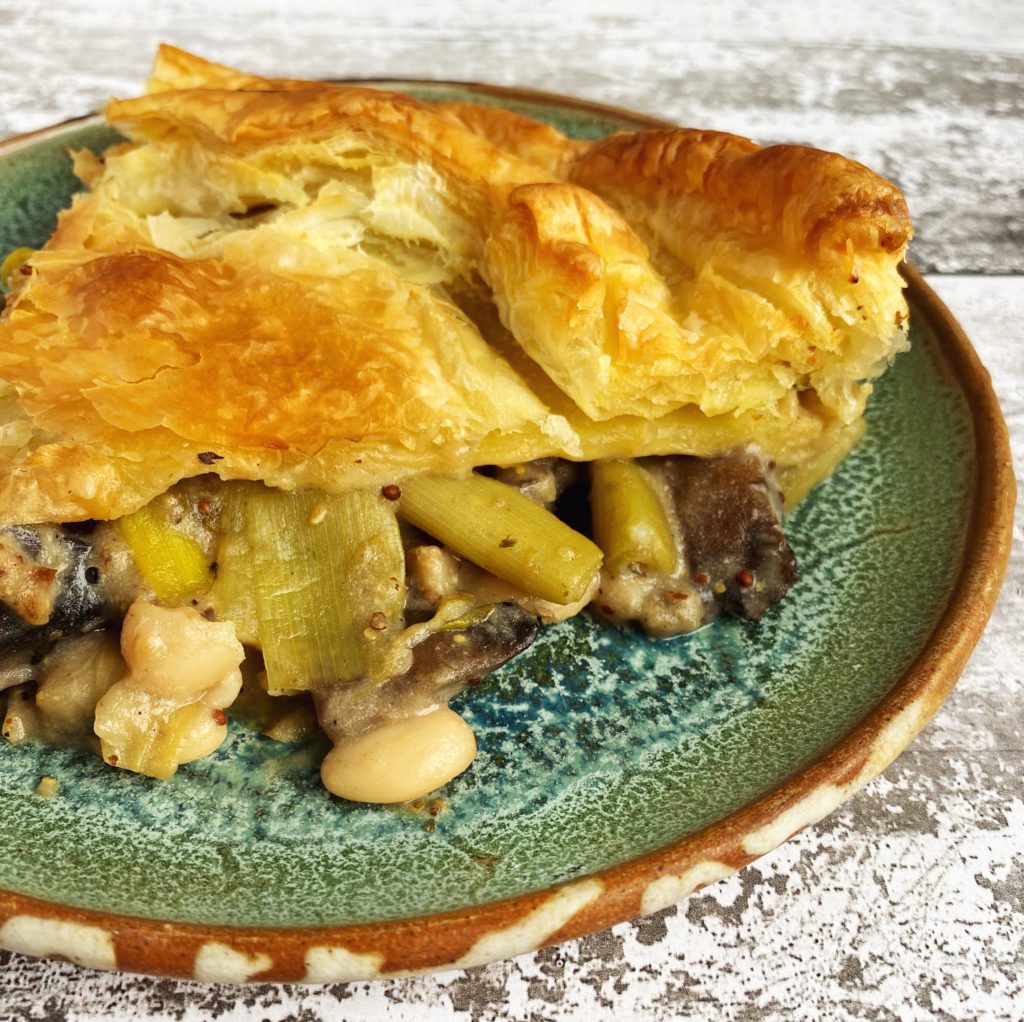
Leeks are such beautiful vegetables and they grow really well here in Ireland. Make the most of their sweet, mellow flavour by giving them the starring role on your plate. I absolutely adore them in this easy tarte tatin recipe – a must try!
As part of my ‘4 Ways With…” series, here are 4 new luscious leek recipes for you. Let us know your favourite leek recipes in the comments or over on our facebook group. We love to see what you make with our wonderful organic produce. As always, the words in bold are clickable links which will take you to our shop so that you can easily find the products to add to your order.
Pre-heat the oven to 200C. Split the leeks in half, lengthways, keeping them intact at the base. Run them under a tap and rinse out all the mud between the layers.
Slice the dark green part of the leeks into 1-2cm chunks and the mushrooms into halves or quarters and sauté with the butter or oil and a pinch of salt.
When the mushrooms and dark greens have started to cook down a little, slice the pale part of the leeks and add that to the pan too with an extra pinch of salt.
Peel and slice the garlic cloves and pull off the thyme leaves and add them to the pan too. Sauté gently for around 10 minutes or until very fragrant and the vegetables are softened and mostly cooked through.
Add the mustard and either a half glass of white wine or a tiny splash of vinegar and stir well.
Sprinkle in the flour and nutritional yeast, stir to coat the vegetables, and then add generous splashes of oat milk and keep stirring and cooking out the flour until you get to to a silky, creamy consistency.
Taste and adjust the seasoning with pepper and more salt as needed. Then drain the butterbeans (reserve the aquafaba for mayonnaise or clafoutis) and add them to the pie filling.
Then either tip the filling into a pie dish and cover quickly with pastry or pop the pastry straight onto your pan if it is oven and hob safe. Work to get the pie in the oven quickly if your filling is still hot otherwise the pastry will melt.
Put the pie into the oven for about 25 minutes or until the pastry is cooked through and the filling is bubbling. Slice into wedges and serve with steamed greens and some extra wholegrain mustard on the side.
*optional extras – garlic, celery, carrot, fresh herbs, a tin of chickpeas/white beans…
Method
Leek and potato soup couldn’t be simpler and it’s my kids favourite soup. They like it left chunky and brothy like in the photo, but it’s delicious blended smooth too.
Sauté the green part of the leek (thinly sliced) in the oil/butter with diced potatoes until softening – about 8 minutes.
Add the thinly sliced paler part of the leek, optional extras like garlic, thyme, rosemary, diced celery or carrots etc and sauté for a few more minutes.
Add a stock cube and cover the vegetables with hot water.
Simmer until the potatoes are cooked through. Then either leave chunky or blend until smooth.
Taste and adjust the seasoning. I always like a squeeze of fresh lemon juice and some freshly ground black pepper in my soup to brighten and lift the flavours.
*Bulk it out and add some plant protein with a drained tin of chickpeas or white beans simmered into the soup.
fresh herbs (tarragon or dill go really well here)
*optional extras – toasted nuts or seeds, capers, olives…
Method
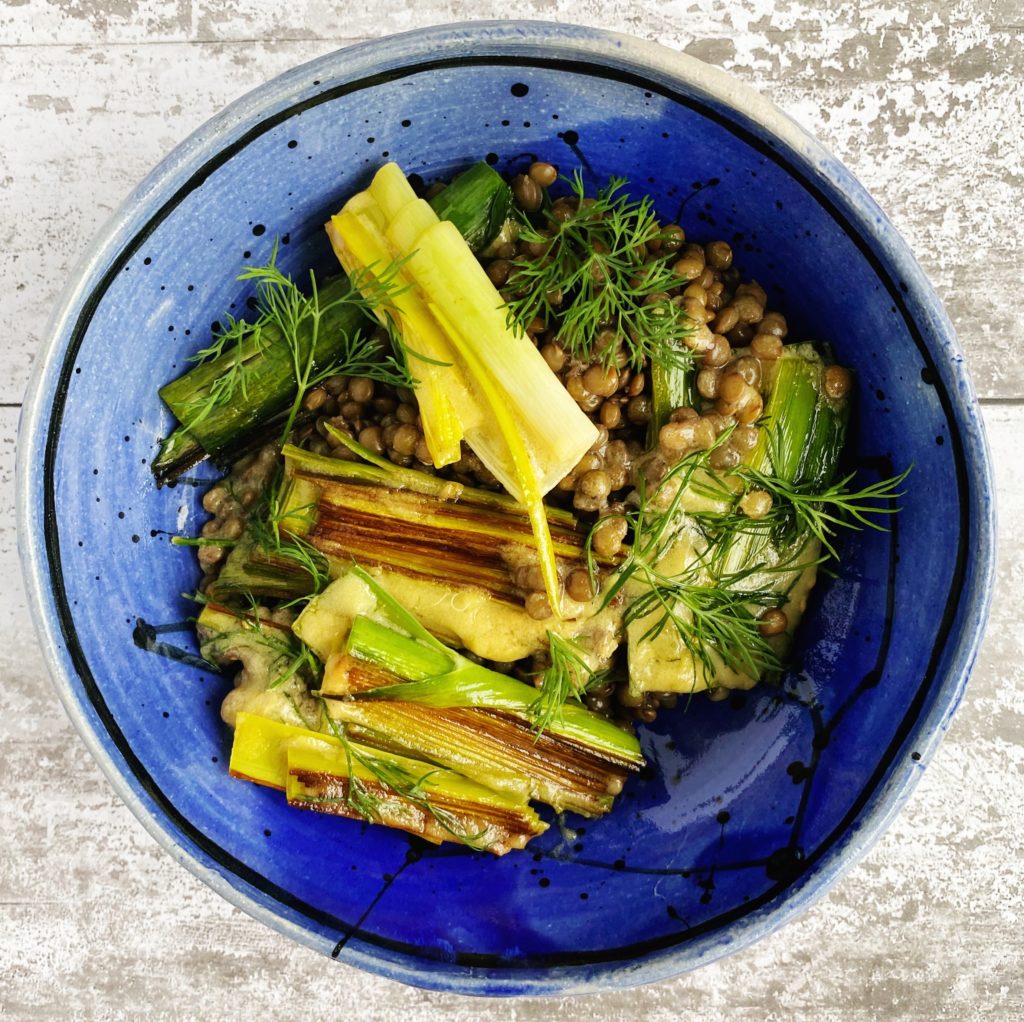
Traditionally, leeks are boiled in salted water then cooled and drained before dressing with a classic vinaigrette. I like to half sauté and half steam my leeks to add a little caramelised colour to the dish.
Split and wash the leeks, keeping them intact at the root end. Then cut into long chunks, about the length of your index finger.
Place the leeks – beautiful, stripy, cut side down – in a hot frying pan with the butter or oil. Sprinkle over a pinch of salt and allow the leeks to take on some colour. Don’t move them around in the pan, let them sit in one delicate piece. Then after about 4 minutes, put the lid on the frying pan and allow the leeks to steam in their own juices. You may wish to turn the heat down to medium at this stage.
Test that they are cooked through with a small, sharp knife. Then plate them up.
Put the cooked lentils into a large bowl or platter (drain the tin or simmer dried lentils in stock until soft). Make a classic vinaigrette by mixing the olive oil, vinegar and dijon mustard with a pinch of salt.
Arrange the leeks on top of the lentils and drench with the vinaigrette. Then scatter over some freshly picked tarragon or dill and enjoy with some fresh, crusty bread and a crisp glass of white wine.
*Sprinkle over some toasted walnuts or other nuts or seeds you like or some salty capers or green olives to give the salad an extra dimension.
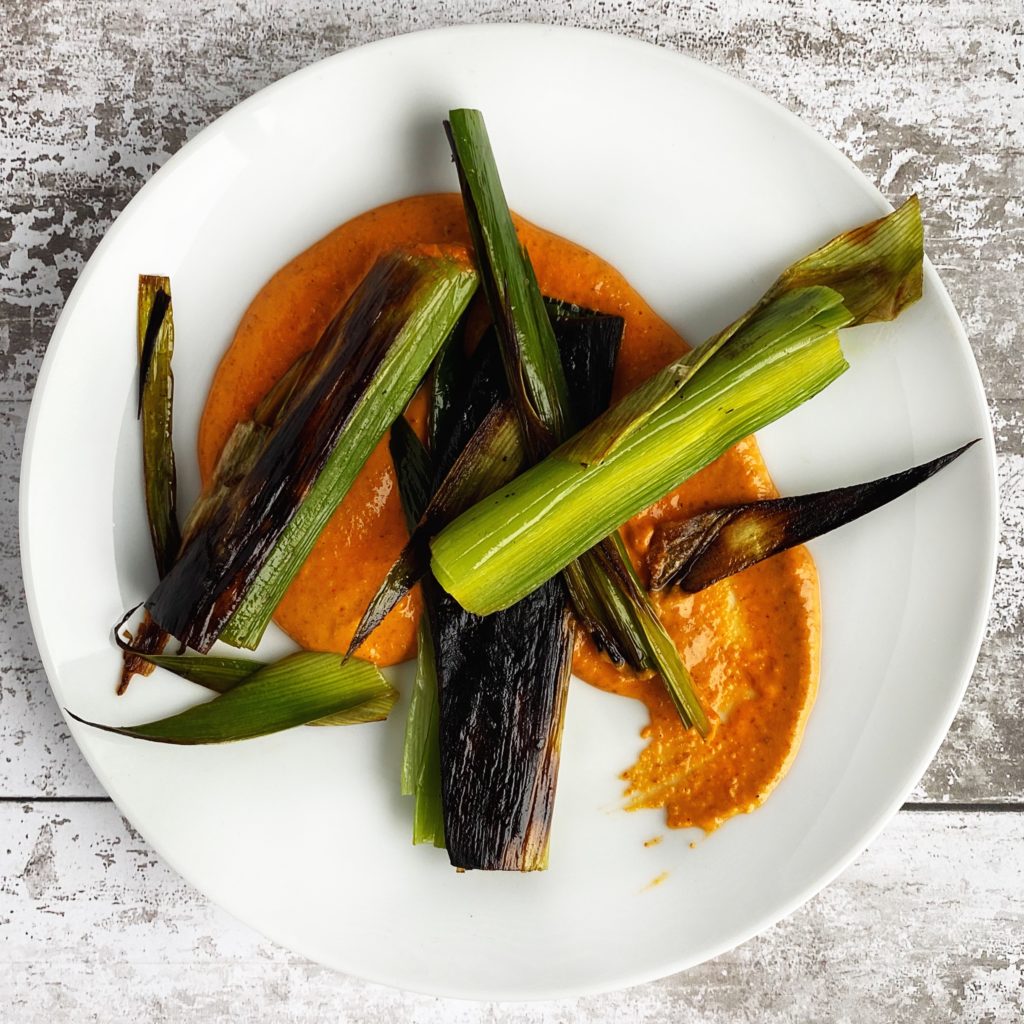
This recipe is my nod to the Catalonian calçot festival which I have never been to but have high on my bucket list. Calçots are extraordinary vegetables, somewhere between a small leek and a large scallion, so leeks work really well as an alternative. Traditionally calçots are grilled over open flame until blackened on the outside and perfectly sweet, smokey and juicy inside. Then they are wrapped in newspaper and left to rest. They are delightfully messy to eat. Peel off the burnt outer layer, dunk the sweet middle in nutty romesco sauce and lower the sweet, tender vegetable into your mouth and enjoy.
My version with leeks is so delicious, you’ve just got to try it! I love this messy meal with some really good bread to mop up the juices and a large glass of red wine. We sell some excellent organic Spanish wines which would go perfectly.
Make the romesco sauce by blending the almonds, red pepper, garlic, olive oil and vinegar into a semi-smooth sauce. Taste and season with a big pinch of salt.
Split and rinse the leeks, leaving the roots intact. Then slice them into long pieces, carefully keeping the layers all together.
Carefully put them in a large, hot frying pan with some olive oil and a sprinkle of salt and allow them to take on a good amount of colour before covering the pan with a lid and steaming them in their own juices until soft.
They should be soft all the way through and the burnt edges should contrast beautifully with the sweet, silky middles.
Spread some romesco sauce on a large platter, then place the hot leeks on top and eat them immediately. Scoop them up with a fork or your hands and finish off the sauce with torn chunks of bread. Absolutely delicious!
Illustration from my cookbook which is available to add to your order here.
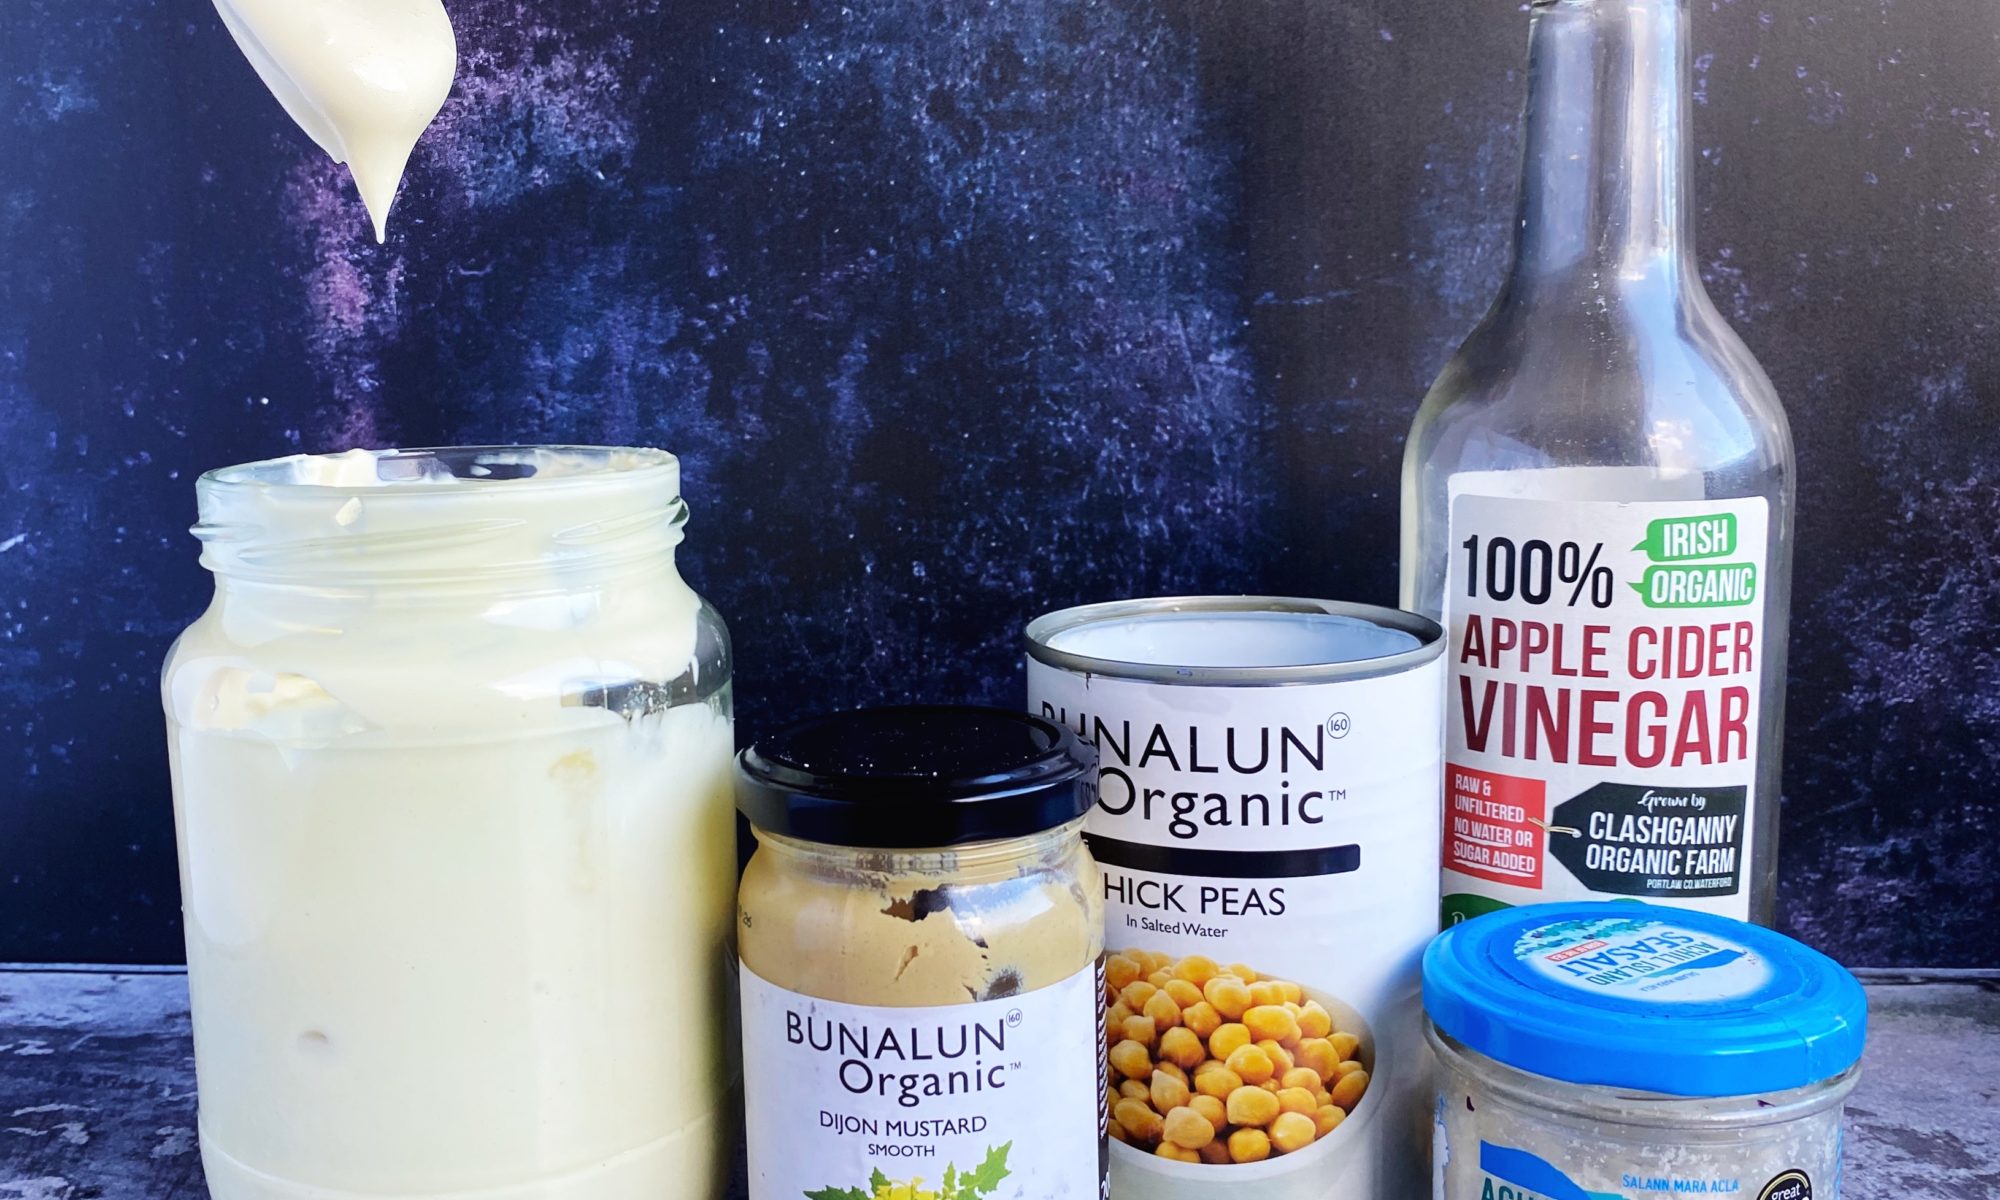
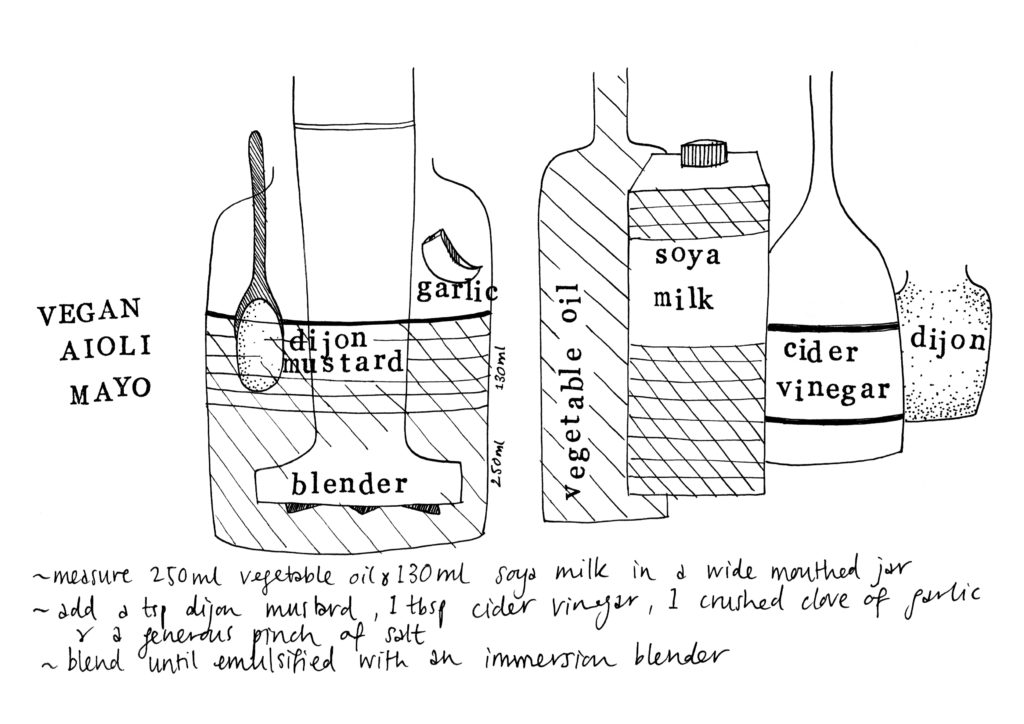
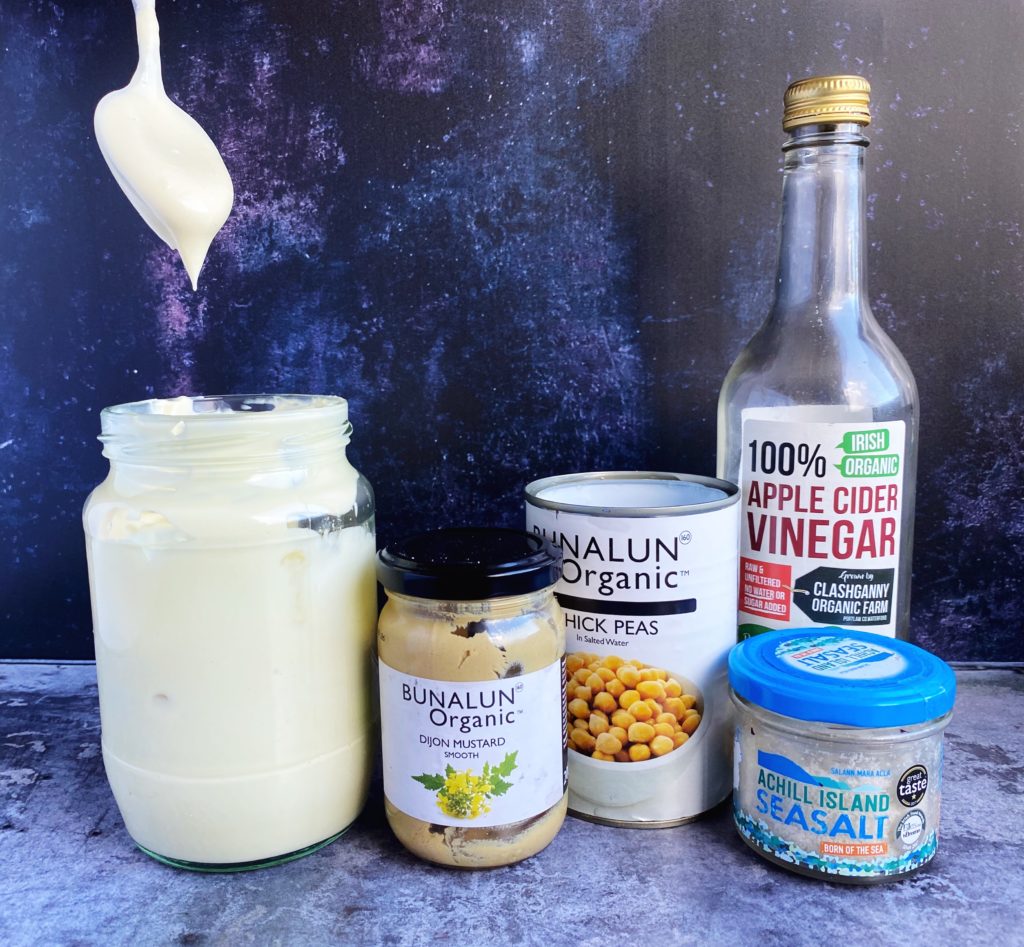
Organic, egg-free mayo is so simple to make with common store-cupboard ingredients. The easiest way is with soya milk as per the illustrated recipe above from my book. But there’s another way if you are intolerant to soy or don’t have soy milk in the house. Aquafaba is the viscous liquid result of boiling beans, the most reliable source is from a tin of organic chickpeas, and it’s truly magic stuff. It makes a brilliant egg white replacement and I use it in lots of cake recipes like this clafoutis. It is used as an emulsifier in this mayonnaise recipe and it works perfectly.
Let us know in the comments or over on our facebook group if you try this recipe. We love to see our recipes recreated in your homes. Liz x
*Get the ingredients from our shop. Just click on any of the bold words and you’ll be taken right to the product so you can easily add it to your cart.
Measure the aquafaba, mustard, salt, vinegar and optional flavourings into a jar or jug in which your immersion blender will fit.
Blend with the immersion blender until frothy.
Add the oil in a slow steam whilst continuing to blend. You may not need to use it all. Stop once your mayonnaise is thick, creamy and glossy.
Taste and adjust the seasoning as you wish with more salt/mustard/vinegar.
Keep refrigerated and use within 2 weeks.
Serving Suggestions:
Add to sandwiches, burgers and wraps.
Stir through shredded cabbage and carrot to make homemade coleslaw.
Dunk potato wedges in it or other roasted veg chips.
Make potato salad. Mix through boiled potatoes, carrot and beetroot with chopped dill and spring onions.
Saffron mayo is especially good with patatas bravas. Roast bite size chunks of potato with olive oil, salt, pepper and smoked paprika. Make a simple tomato sauce (simmer sautéed onion and garlic with a tin of chopped tomatoes and seasoning) and serve the potatoes in small tapas bowls on top of the sauce with chopped parsley and saffron mayo.
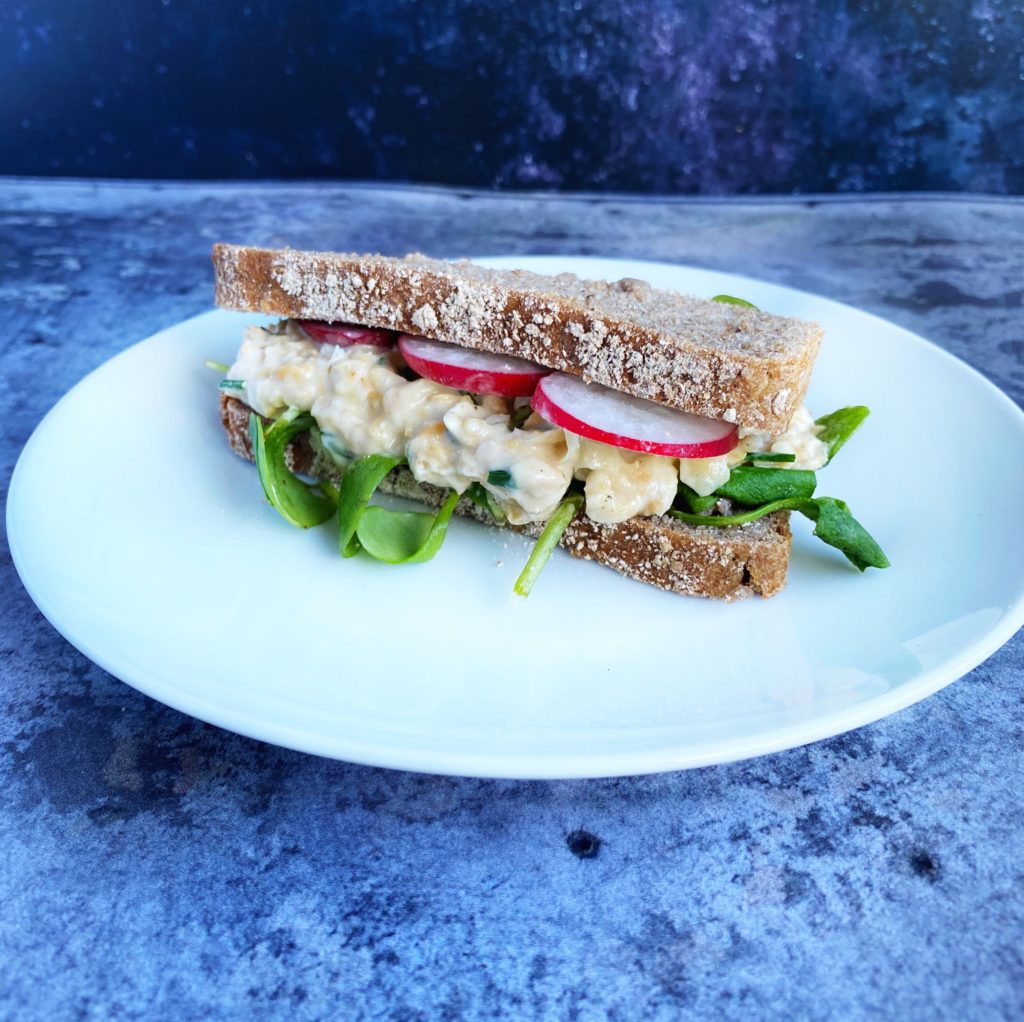
Make a vegan ‘egg mayo’ sandwich. Simply mash the chickpeas from the tin, then stir through some mayo and chopped chives or spring onions, black or white pepper and then pile between two slices of bread with some watercress, rocket or our seasonal winter purslane. It’s great with some crunchy, peppery radish slices too! Get that eggy flavour by sprinkling in some sulphurous kala namak (aka black salt).
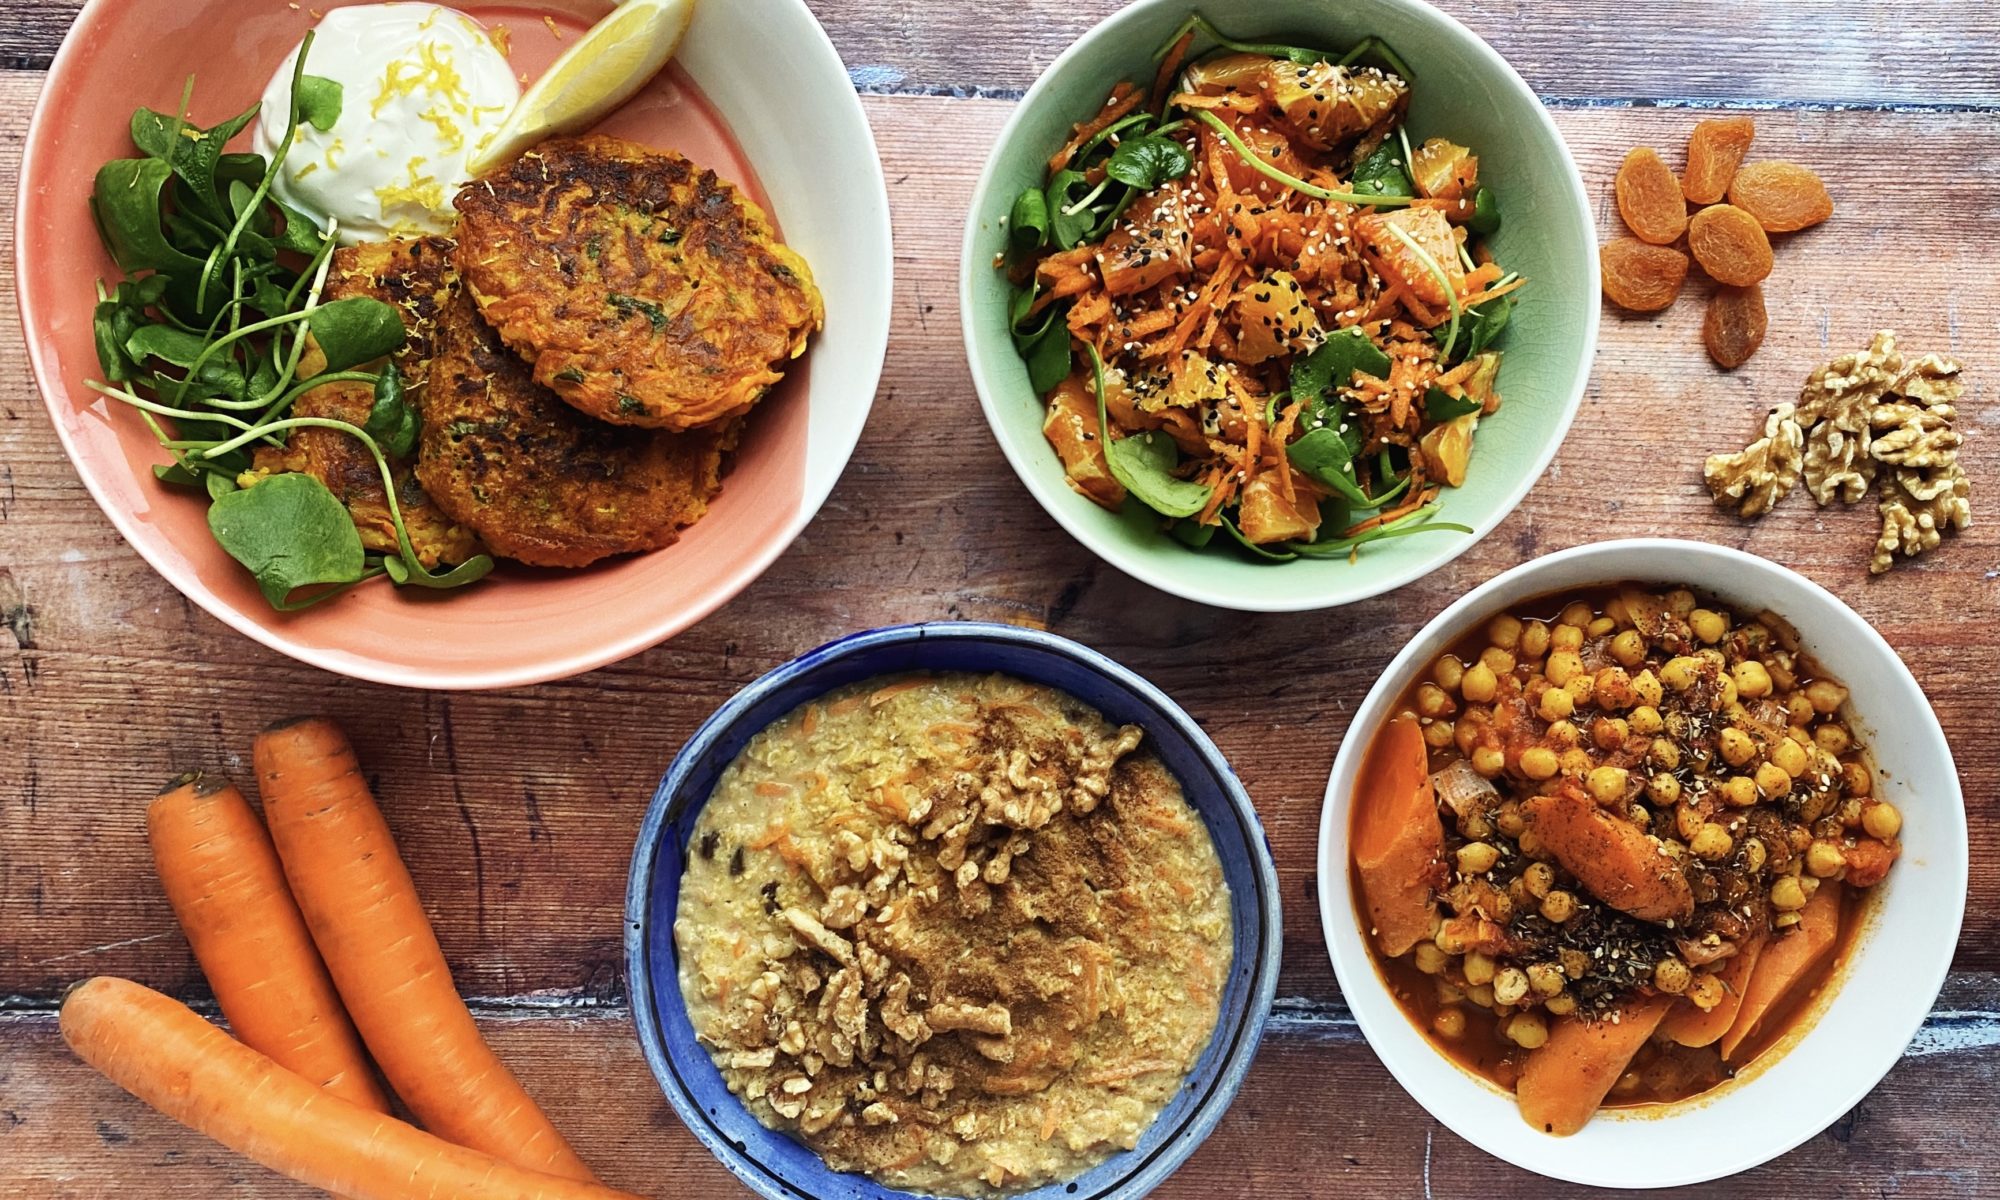
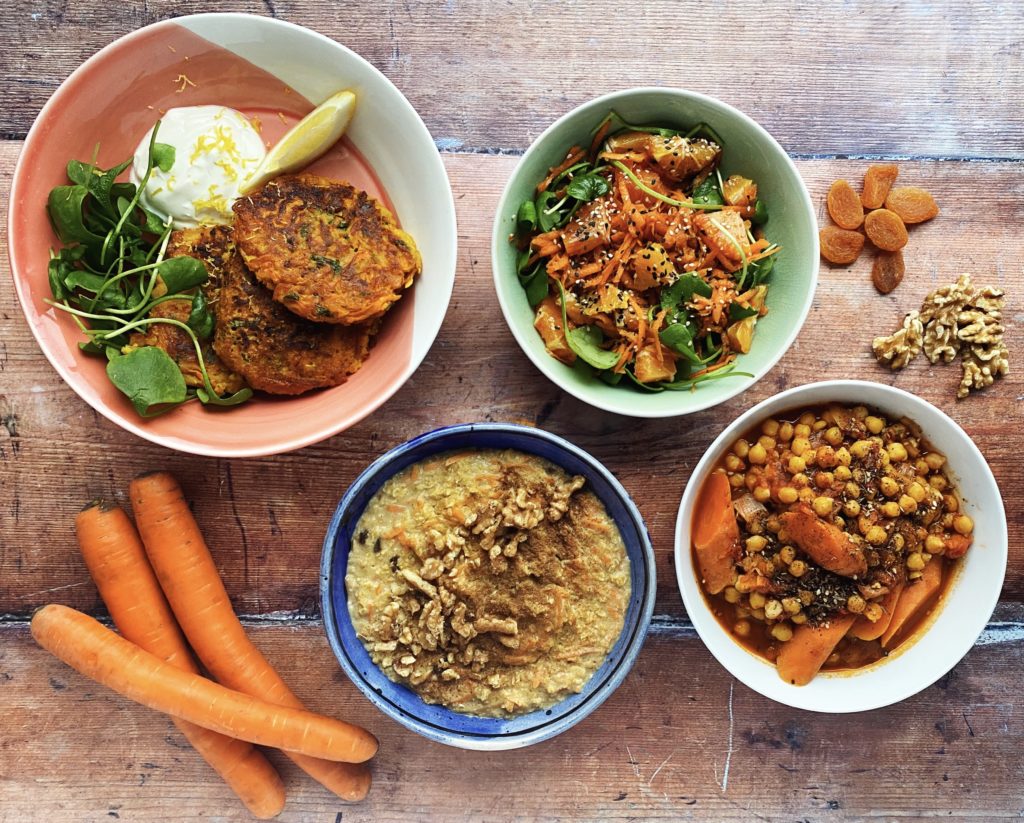
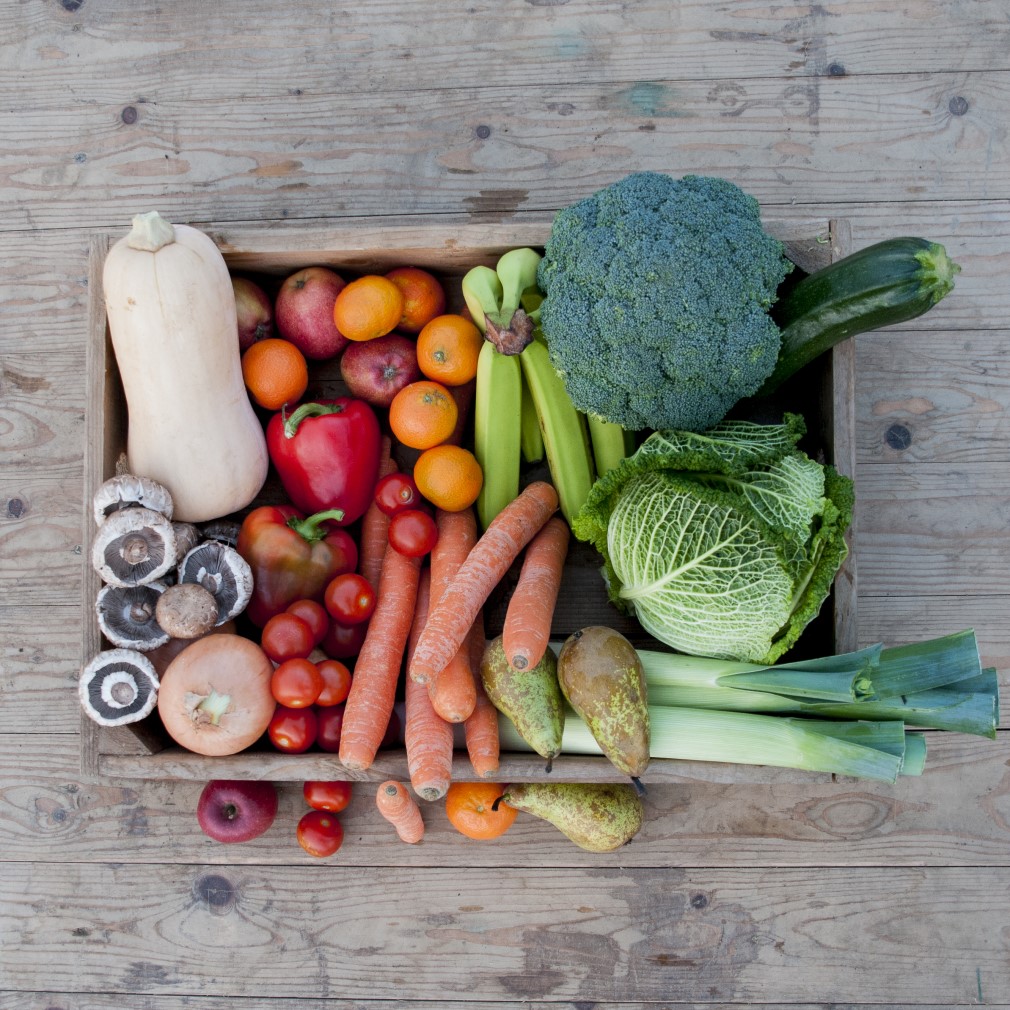
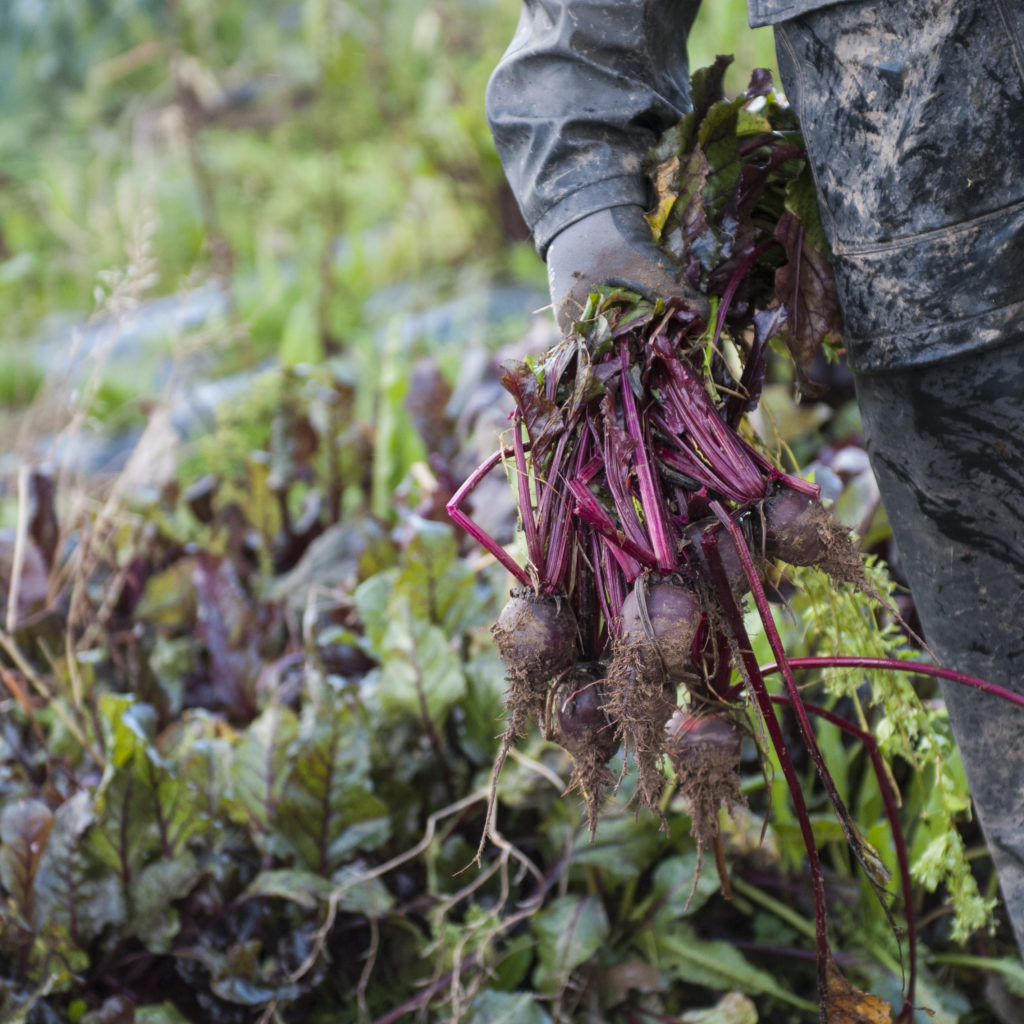
Carrots are such a staple you’d be forgiven if you’d never thought of them as the main event of a meal or barely even given carrots a second thought. But we love carrots over at Green Earth Organics and you’ll always find them in our subscription boxes. Covered in mud and fresh from the field here in Galway, I can honestly say these are the best carrots I’ve ever tasted. The scrubbed, plastic wrapped supermarket carrots just don’t compare. Muddy carrots seem to stay fresh longer and taste sweeter so if you get scrubbed ones, keep them in the fridge and use them in a week or so, the muddy ones are ok in a dark, cool kitchen cupboard or pantry for much longer.
I’ve had quite a few requests for carrot recipes as that’s what most people seem to end up with as their next box is arriving – so here are four ways I cook carrots regularly. You can also click on my raw carrot cake recipe which uses a whopping 600g of carrot, my smoked carrot strips which are fabulous for breakfast with wobbly scrambled tofu or on a toasted bagel with cream cheese or my butterbean barleyotto topped with roasted carrots and carrot top pesto if you’d like further carroty inspiration. Please do share your favourite carrot recipes with us too – in the comments or over on our friendly facebook group. Liz x
Watch this ‘4 Ways With Carrots’ video (you can skip to the recipe you are looking for) or the recipes are below.
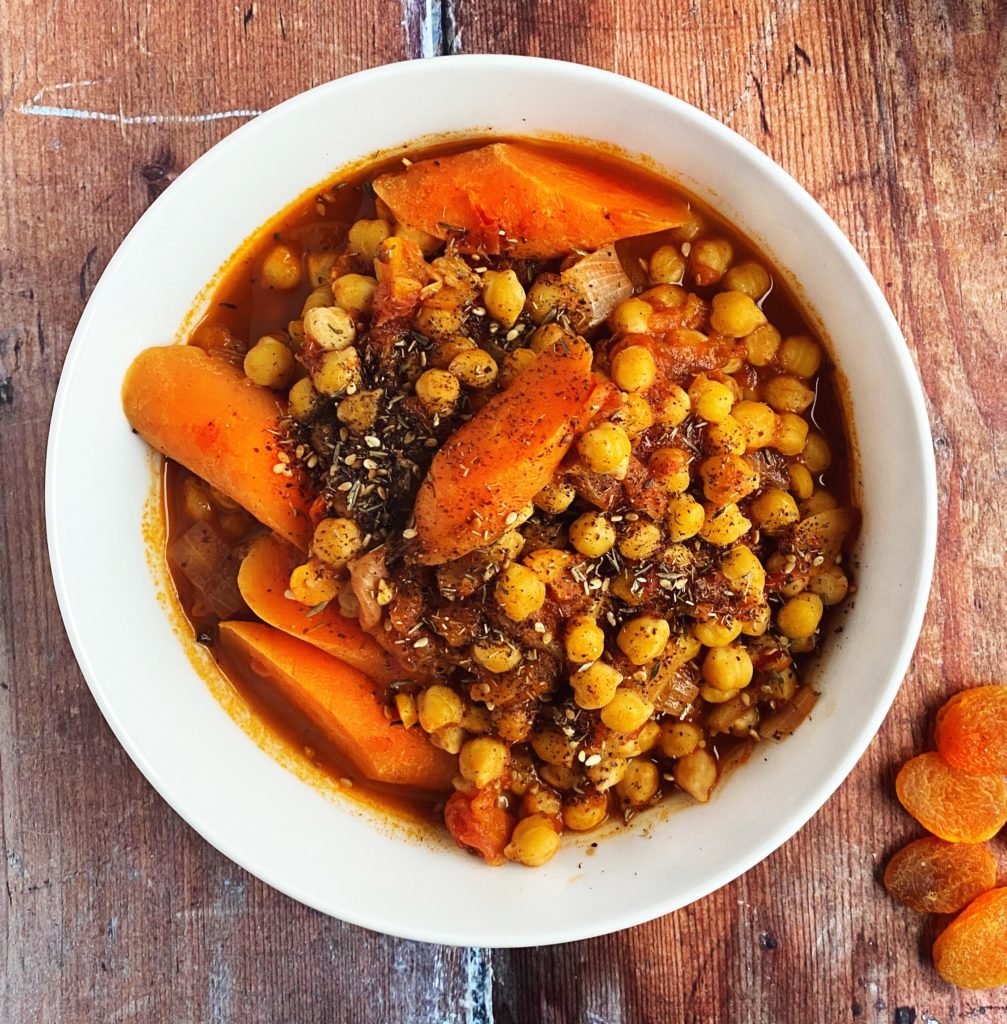
Carrot, Chickpea & Apricot Tagine
A warming Middle Eastern stew, simple to put together with punchy flavours from the chermoula paste.
Dice the onion and sauté it over a medium-high heat in a large pot. While it is cooking make the chermoula paste.
Crush the cumin and coriander seeds with a pestle and mortar until roughly broken up. Add the peeled cloves of garlic and crush some more. Then add the chilli flakes and smoked paprika and stir in 2 tbsp of olive oil. Finely dice the preserved lemon and stir it into the spices. Instead of using a pestle and mortar you could use a small blender and pulse the ingredients together into a rough paste.
Add the chermoula paste to the onions and stir for a few minutes to toast the cumin and coriander seeds. Once they are very fragrant, drain the tins of chickpeas and add them to the pot.
Chop the carrots into chunky slices and add them to the pot along with the two tins of chopped tomatoes and the tsp of ground cinnamon. Half fill the tomato tins with water and swirl out any remaining tomatoey juices into the pot.
Slice up the apricots and add them to the stew, season it really well with salt and pepper then put the lid on and simmer for an hour or so until the carrots are cooked through and the stew is rich and flavoursome.
Taste and adjust the seasoning as needed and serve with cous cous or rice or breads or even on it’s own. It’s fantastic with some freshly chopped parsley or coriander mixed through right before serving too. I’ve topped mine in the photo above with some homemade z’atar which is simply an even mix of toasted sesame seeds, dried thyme and ground sumac.
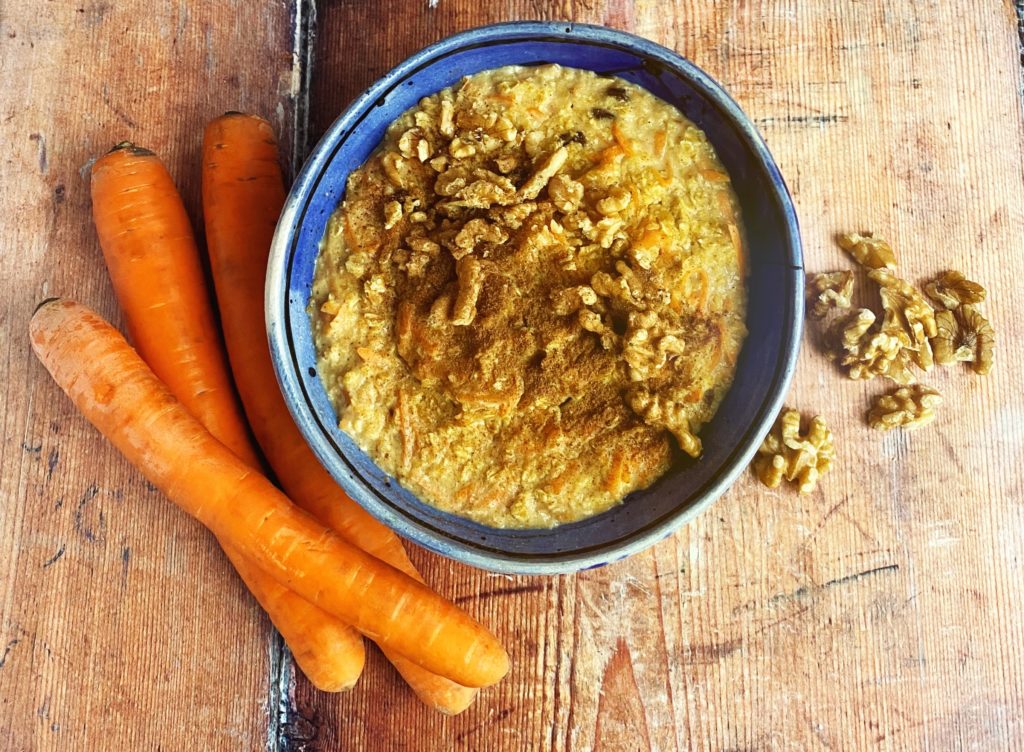
Carrot Cake Porridge
Sweet spices, grated carrot, creamy oats…delicious topped with walnuts on a cold morning.
walnuts and extra cinnamon/maple syrup to top the porridge
Method
Grate a carrot and put it in a small pot with the oat milk, oats, spices, raisins, oats and maple syrup.
Simmer and stir until hot and creamy, then serve topped with walnuts and a dusting of cinnamon. Add an extra drizzle of maple syrup if you like too!
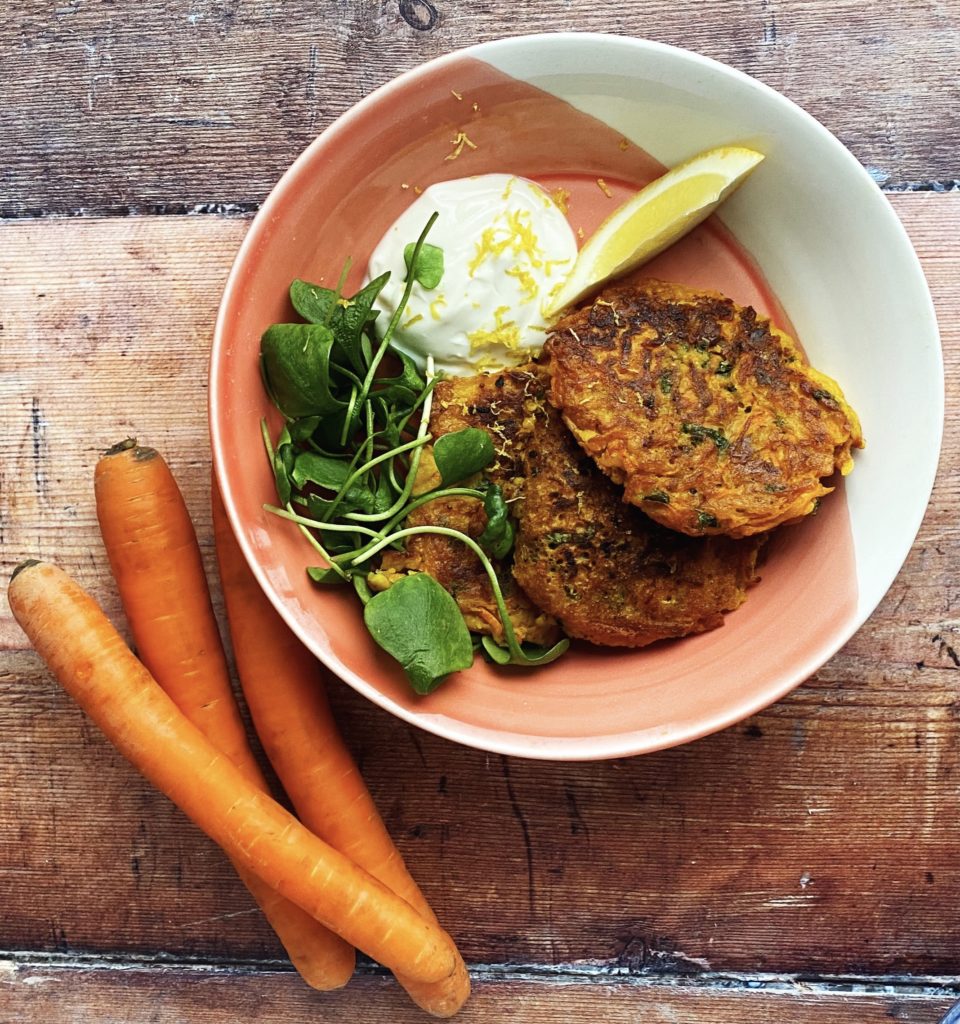
Carrot & Mint Fritters with Yogurt, Leaves & Lemon
Fritters are a fantastic light lunch with salad leaves and a simple dip. Or have them as a sandwich filler? Very versatile, use whatever herbs, spices and veg you fancy. This combination is especially delicious though. Tastes like Spring is around the corner!
Whisk the gram flour and water together into a smooth batter, then season it well with a big pinch of salt and pepper.
Stir in the grated carrot and chopped mint and then fry well spaced dollops of the mixture in a pre-heated to medium-high, well oiled frying pan. Fry on both sides for about 3-5 minutes per side or until golden brown and crispy and cooked through.
Serve hot with a couple of spoons of natural yogurt with a little lemon zested over it (lemon and mint work so well together), a few salad leaves and a wedge of fresh lemon to squeeze over the leaves and the fritters.
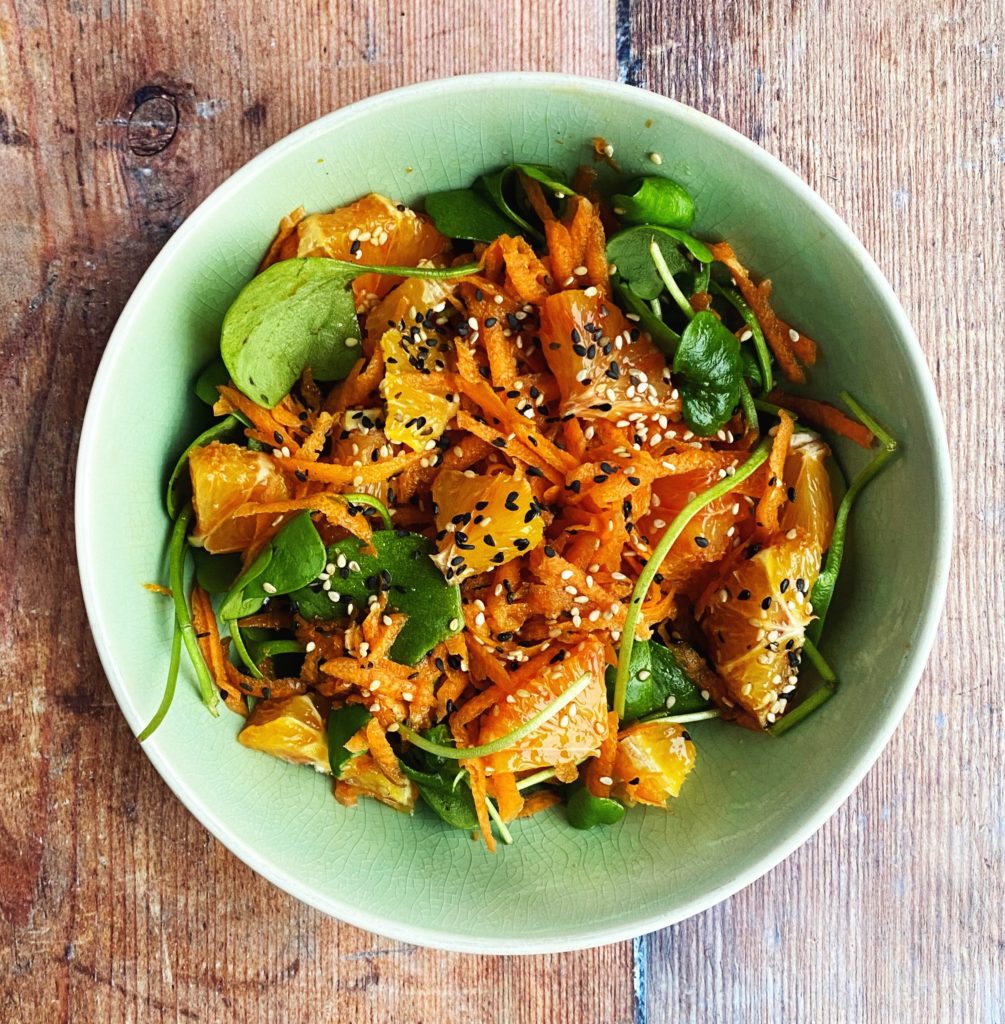
Carrot, Blood Orange & Sesame Salad
Toasty, salty, sweet, fresh and tangy – just the perfect combinations. This simple salad takes very little time to put together but has all the big time flavours!
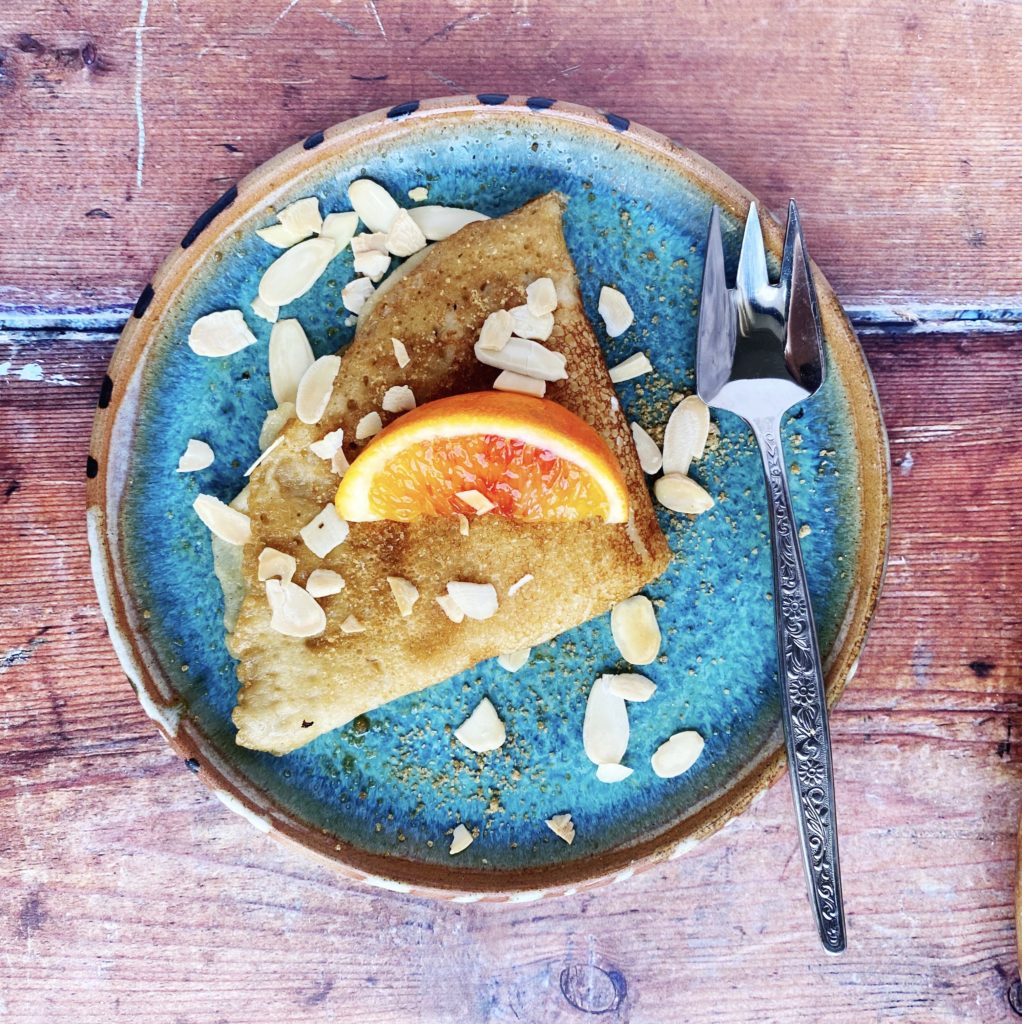
Pancake day just so happens to fall at the same time that blood oranges are in season so I couldn’t resist combining the two. Here I mixed up a batch of my simple flat pancake batter (recipe below) with the zest of a couple of blood oranges, then served them with a dollop of yogurt and a squeeze of blood orange. Folded it up and sprinkled with our organic whole cane sugar and toasted, flaked almonds. Utter heaven!
Blood oranges are a beautiful member of the citrus family, they are usually sweeter than regular oranges and the organic ones we source are pretty special. Early on in the season they just have an ombre blush of raspberry flavoured red like these, then as as the season goes on they get to a deeper, almost purple colour. Spectacular to slice open and such a special, seasonal treat. One blood orange contains 75% of your recommended daily vitamin C dose. Add them to your order here today, they won’t be in season for long.
Measure the flour, milk, salt, baking powder, olive oil and sugar into a bowl and whisk into a smooth batter. I don’t bother getting out the scales as this recipe is very forgiving, just use a mug to measure out the flour and milk.
Zest the two blood oranges into the batter and stir to combine. Allow the batter to rest for at least 20 minutes. You can even make the batter the night before and keep it covered in the fridge.
Heat up a non-stick frying pan or better yet, a pancake pan, to a medium-high heat.
Toast a handful or two of flaked almonds in the dry pan and then put them aside into a small bowl.
Melt a tbsp of butter or vegetable oil in the pan and swirl to coat the base of the pan.
Add a ladle of pancake batter and swirl to create a thin, flat pancake. Let it cook for a minute or so on the first side before carefully flipping and cooking the other side for a further minute. You know it’s ready to flip when it is golden brown underneath and comes away from the pan easily.
Serve warm with a dollop of yogurt and a squeeze of blood orange in the middle of the pancake. Fold it up into quarters, sprinkle over some sugar and flaked almonds and serve with a wedge or two of blood orange.
Butternut squashes are the most common squash that we deliver on repeat at Green Earth Organics and it’s no wonder. Organic vegetables just taste better! If you’ve ever been disappointed by a bland, watery supermarket squash, we urge you to try one of ours. These vibrant veggies are sweet and nutty and their fabulous flavour is more than matched by their incredible nutritional profile. Butternut squash is a great source of fibre, vitamins and minerals including A, B, C, E, calcium, magnesium and zinc.
Here are just 4 ways I cook a butternut squash regularly. Let us know your favourite butternut recipes in the comments or over on our friendly facebook group. We love to see what you’ve been making with our vegetables.
Head to our shop here to sign up for a veg box subscription or order from our wide selection of organic fruit, veg and groceries.
Liz x
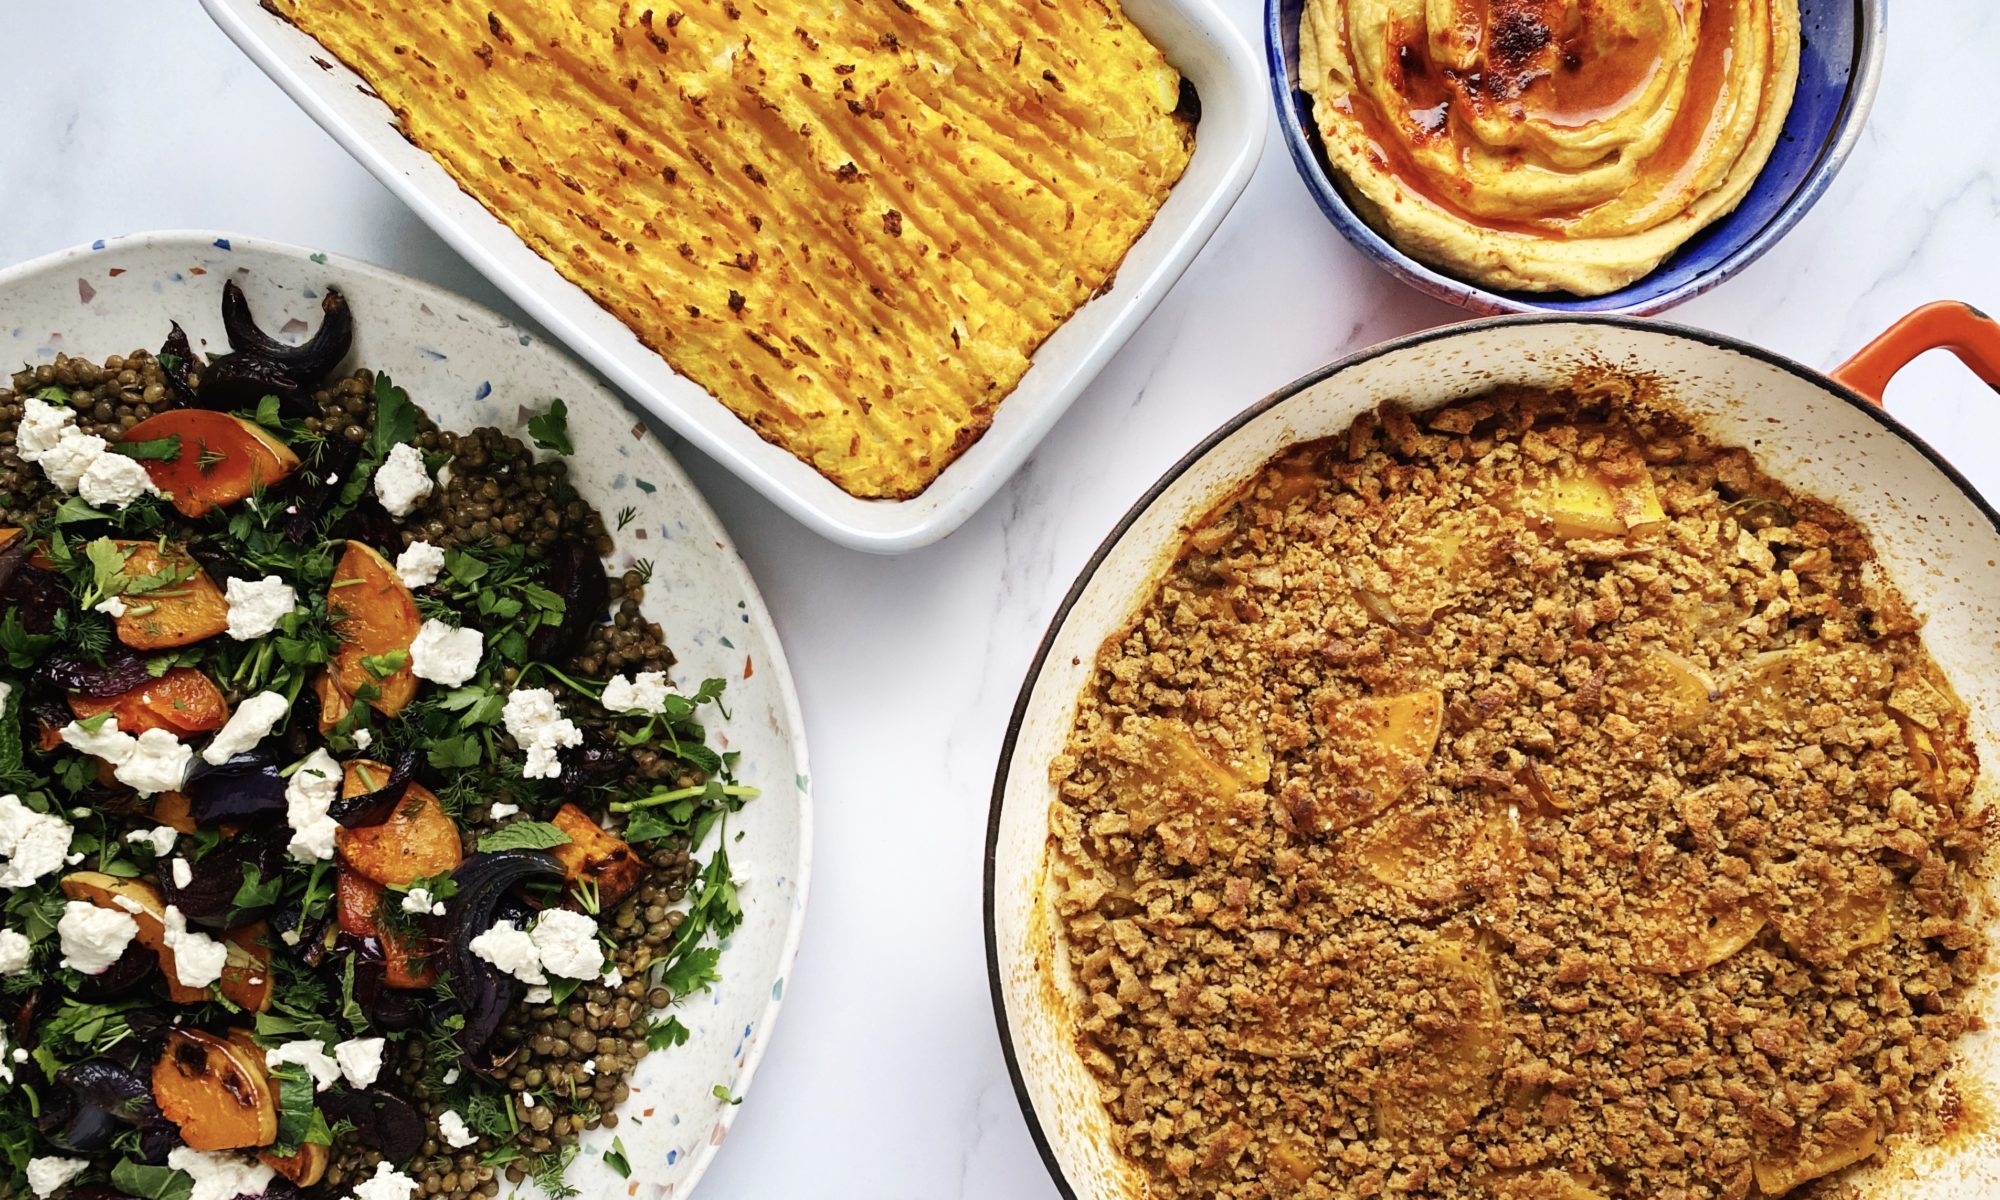
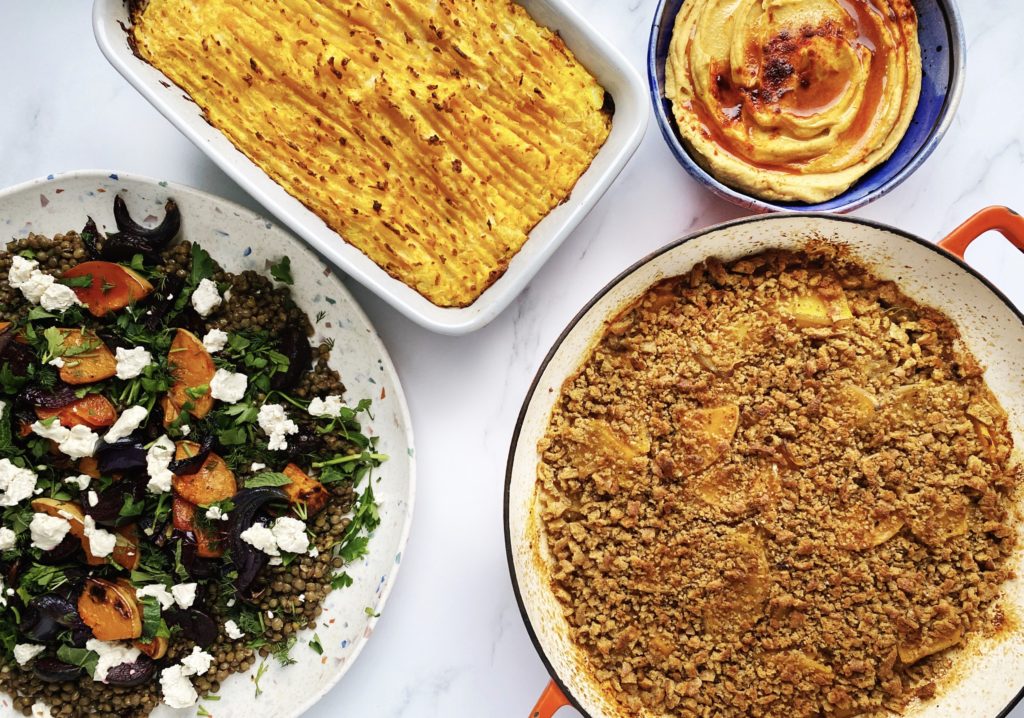
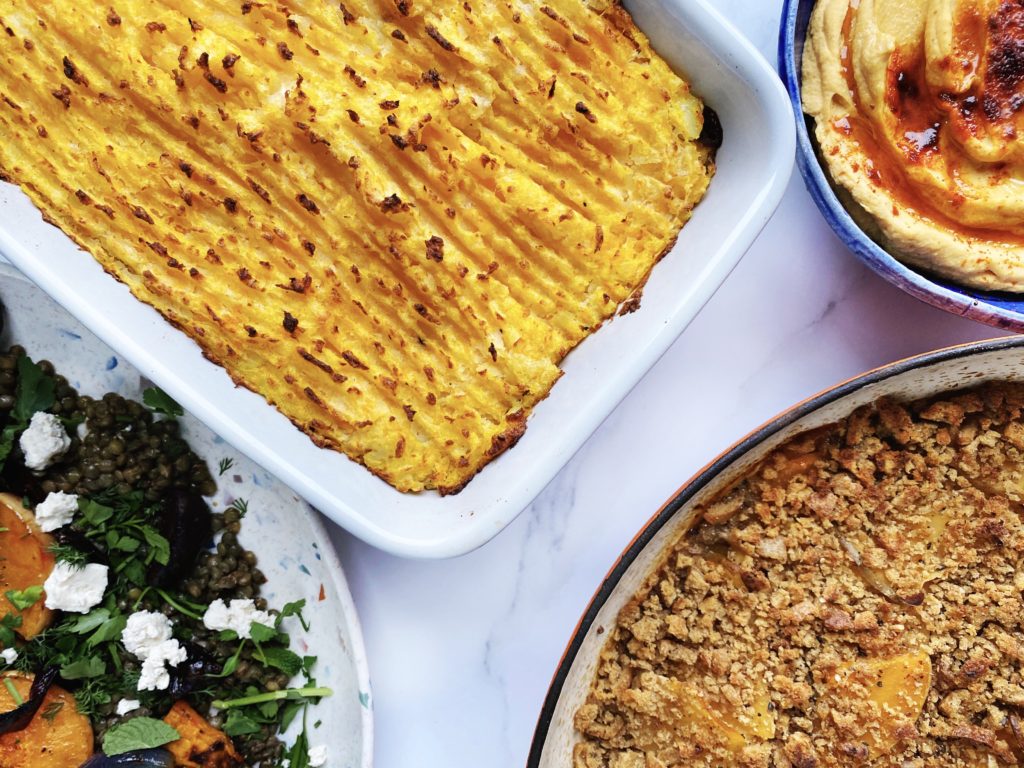
Lentil Pie with Squash Mash
Ingredients (serves 4)
1 onion, diced
3 cloves of garlic, crushed
10 diced mushrooms or two grated carrots or beetroots (use any base veg that is in season or a combination of veg that you like, diced or grated)
2 sticks of celery, diced
2 tbsp olive oil
1 vegetable stock cube or a big pinch of dried, crumbled mushrooms
1 mug of green/brown lentils (or two tins of cooked lentils, drained)
1/4 to 1/2 a butternut squash (or about 400g if you want to weigh it), peeled
a similar amount of potato as the squash, around 400g
salt, pepper and olive oil or butter for the mash – to taste
Method
Sauté the onion, garlic in a little olive oil over a medium-high heat until starting to soften and take on some colour.
Add the diced mushrooms/carrot/beetroot and celery and a big pinch of salt and sauté for a bout 5-10 minutes until they have cooked down a little.
If you are using raw lentils, add them now and the stock cub or dried, crumbled mushrooms and herbs if using. Cover with water and simmer and stir until the lentils are cooked through. Keep tasting and adding more liquid if needed.
If you are using pre-cooked lentils from a tin, add the stock/dried mushrooms/herbs and a mug of water and simmer the vegetables in that for 5 minutes first, then add the drained lentils to the pot and a touch more water if needed to make a nice (not too dry, not too wet) base for your pie.
Taste and adjust the seasoning if needed with salt and pepper. Pour the lentil pie mixture into a baking dish and preheat your oven to 200C.
Meanwhile peel, chop and boil the potato and squash together until soft. Drain and mash with salt, pepper and a little oil or butter. Taste for seasoning.
Top the lentil base with your sunny, butternut mash. Rough it up a little with a fork and drizzle with olive oil.
Bake for 20-30 minutes or until hot, bubbling and crisp and golden on top. Enjoy with seasonal greens.
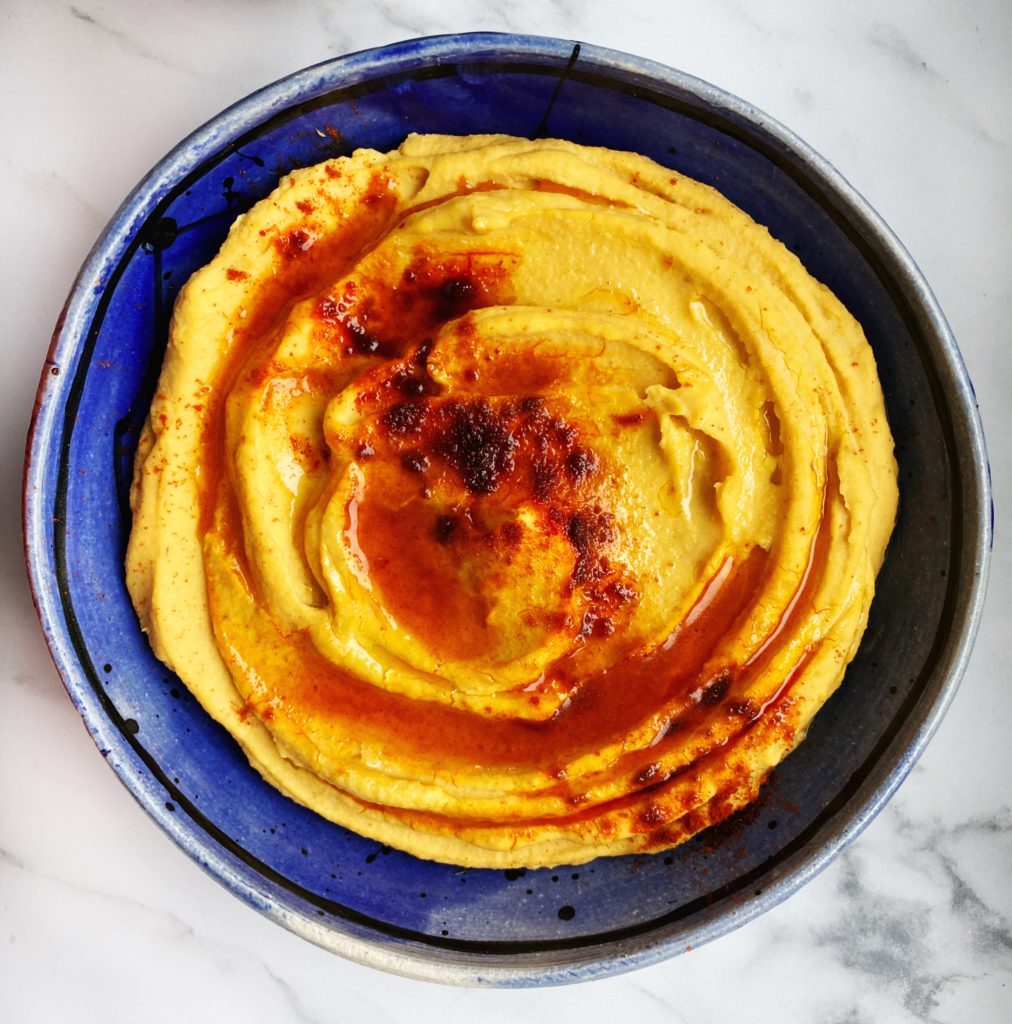
Butternut Squash Hummus
Ingredients (makes about 600g of hummus)
1 tin of chickpeas, drained over a jug to reserve the aquafaba
1 heaped tbsp tahini
1 clove of garlic, crushed
1/4 of a preserved lemon or the juice of 1 lemon
salt to taste
1/4 of a butternut squash (about 400g or so)
1 tsp cumin seeds
1 tsp smoked paprika and olive oil to drizzle
Method
Roast the butternut squash with a drizzle of olive oil, a tsp of cumin seeds and a pinch of salt until soft. This could take 20-3- minutes at 200C depending on the exact size of your squash, just keep an eye on it.
Place the drained chickpeas, preserved lemon, crushed garlic, tahini and cooked butternut into a food processor. If you are using lemon juice, start with the juice of half the lemon and see how you go.
Add a splash of aquafaba and a pinch of salt and blend into a smooth paste.
Taste and adjust the seasoning as you like with more lemon, salt, tahini, garlic as you prefer. If you like a lighter, fluffier hummus, add an extra splash of the aquafaba or some cold water and blend again.
Serve drizzled with extra virgin olive oil and a sprinkle of smoked paprika.
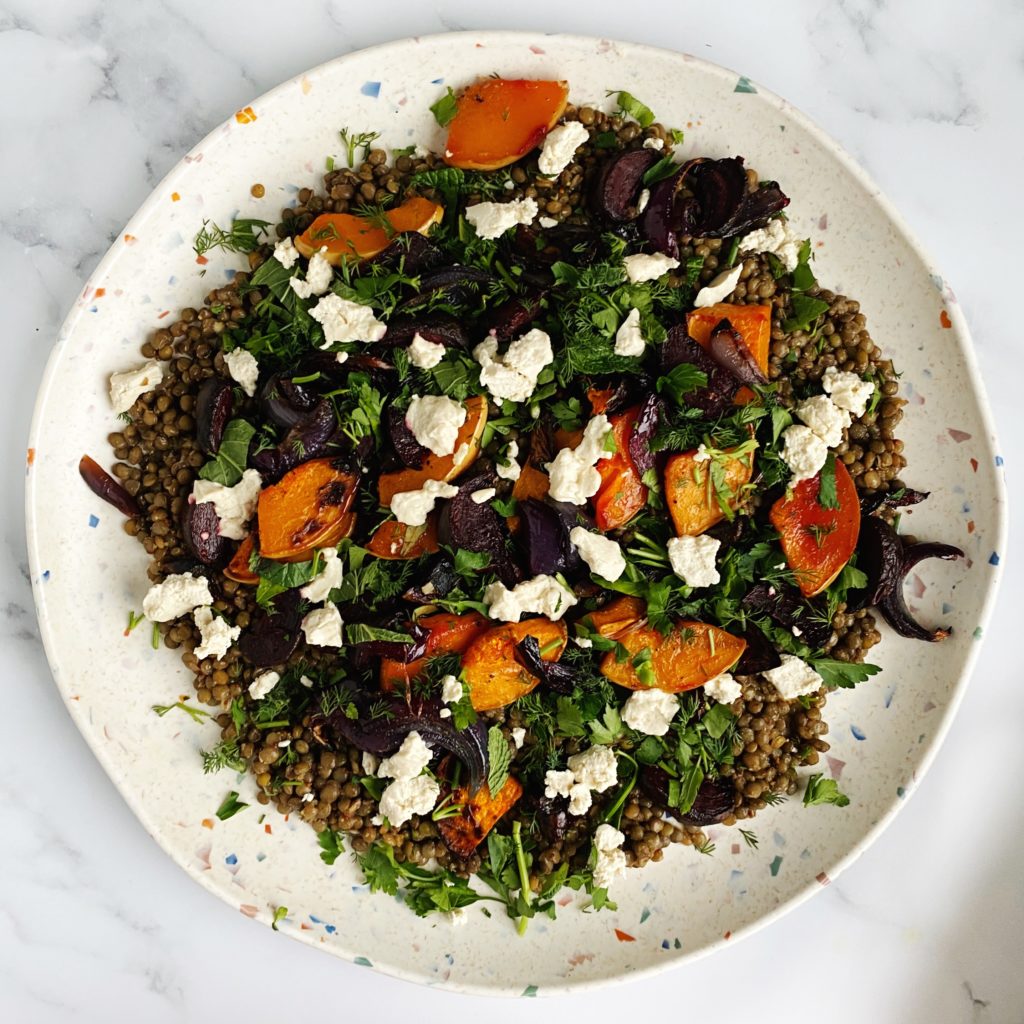
Butternut, Beetroot & Tofeta, Lentil Salad
Ingredients (serves 4-6)
1/4 of a butternut squash
2 beetroots
1 red onion
olive oil, salt and pepper to taste to season the above
1 mug of lentils boiled in 2-3 mugs of vegetable stock or water (or 2 drained cans of pre-cooked lentils)
dressing – 1 crushed clove of garlic, 1 tbsp wholegrain mustard, 1 tsp maple syrup, 2 tbsp apple cider vinegar, 3 tbsp extra virgin olive oil, pinch of salt
3 handfuls of chopped fresh herbs (dill, parsley and mint?)
This dish is really special with the addition of my tofeta. You can find the easy recipe illustration in this bog post here or in my book which is available to add to your order here. Otherwise use whichever cheese you prefer or replace the feta with toasted nuts or seeds.
Pre-heat the oven to 200C and find a large baking dish.
Boil green lentils in stock or water until cooked through. Drain off any excess liquid and leave to cool while your prepare the vegetables, herbs and dressing.
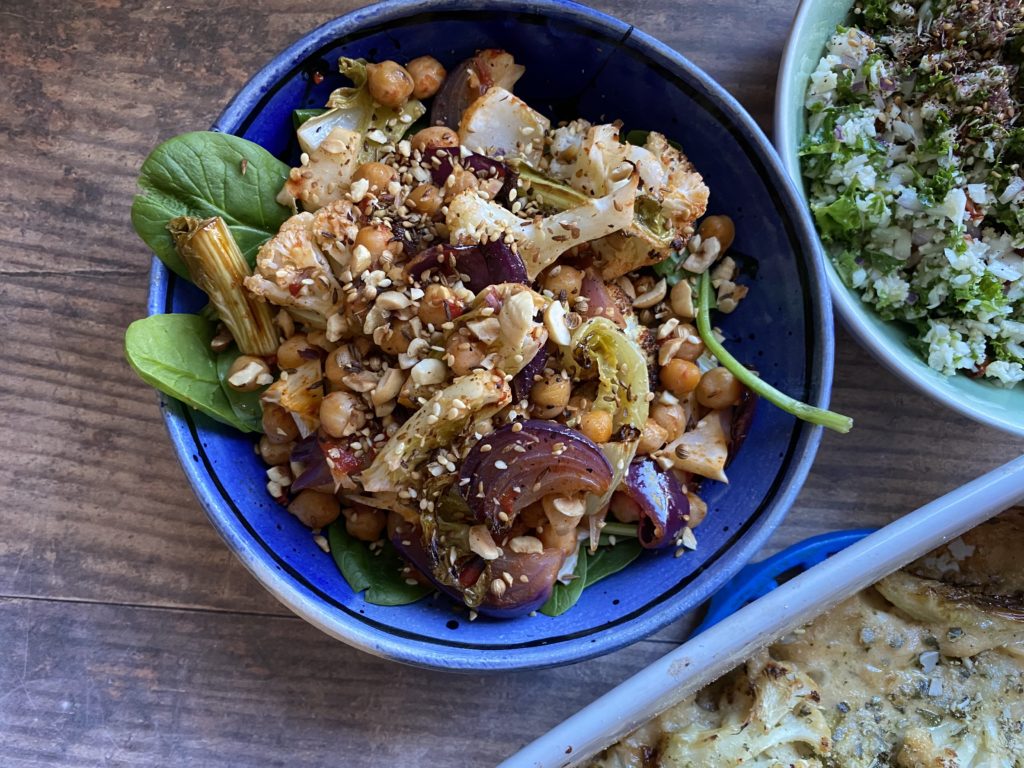
Chop the squash, beetroots and red onion into slim wedges, season them with salt, pepper and olive oil, then roast them until they are soft and slightly charred.
Mix up the dressing ingredients and stir it through the cooked lentils.
Chop the fresh herbs then arrange the salad into a large salad bowl or platter.
Put the dressed lentils on the base, spoon over the roasted vegetables, scatter over the fresh herbs and crumble the tortes on top.
Enjoy warm or cold. This keeps well in the fridge for no more than three days. Keep the tofeta seperately and it will last longer.
Butternut & Swede Gratin
Ingredients (serves 4)
1/2 a butternut squash
1 small swede or half a large one
2 crush cloves of garlic
a small handful of wintery herbs like thyme/rosemary/sage
salt and pepper
olive oil
oat milk
4 or 5 handfuls of breadcrumbs (add chopped herbs and nutritional yeast to your breadcrumbs to make them more flavoursome – or replace the bread crumbs with crushed nuts/seeds)
Method
Pre-heat the oven to 200C.
Thinly slice the butternut and swede and mix them together in a large, lidded baking dish with the crushed garlic, a generous drizzle of olive oil and salt and pepper to your taste.
Pour in enough oat milk (or use cream for a richer gratin) to cover about a cm of the base.
Put the lid on the dish and bake until the vegetables are soft all the way through. This should take about 30-40 minutes.
Remove the lid and add a little more oat milk. Scatter over a thin layer of breadcrumbs, drizzle with olive oil and return to the oven for a further 10-15 minutes, lid off, to brown on top.
Serve with seasonal greens or as a side to a roast.
“Cooking from scratch is the single most important thing we can do…to improve our health and general wellbeing.” – “Eat food, not too much, mostly plants.”
Michael Pollan
At Green Earth Organics, we are on a mission to help you Eat More Veg and Cook From Scratch. These two phrases are the cornerstones of good health, not just for us but for our planet too! Cutting down on processed food, ready meals and animal products and preparing and eating lots more whole, organic, fruit, veg, beans, nuts and grains is not only great for our health, it means less packaging, less harmful emissions from factories and animal farms and a lot less unhealthy, unnecessary ingredients.
With our modern, busy lifestyles, it can seem like too much effort to shop for groceries, fruit and veg and get into the kitchen and cook from scratch after a long day at work. It is easy to just take something out of the freezer and microwave it or pop it in the oven. But you owe it to yourselves to cook from scratch. You are worthy of home cooked, healthy food and it will positively impact the rest of your life. It doesn’t have to be complicated to be delicious and satisfying.
So as well as making it easy for you to get the good stuff straight to your door with our weekly veg box subscriptions, we are starting a new weekly series called ‘4 Ways With…’ This series will showcase a seasonal vegetable or other ingredient and demonstrate four simple ways to prepare or cook it. We want to inspire you and give you the confidence to get into the kitchen and whip up a simple but satisfying meal. Follow us on Instagram or subscribe to our YouTube channel to watch the videos each week. Please feel free to comment and share your favourite seasonal recipes with us and the rest of our community. We love to see what you make from our weekly boxes. Liz x
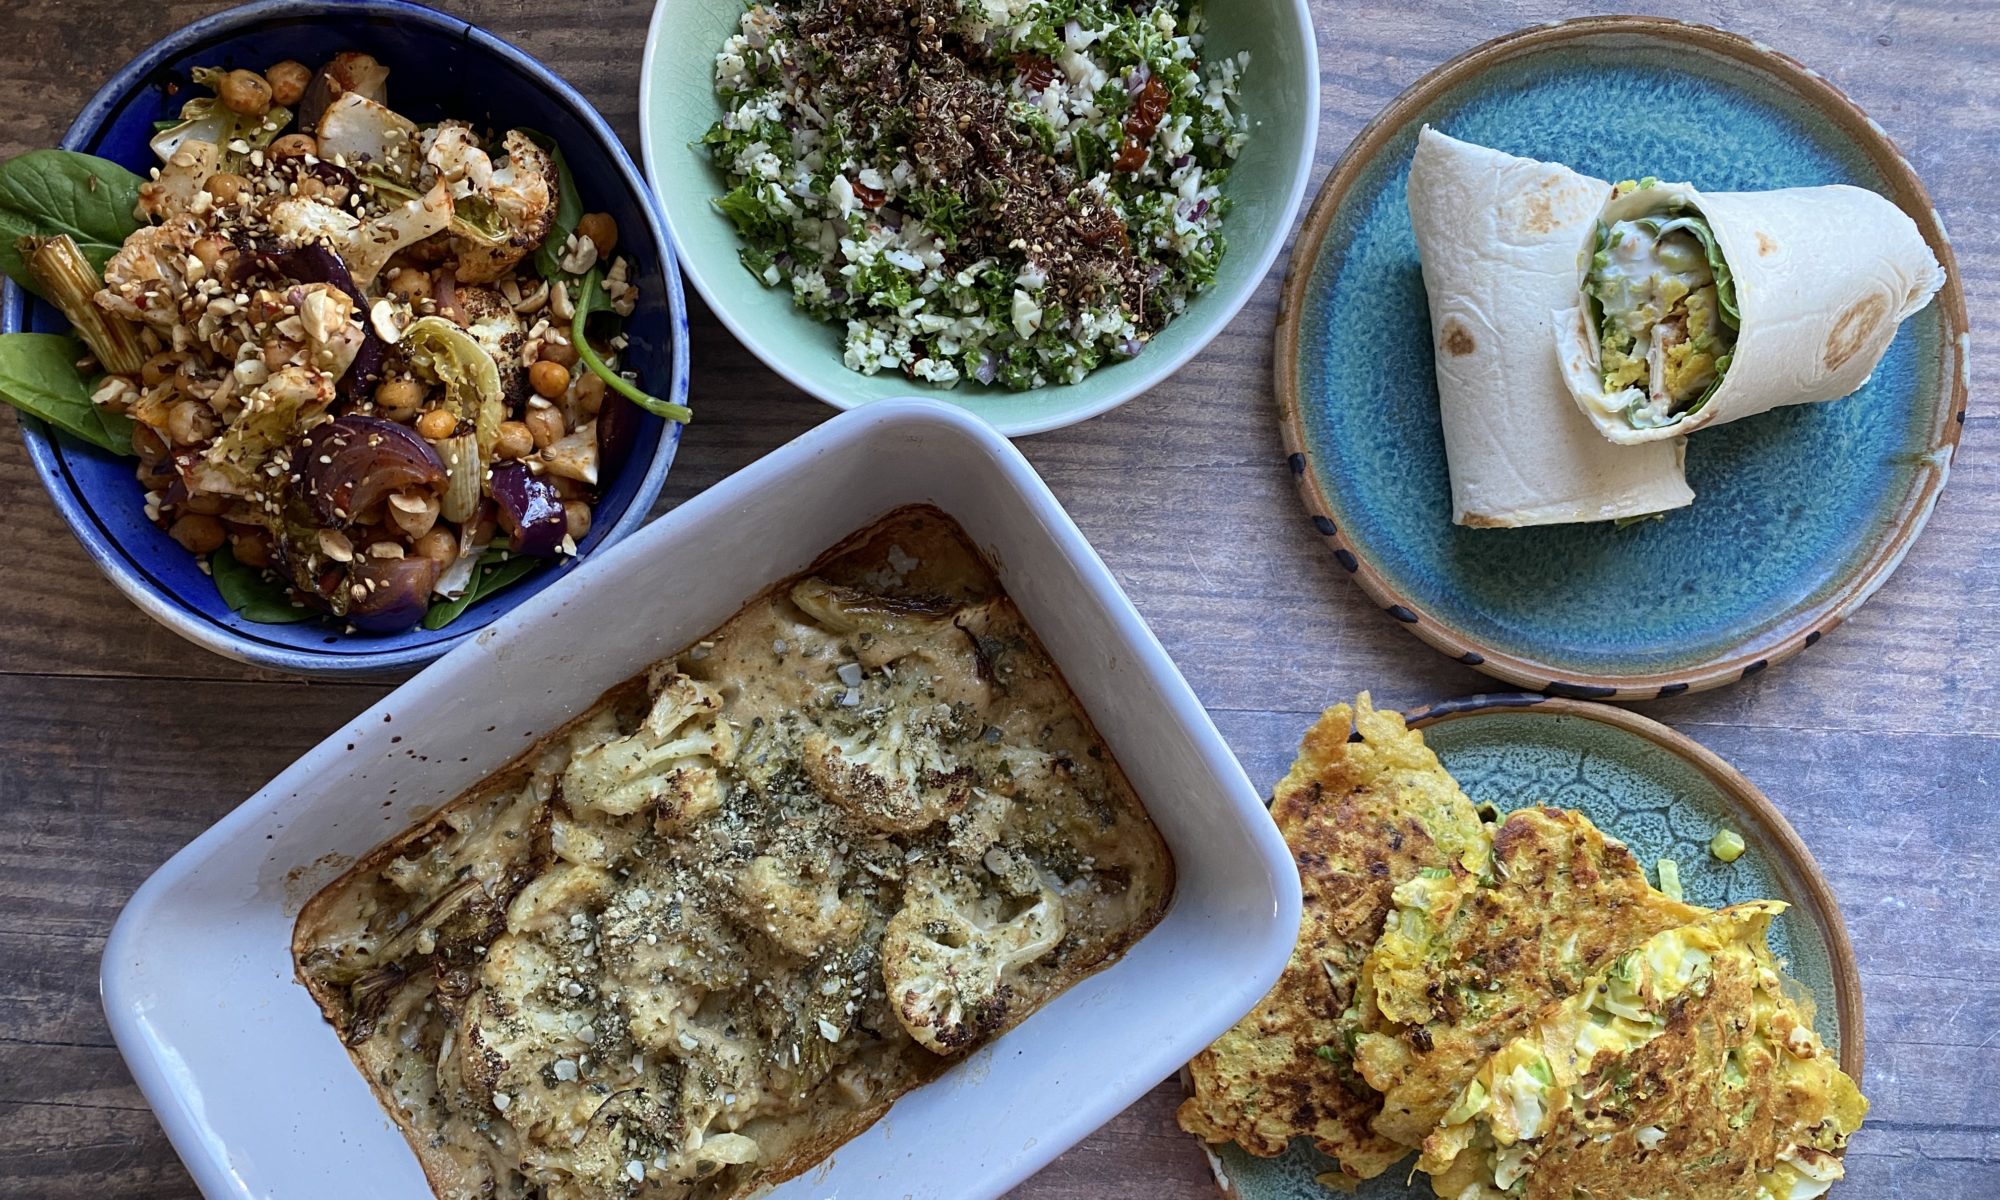
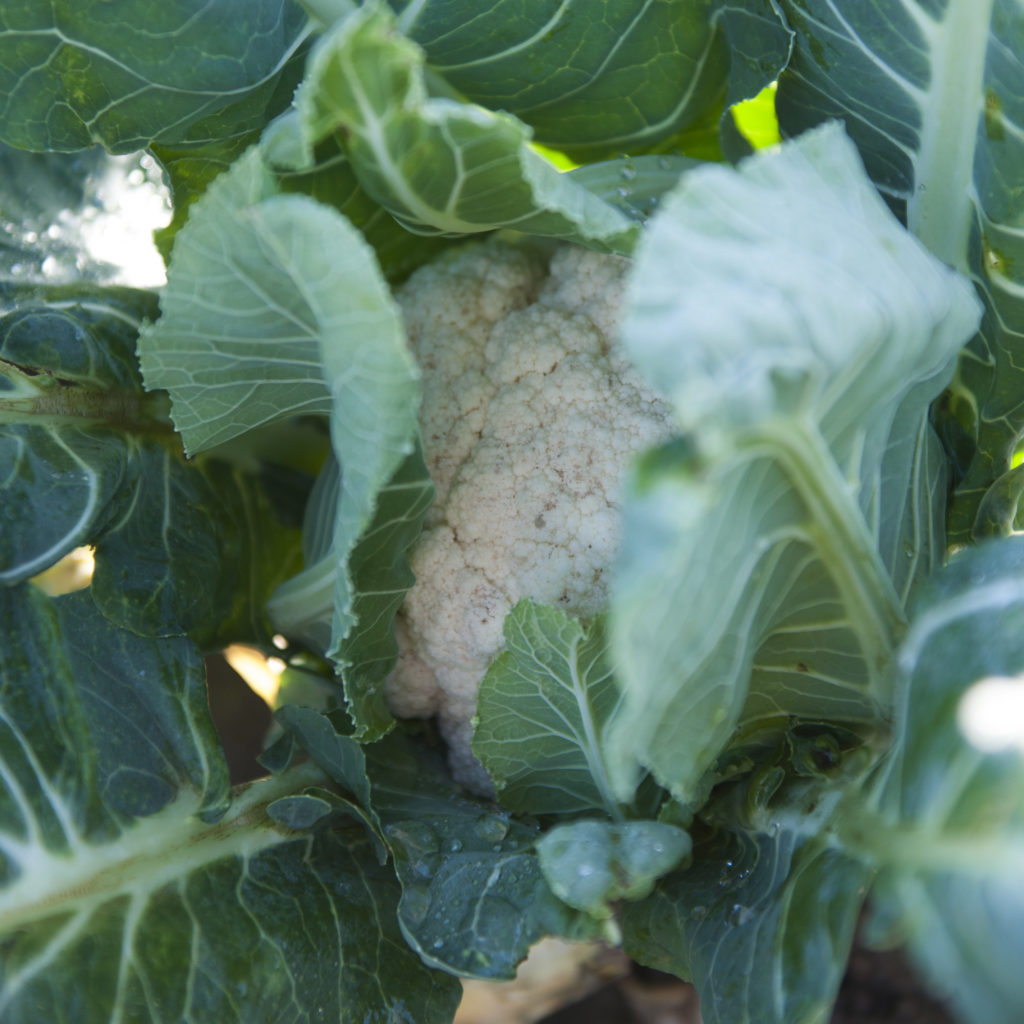
4 Ways With Cauliflower
First up is the humble, but every versatile, cauliflower. Cauliflower has had one of the biggest ‘glow ups’ of all vegetables over the last 10 years. Once simply boiled and relegated to the side of the plate, cauliflower is now the captain of the vegetable patch! Roast it covered in Middle Eastern spices, blitz it into a rice or cous cous alternative, turn it into steaks, batter and deep fry it and transform it into a fried chicken substitute, even use it as a gluten free pizza base! If you’ve got a need for a vegetable to pretend to be something it’s not, cauliflower is your man. And it is delicious. Cauliflower is a bit of a blank canvas and is very good as a vehicle for delicious herbs and spices. It is absolutely fantastic in a curry or to top my baked biryani. Here are just 4 of the many ways I use cauliflower regularly. Vegan Cauliflower Cheese, Winter Tabbouleh, Spicy Roast Cauliflower and Chickpea Salad and Curried Cauliflower Fritters. What is your favourite cauliflower recipe? Let us know below or over on our healthy eating facebook group. Liz x
The recipes shown in the video above are just quick ideas and inspiration for dishes you can create with a cauliflower from your veg box. Below are the same recipes with amounts adjusted for a whole cauliflower in each recipe.
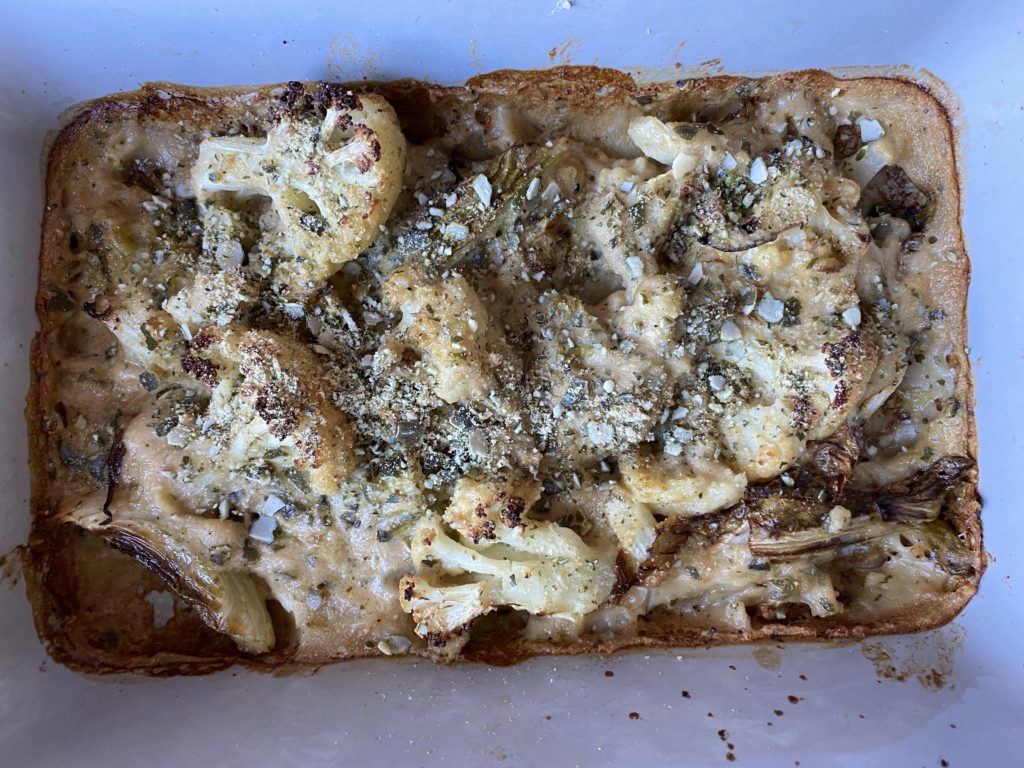
Vegan Cauliflower Cheese (serves 4-6 as a side for a roast)
150g plain flour (gluten free plain flour works too)
Preheat your oven to 200C. Find a large baking dish which will accommodate a whole cauliflower.
Rinse and quarter the cauliflower and break it into florets. Put them in the roasting dish. Add the sliced leaves and cores too.
Drizzle over the olive oil and season the cauliflower with salt and pepper. Mix well to spread the seasoning evenly. Then pop the dish in the oven to roast the cauliflower for 20 minutes.
While the cauliflower is roasting, prepare your vegan béchamel.
Simply whisk together the flour, nutritional yeast, nutmeg, mustard and oat milk. Add a big pinch of salt and some freshly ground black pepper.
Give it another which and pour the uncooked béchamel over the now roasted cauliflower. Return the dish to the oven to cook for a further 15 minutes or until golden and bubbling.
OPTIONAL EXTRAS: you could add a crunchy topping to your cauliflower cheese before you return it to the oven. I like to roughly blend extra proportions of pumpkin seeds and nutritional yeast. You could also use breadcrumbs.
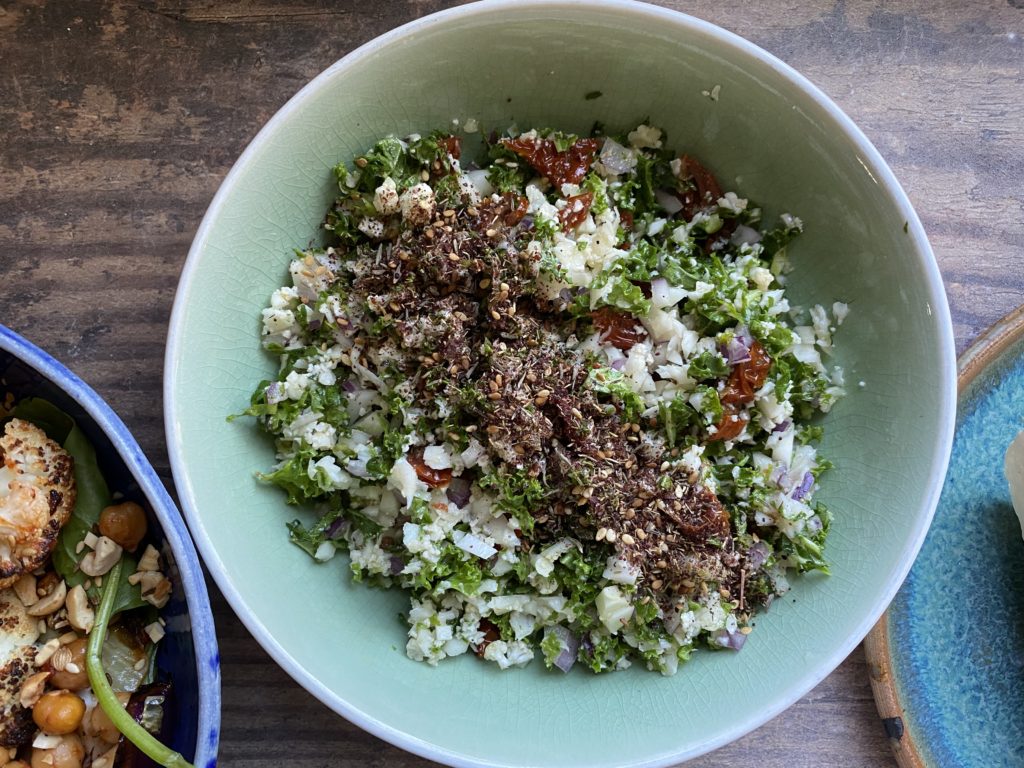
Winter Tabbouleh (serves 6)
1 cauliflower
8 large kale leaves (or use lots of fresh parsley or a mix of the two)
option extras like chopped walnuts, z’atar or dukka
Grate a rinsed cauliflower into a large bowl. You should end up with a rice/bulgar wheat like grain substitute.
Rinse the kale, remove the tough stems and very finely chop the leaves. Add to the bowl of cauliflower.
Finely dice the red onion (or slice the spring onion) and add it to the bowl.
Slice the sun-dried tomatoes and add to the bowl then make the simple dressing.
Mix the juice of the mon with a small crushed clove of garlic, and 4 or so tbsp of oil from the jar of sun-dried tomatoes. Season with salt and pepper and mix the dressing through the tabbouleh.
Serve as part of a salad bowl with some hummus, roasted vegetables and bread or with a tagine-type stew. It’s very good with something crunchy and nutty/seedy on top too. Simply toasted, chopped walnuts or make a dukka (a mix of toasted nuts, sesame seeds, cumin and coriander seeds) or z’atar (a mix of toasted sesame seeds, dried thyme and ground sumac).
about 6 tbsp of ready made chilli sauce like harissa or sriracha or a mix of your own favourite spices (eg 1 tsp chilli flakes, 1 tbsp cumin seeds, 1 tbsp ground coriander, 1 tbsp smoked paprika and 2 tbsp maple syrup)
Pre-heat the oven to 200C and prepare a large roasting dish.
Rinse and chop the cauliflower (leaves, core and all), peel and slice the onions into thick wedges and drain and rinse the chickpeas.
Put them all into the roasting dish and drizzle over the olive oil. Season well with salt and pepper and add the chilli sauce or your own mix of spices.
Mix well and roast in the oven until the cauliflower is lightly charred and cooked through – around half an hour or so.
Serve warm with salad leaves and a cooling hummus or yoghurt and tahini dip or allow it to cool and keep in the fridge for 4 days for quick salad lunches.
1 tsp each of cumin seeds, brown mustard seeds, chilli flakes, turmeric, salt…some freshly ground black pepper and about 15 fresh curry leaves if you have them
vegetable oil for frying
Start with the gram flour batter. Mix the gram flour and spices with a mug of water.
Chop the cauliflower (leaves, core and florets) into small, pea sized pieces and mix it into the gram flour batter. There should be enough gram flour batter to coat all the pieces. If your cauliflower is very large and the mixture seems dry just make a bit more of the batter.
Heat a frying pan to a medium heat with a generous slick of vegetable oil. Fry spoonfuls of the batter in batches and flip them over once golden brown underneath. Ensure the heat is not too high as if it is the fritters will burn on the outside and be raw in the middle. A medium heat allows the fritters to cook slowly all the way through.
Serve warm as a side to a curry or salad or as a sandwich or wrap filling. I like mine in a wrap with some spinach or lettuce leaves, yoghurt and mango chutney.
Leftover mixture will keep well in the fridge in an airtight box for three days.
A page from the Sweet chapter of my book, available to add to your veg order here.
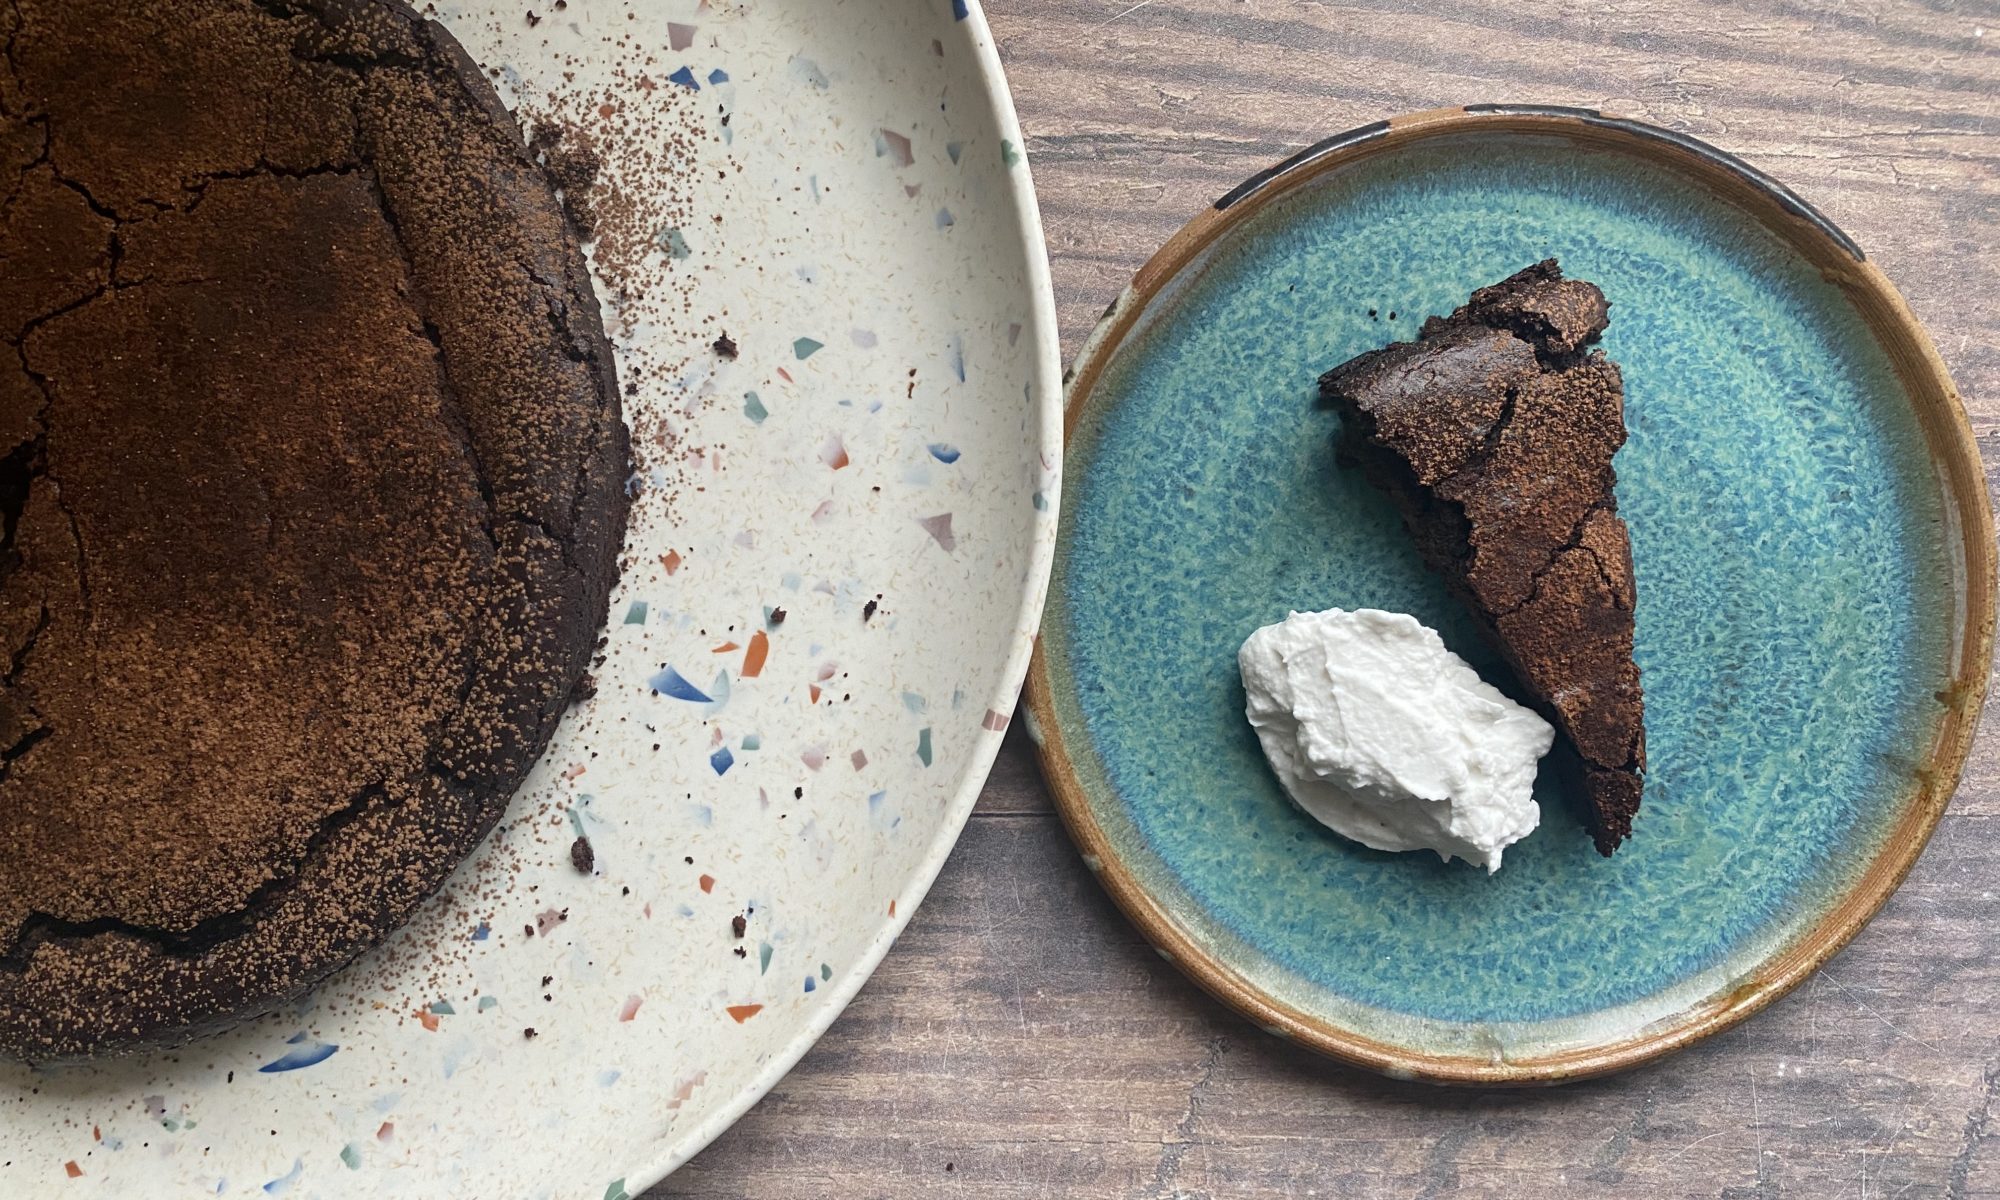
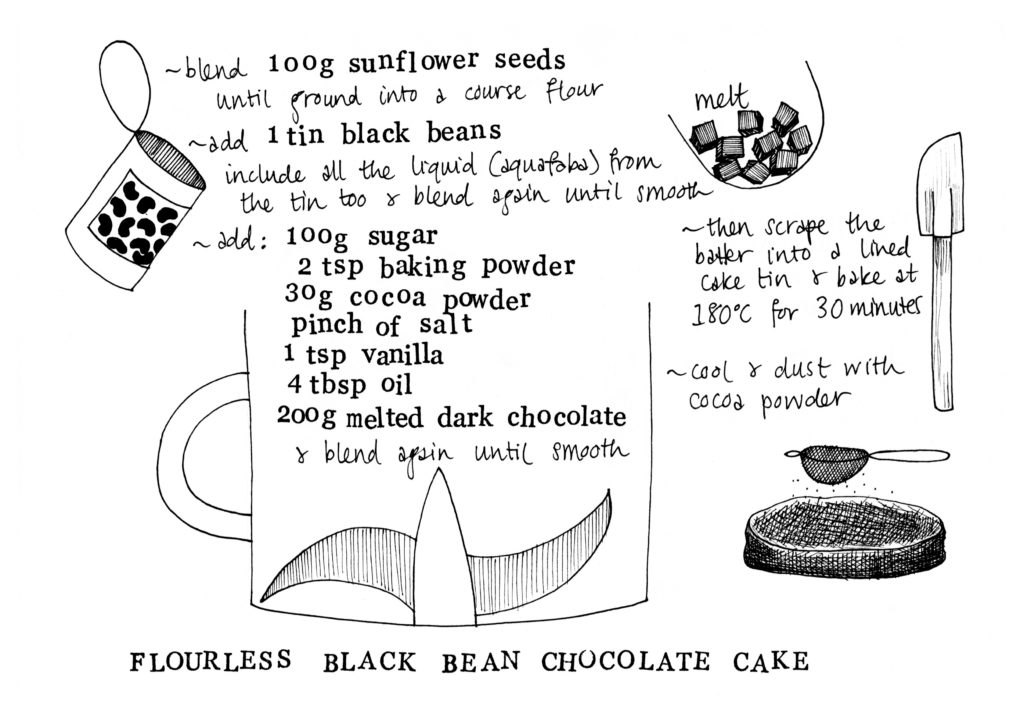
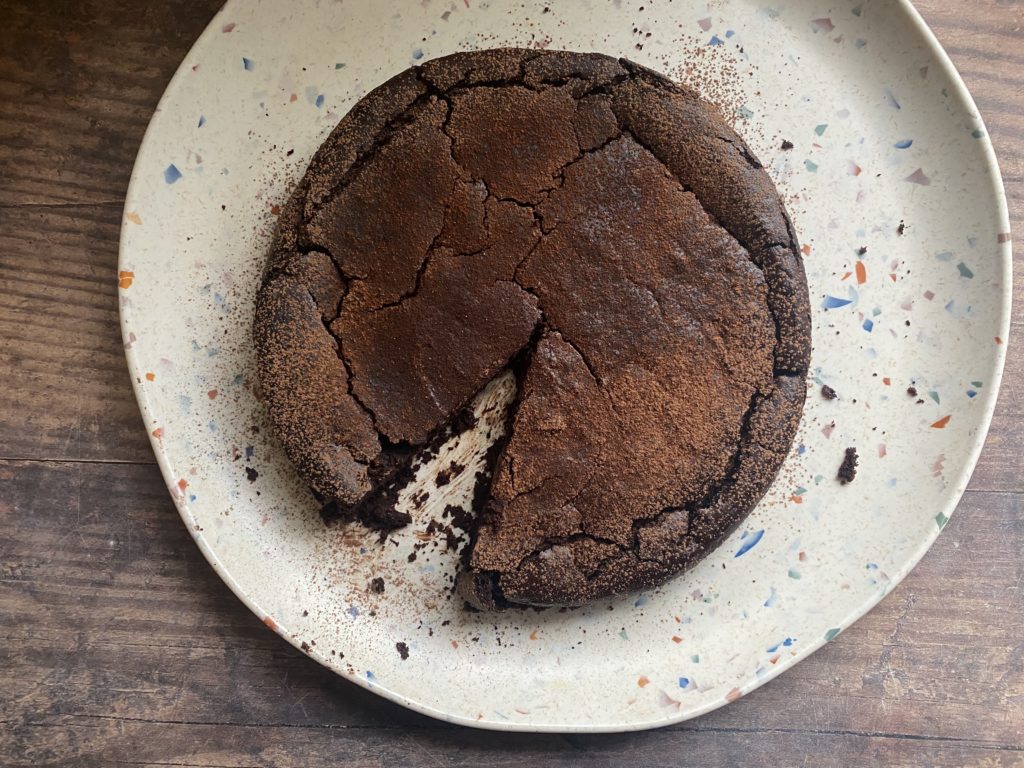
Flourless chocolate cakes are not just great for the coeliacs in your life, they are simply lovely cakes – somewhere between a brownie and a chocolate truffle – and incredibly delicious! The lack of flour means they are naturally rich and fudgy. The bitterness of the dark chocolate makes what would otherwise be quite a sweet and heavy cake, something quite sophisticated and moreish. Perfect served with some whipped coconut cream and a mug of coffee! I wrote this recipe with nut and gluten allergy sufferers in mind, but you can substitute the sunflower seeds with ground almonds if you wish. The recipe illustration above is from my book which is available to add to your veg box order on our website. The recipe video can be found on our Instagram @greenearthorganics1 or at the end of this blog on our YouTube channel. Liz x
Pre-heat the oven to 180C and line a loose bottomed cake tin with a circle of baking parchment.
Pulse the sunflower seeds in a food processor or large blender until they come into a course flour. Careful not to process for too long as that will turn the seeds into butter!
Add the tin of black beans to the blender – including all the aquafaba (that’s the viscous liquid that the beans were cooked and sitting in) from the tin. Blend again until smooth.
Add the sugar (or a sweetener of your choice eg maple syrup), baking powder, cocoa powder, salt, vanilla, olive oil and melted dark chocolate and blend again to combine. To keep it dairy free, check the ingredients in the chocolate – most dark chocolate is dairy free but it’s always worth checking the label. I usually just melt the chocolate in the microwave in little 10 second bursts, checking and stirring between each. You can put the chocolate in a bowl over a small pot of simmering water to melt it gently that way too.
Then scrape the mixture into the lined cake tin, smooth it out with a spatular and bake it in the centre of the oven for 30 minutes or until cracked on top and with minimal wobble.
Allow it to completely cool in the tin before carefully removing it onto a plate and dusting the cake with a tsp of cocoa powder.
Serve slices of the cake with whipped coconut cream from a tin (we sell these in the grocery section of our shop) – it’s also delicious with fresh, tangy raspberries in the summer, to cut through the richness of the cake.
Enjoy! Don’t forget to tag us @greenearthorganics1 on instagram if you make this recipe and join our friendly facebook group to share recipes and tips.
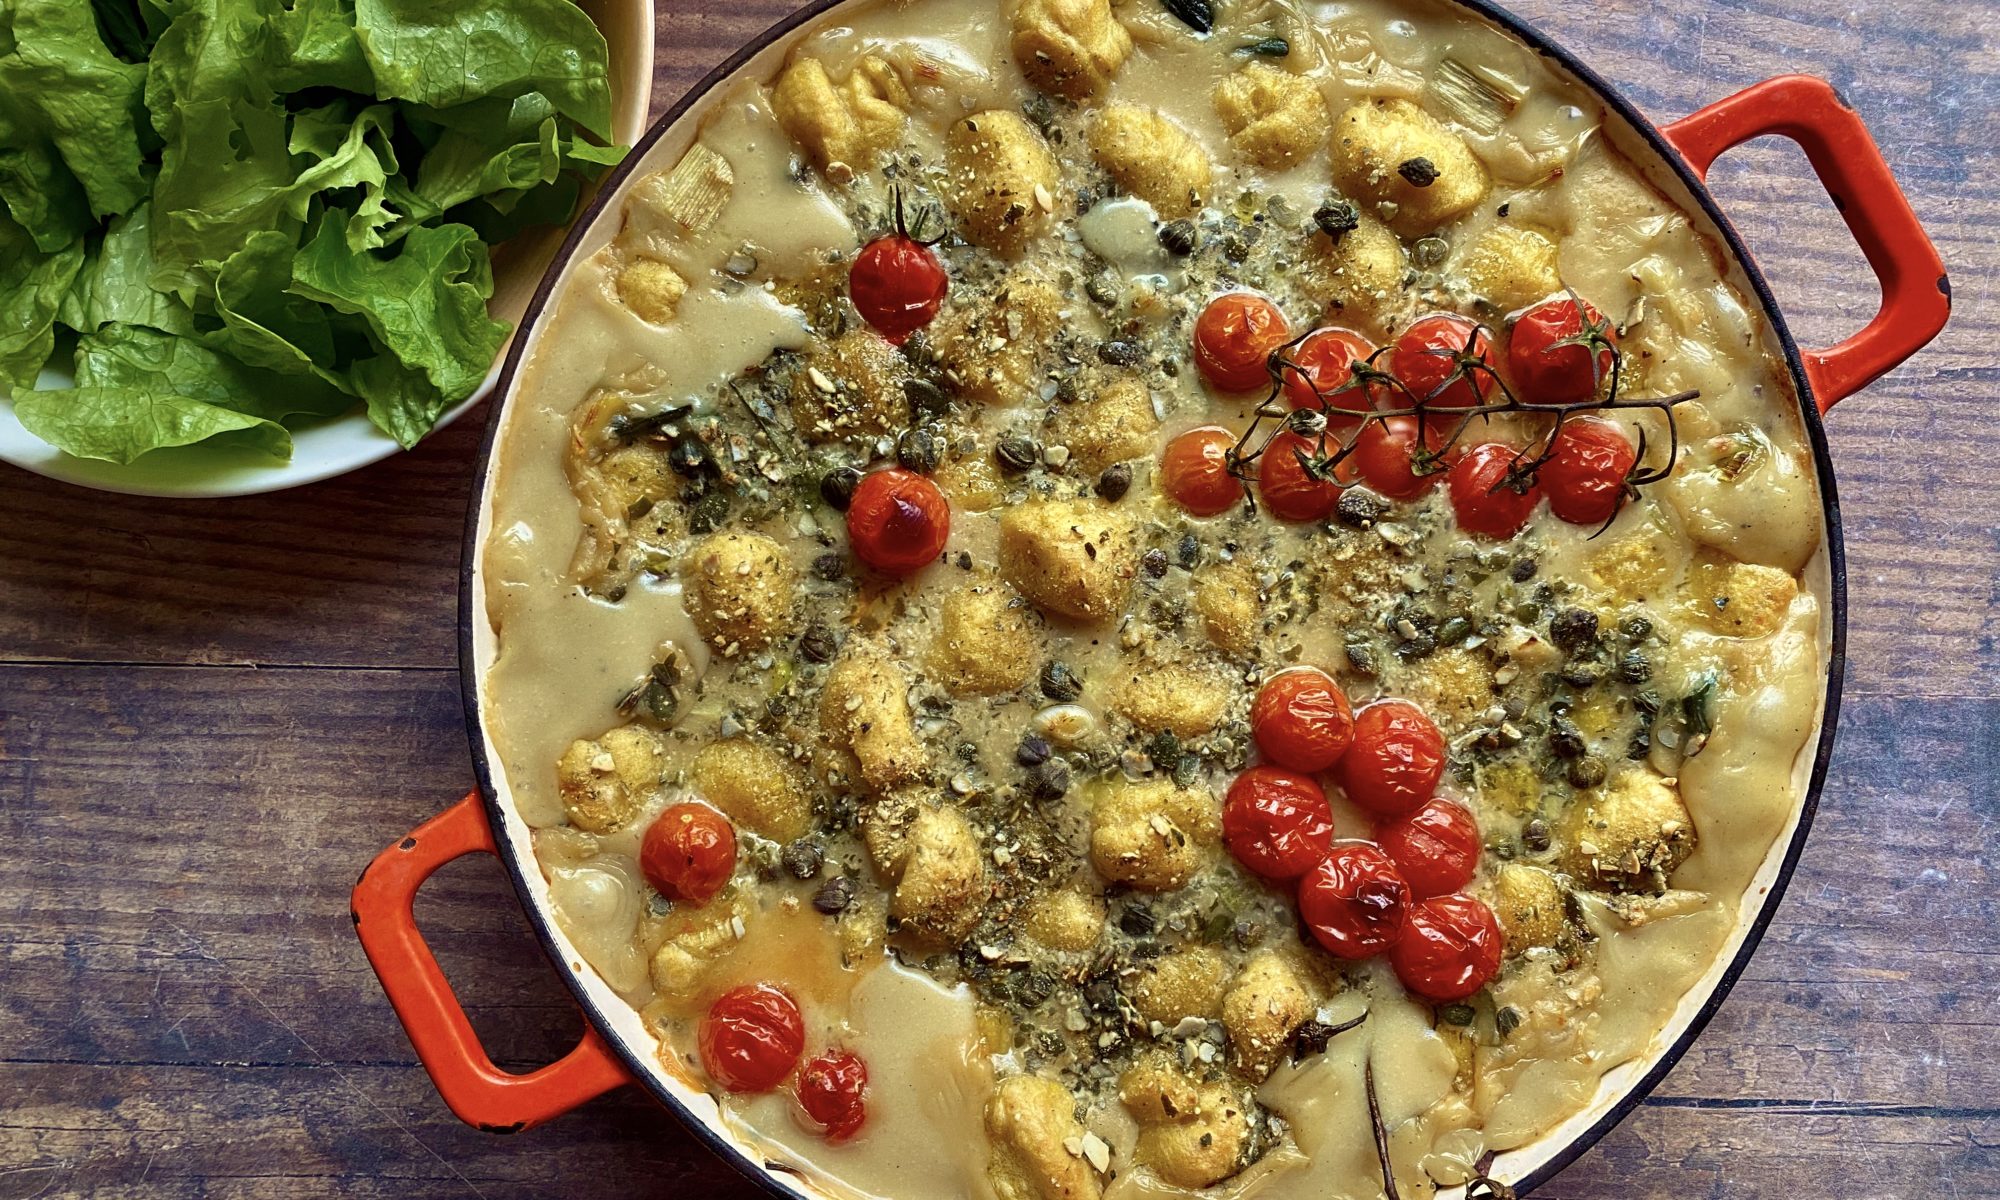
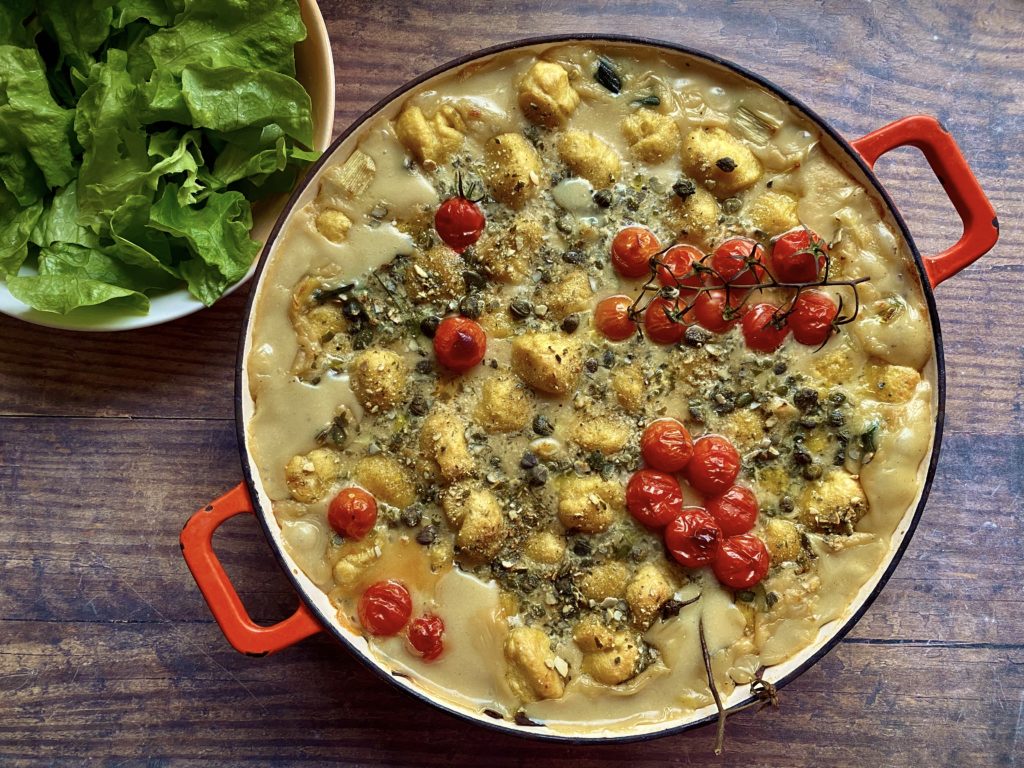
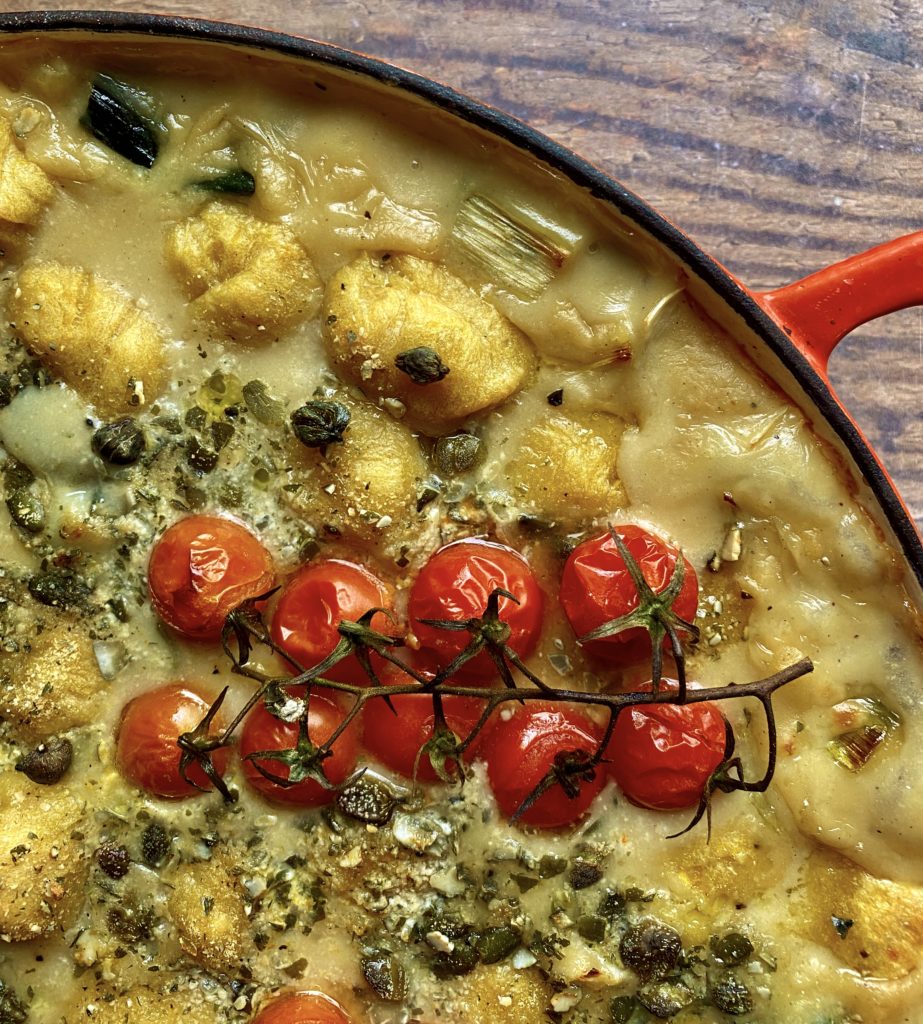
Introducing the slightly more laborious, but much more exciting cousin of macaroni cheese! Béchamel Baked Butternut Gnocchi! This is comfort food at it’s finest.
My vegan béchamel sauce is very simple to put together, and for this I’ve simply whisked it up and poured it over sautéed celery and leek. Then I popped in lots of freshly boiled butternut gnocchi (not as tricky to make as it seems), scattered over some tangy capers and crushed pumpkin seeds and baked it until the béchamel was bubbling and thickened! I got some gorgeous cherry tomatoes in my box last week so I placed them on top to roast in the oven. Their bright acidity is the perfect foil to the creamy richness of the béchamel and gnocchi.
I’d love to see your photos if you make this dish. Share them with us over on our friendly facebook group or tag us @greenearthorganics1 on Instagram and don’t forget to share this blog post with your friends. Liz x
enough plain flour to bring it into a dough (this varies depending on the water content and size of your squash)
salt, pepper and optional herbs or spices (sage/rosemary/thyme/chilli flakes…)
Method
Pre-heat your oven to 200C.
Cut a small butternut squash in half, scoop out the seeds and bake it – cut side down – in a hot oven (200C) until the flesh is soft all the way through. Test it with a small knife, it should easily slide into the soft, roasted butternut. (This normally takes 30 minutes or so. While it’s in the oven, get on with the sauce and preparing the toppings below.)
Allow the squash to cool to the point where you can easily handle it, then scoop out all the roasted flesh and mash or blend it into a smooth purée.
Find your biggest pot, 2/3rds fill it with water and get it on the stove to heat up to a rolling boil while you make the gnocchi.
Season the purée with salt and pepper and taste to check the seasoning. It should be slightly too salty as you are going to fold in a fair bit of flour. You can also add optional extra flavours at this stage. For example chilli flakes and sage or rosemary and lemon zest… or just leave it plain, that’s delicious too!
Then stir in enough flour to turn the purée into a soft dough. You can use plain flour (make sure there are no raising agents in it) or strong bread flour or even a gluten free plain flour blend. Gnocchi works best with white flour rather than wholemeal.
The amount of flour varies depending on the size and moisture content of your squash. Just start with a mug or so, gently fold it in and keep going until it’s the right consistency to be tipped out onto a floured work surface and very briefly kneaded. You want to work it as little as possible to keep it tender, but just enough to bring it together into a manageable ball of dough. It should be soft and sticky, get a helper to keep dusting the work surface and your hands with flour to make it more manageable.
Cut the ball of dough into 4, then roll one of the quarters into a thick snake. Chop the snake into little bites. If you want to make little traditional looking grooves in the gnocchi you can stamp each bite with a fork or you can roll them over a gnocchi board if you have one… or simply roll them into balls.
Then drop the gnocchi into the now boiling water in batches. Gently loosen them from the bottom of the pot with a slotted spoon. When they rise to the top of the water they are done and can be scooped out and placed in the sauce below. I do them in batches of one snake at a time, then while that batch is boiling I get the next snake ready.
Keep going until all your gnocchi dough is used up. If you make too much for the bake, then you can cool down and keep the excess boiled gnocchi in the fridge/freezer and use it another day (pan fry it with a little olive oil or butter and serve with pesto and salad?)
In an oven and hob safe, large, wide pan, sauté the sliced celery, leek and garlic with the butter or olive oil and some salt and pepper until soft. Then turn off the heat. (If you don’t have an oven and hob safe large dish like this, you can just sauté the veg and tip it into a roasting tray instead.)
Then whisk the flour, milk, mustard, nutritional yeast, nutmeg, salt and pepper in a large jug or mixing bowl and pour the mixture over the sautéed celery and leeks.
Boil the gnocchi in batches as above and pop them into the dish on top of the sauce.
In a small blender or large pestle and mortar, crush/blend the handful of pumpkin seeds with a small handful of nutritional yeast for a crunchy, savoury topping. Scatter this over the gnocchi and sauce.
Sprinkle over the capers and cherry tomatoes then pop the dish into the oven (with an optional drizzle of olive oil) to bake until the gnocchi are burnished golden brown and the sauce is thick and bubbling. This should take around 20-30 minutes.
Serve with a simple green salad and an ice cold glass of white wine and enjoy!
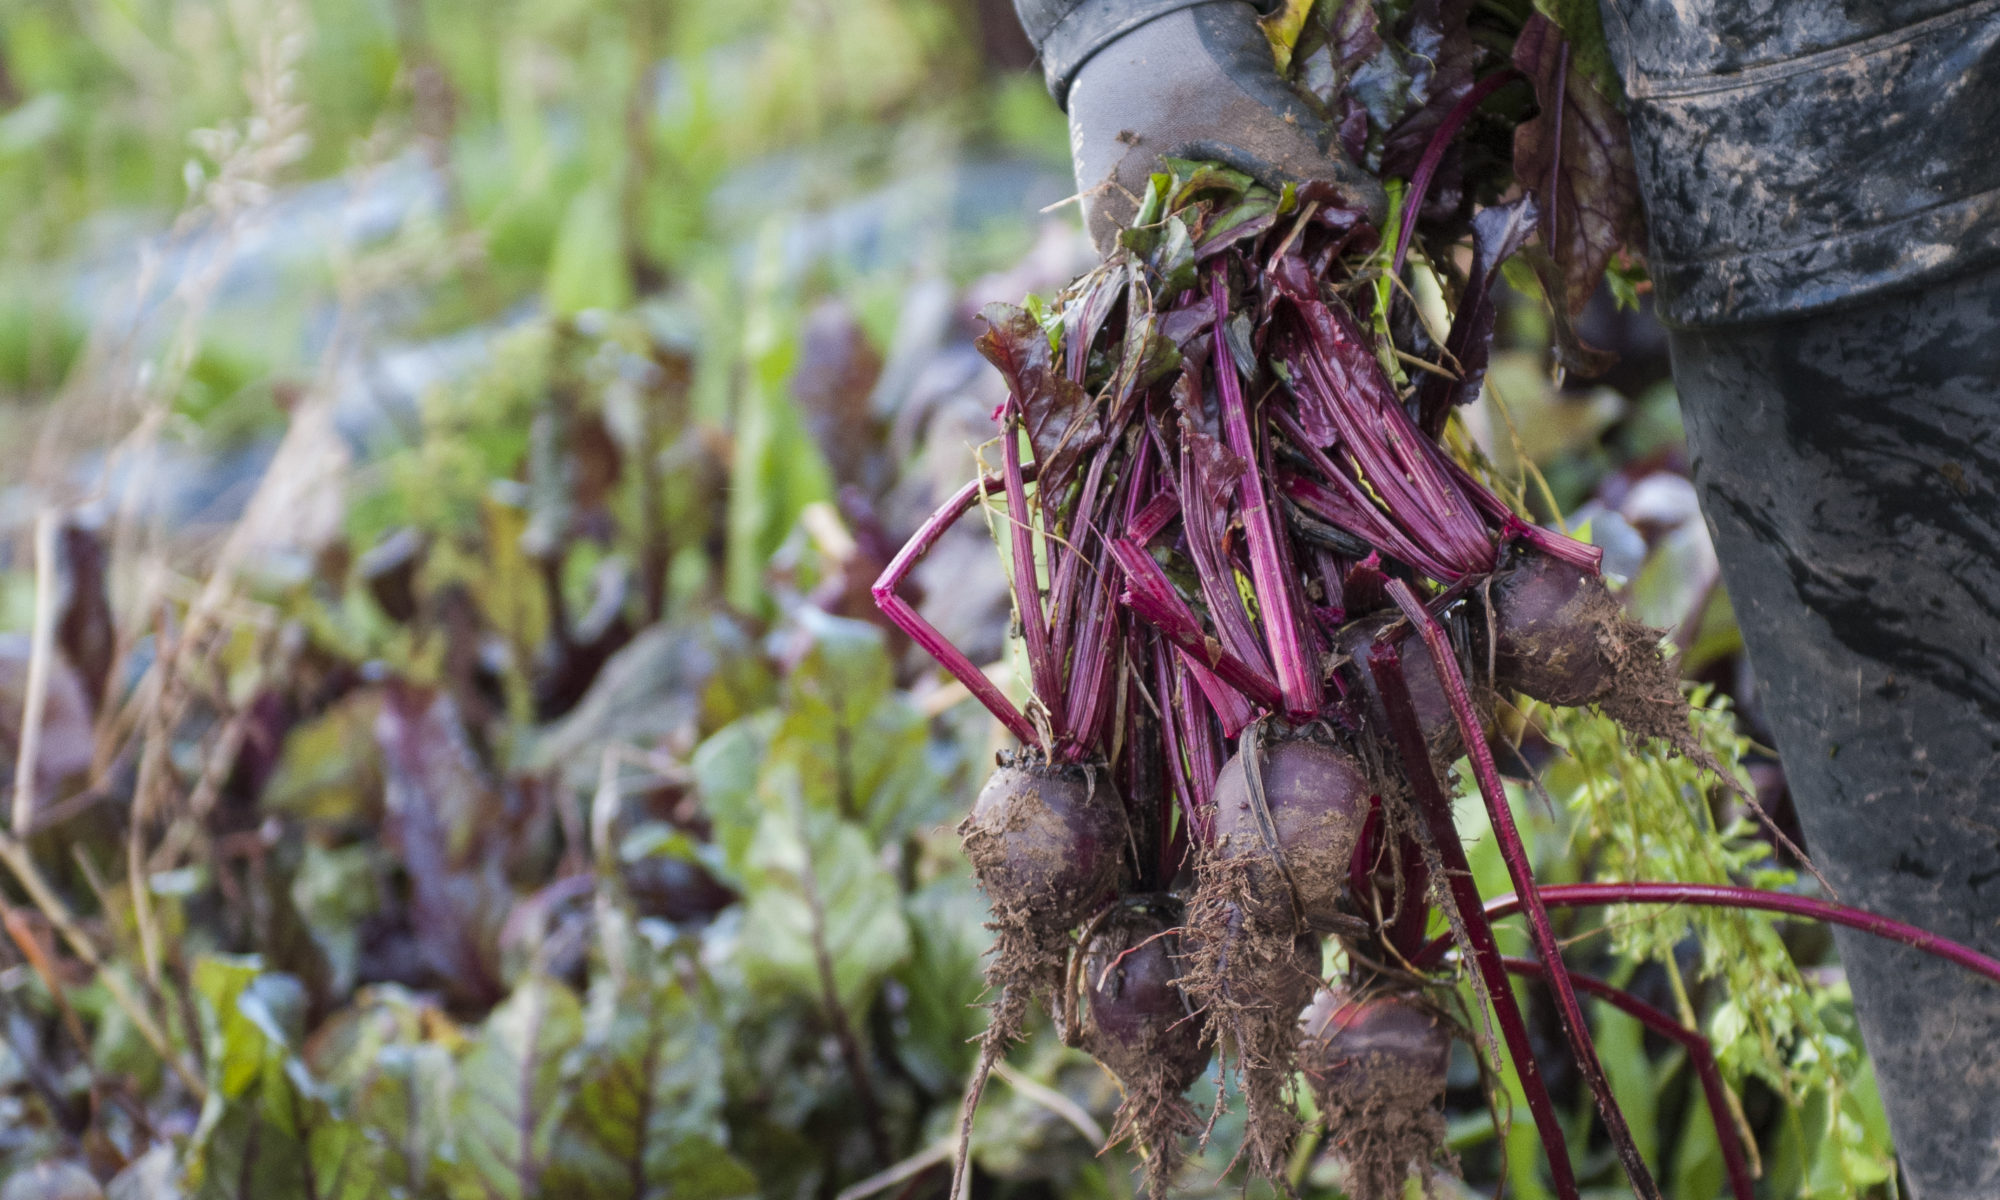
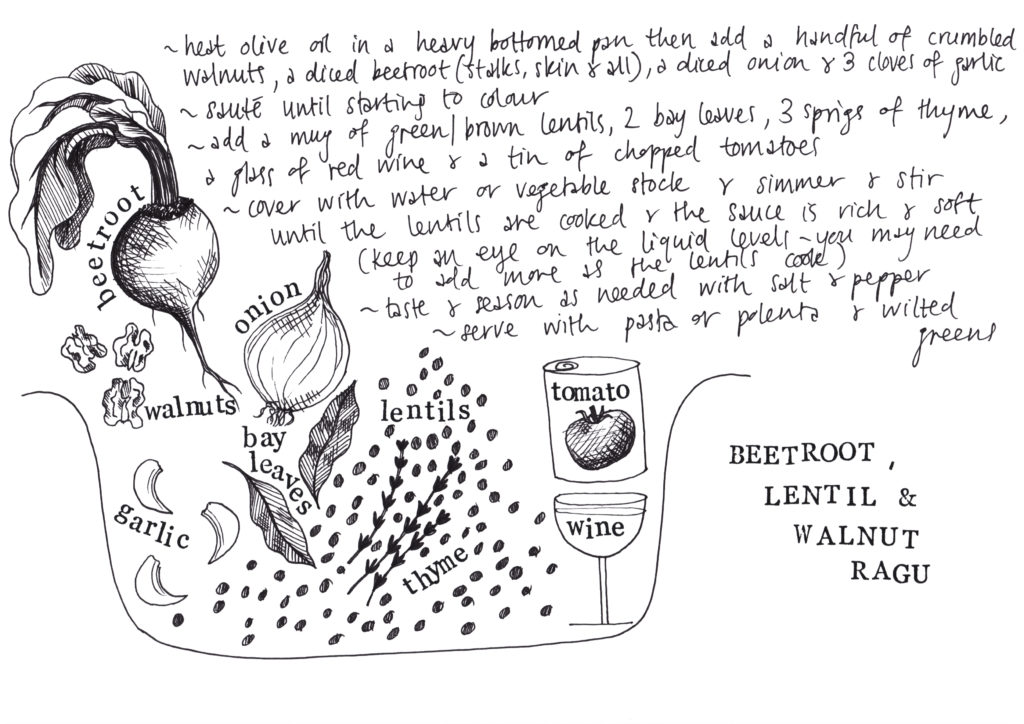
Ragu is a rich, slow cooked pasta sauce, traditionally made with meat and served with a wide pasta like pappadelle or tagliatelle. Of course you can also eat it however you like – with polenta or in layers in a lasagne with a béchamel? I love it with rigatoni, those large, ridged tubes of pasta pick up the sauce beautifully. My version uses earthy beetroots, satisfying green lentils and crumbled, rich, fatty walnuts. Delicious! Did you know we sell organic lentils and walnuts in our grocery section? If you have a slow cooker, this is a good one to get going in the morning and enjoy for supper. Simply boil some pasta and you’ve got a hearty, healthy meal ready to go. The ragu also freezes well so I always make a big batch and freeze some for a rainy day. And we are not short of those right now are we?
If you make this recipe please share it with us on our friendly facebook group, and please feel free to share this blog post with your friends and family of course! The illustration above is from my 2021 recipe calendar. While stocks last I’m including a free one with every book order this month. You can add my cookbook to your shopping here. Thank you.
I usually start a ragu with a soffritto. Soffritto is the word for gently cooking diced vegetables (usually onion, celery and carrot) in a little oil until soft to provide a base flavour to build a sauce, soup or stew from. In this case start with 1 diced onion, 1 large diced beetroot (or 2 small – just give it a scrub and don’t bother peeling, also finely chop & add the purple stalks from any leaves should you be lucky enough to have some – save the green leaves to wilt as a side), 3 diced cloves of garlic and a generous handful or two of crumbled walnuts. If you have celery to hand then definitely add a few diced stalks for extra depth of flavour!
Sauté the diced vegetables and nuts in the tbsp of olive oil in a large pot until soft. Then add a mug of green lentils, 2 bay leaves, 3 sprigs of thyme, a glass of red wine & a tin of chopped tomatoes. If you prefer more Italian herbs with this sauce then sub the thyme with some fennel seeds and a pinch of dried oregano. Add a tin of water or veg stock to swirl out the last of the tomatoey juices from the tin. Season with salt and black pepper.
Simmer until the lentils are cooked through then taste and adjust the seasoning if necessary. This will take a minimum of 30-40 minutes, but if you have time to simmer for longer, the flavours will be richer. This is one of those sauces that is even better the next day. Keep an eye on the liquid levels as the lentils will absorb a lot. Add more water/stock as needed and give the pot a stir every now and then to prevent sticking.
Serve tossed through pasta or in a warm bowl with soft polenta and wilted greens.
Get hold of some of our beautiful, organic beetroots when they are in season, sign up for a veg box subscription!