How is it the Easter holidays already? The kids have only just been back at school for a few moments! Well here we are and what is Easter without toasted sticky, spiced, fruity buns slathered in lots of butter? Here’s my plant based recipe. Sure it takes a while to make, but most of that time is just waiting for the dough to rise. These will keep you and the kids busy for a least one day over the Easter holidays anyway. Liz x
Ingredients (makes 12 buns)
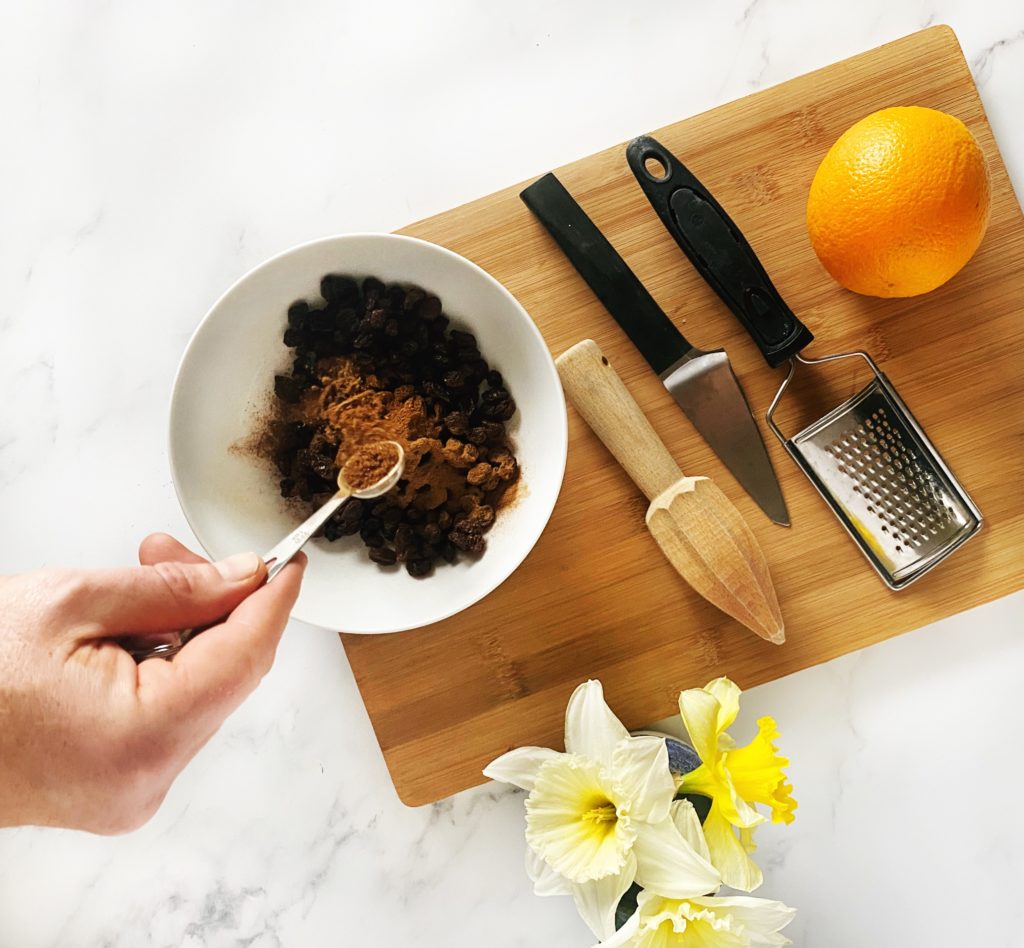
120g sultanas
1 orange
2 tsp mixed spice
2 tsp cinnamon
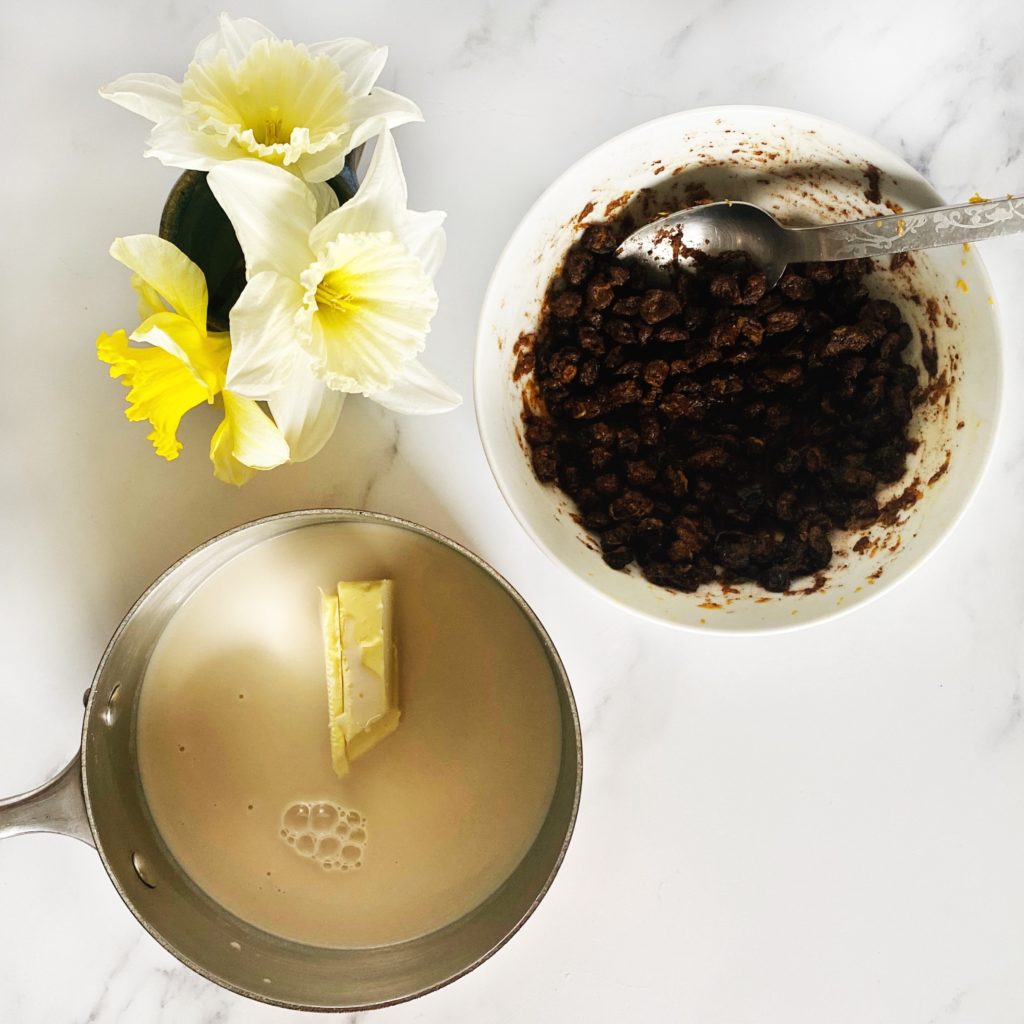
300ml milk (I use oat milk)
50g butter (I use a dairy free butter)
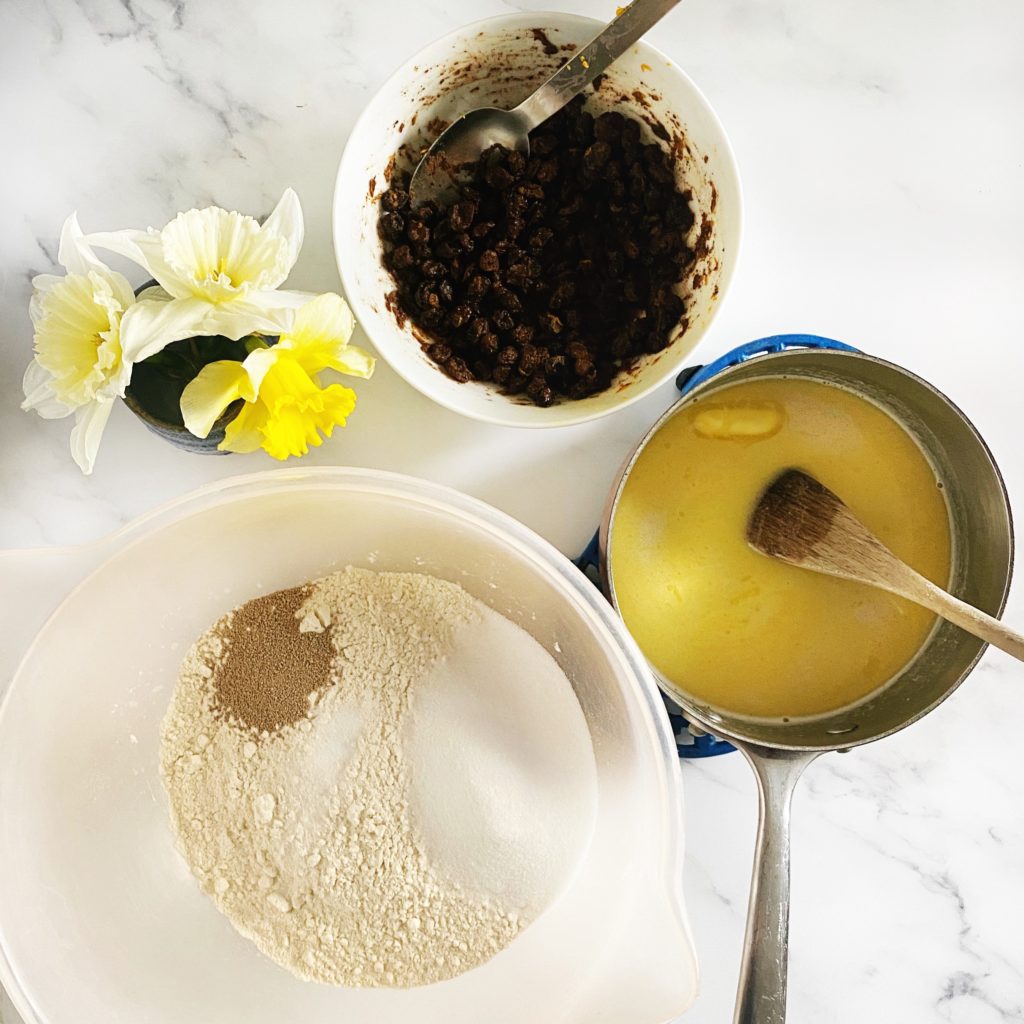
500g strong white bread flour (plus about 60g extra for making the paste for the crosses)
70g caster sugar
7g yeast
1/2 tsp salt
2 tbsp brown sugar mixed into a syrup with a little water (or maple syrup) for glazing
Method
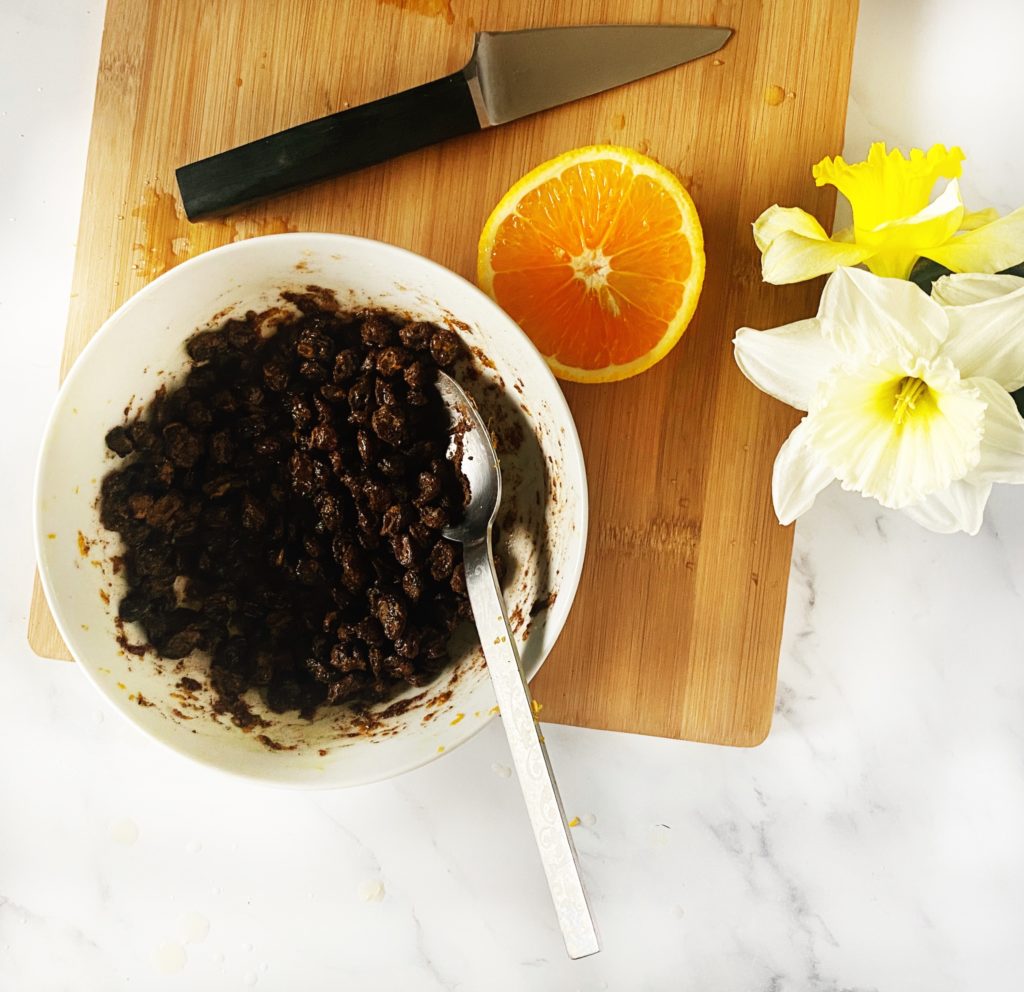
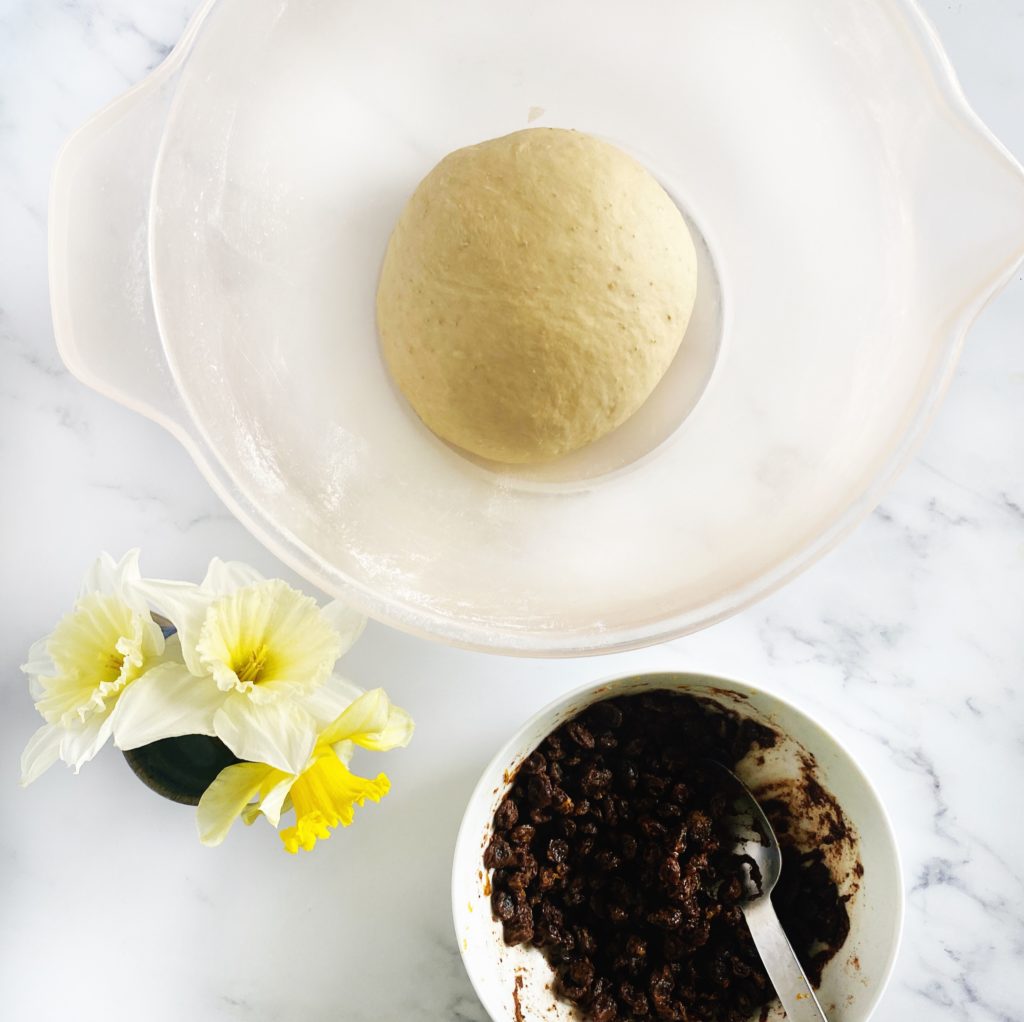
Measure out the sultanas and spices into a small bowl. Add the zest and juice of the orange. If your orange is very large, just use half the juice. Mix well and allow the sultanas to soak up the orange juice and spices.
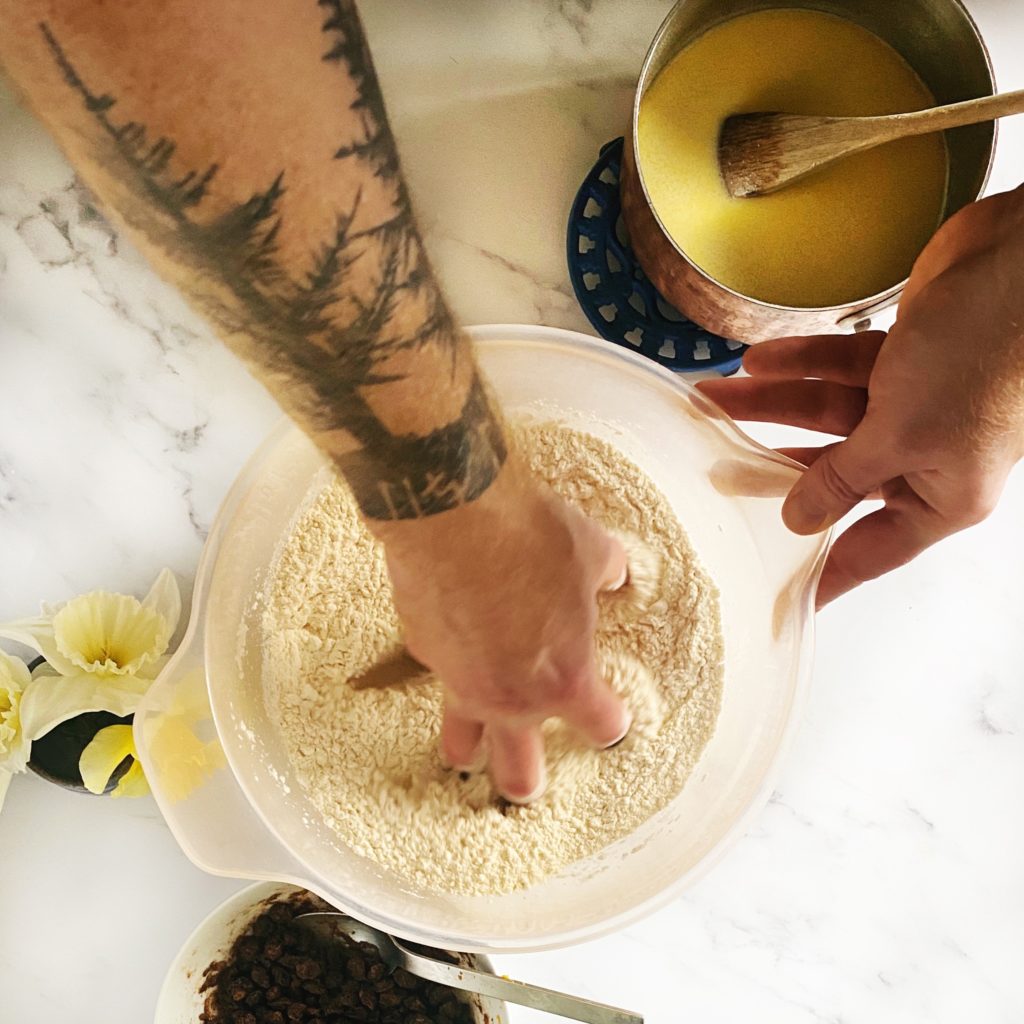
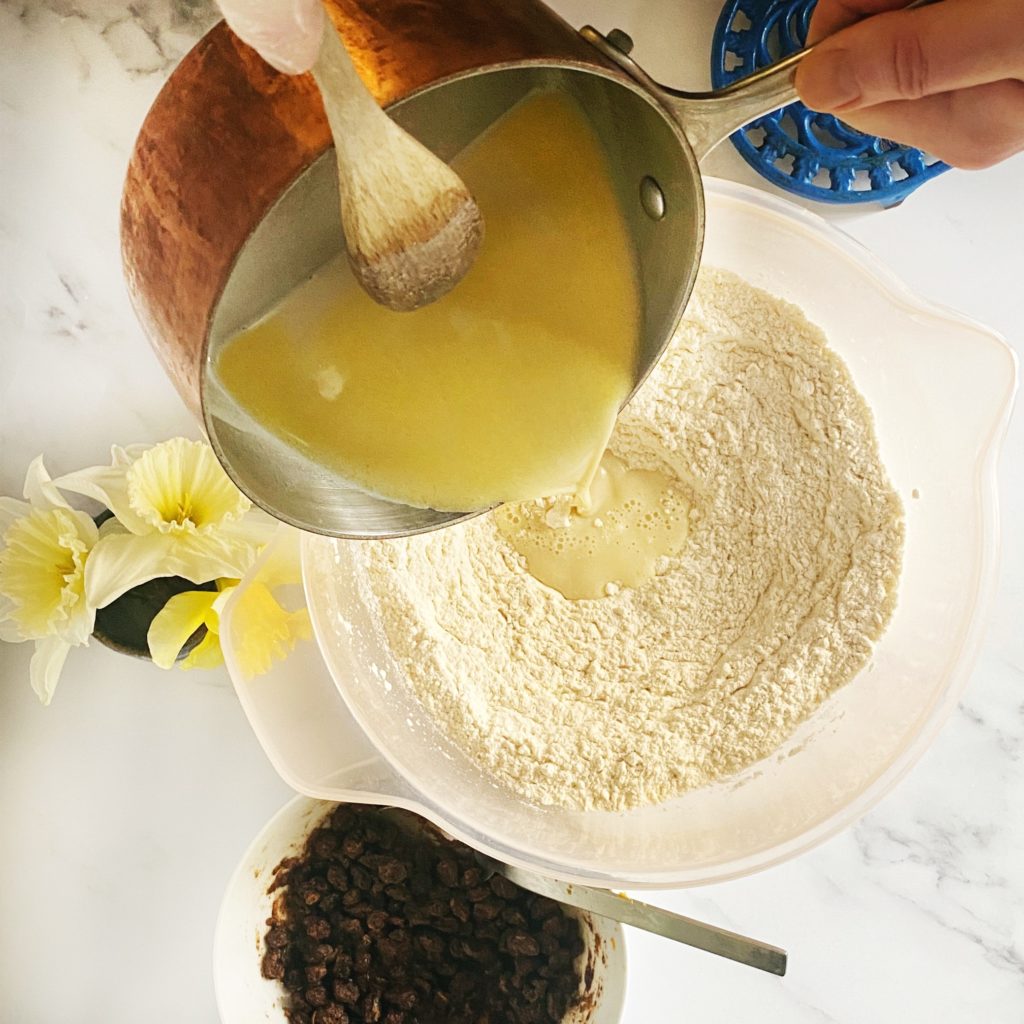
Measure the milk and butter into a small pan and gently heat it to melt the butter. Allow it to cool to a touchable temperature while you measure out the flour, sugar, salt and yeast into a large mixing bowl. Mix the dry ingredients well then pour in the warm milk and butter and mix with your hand into a rough, sticky dough.
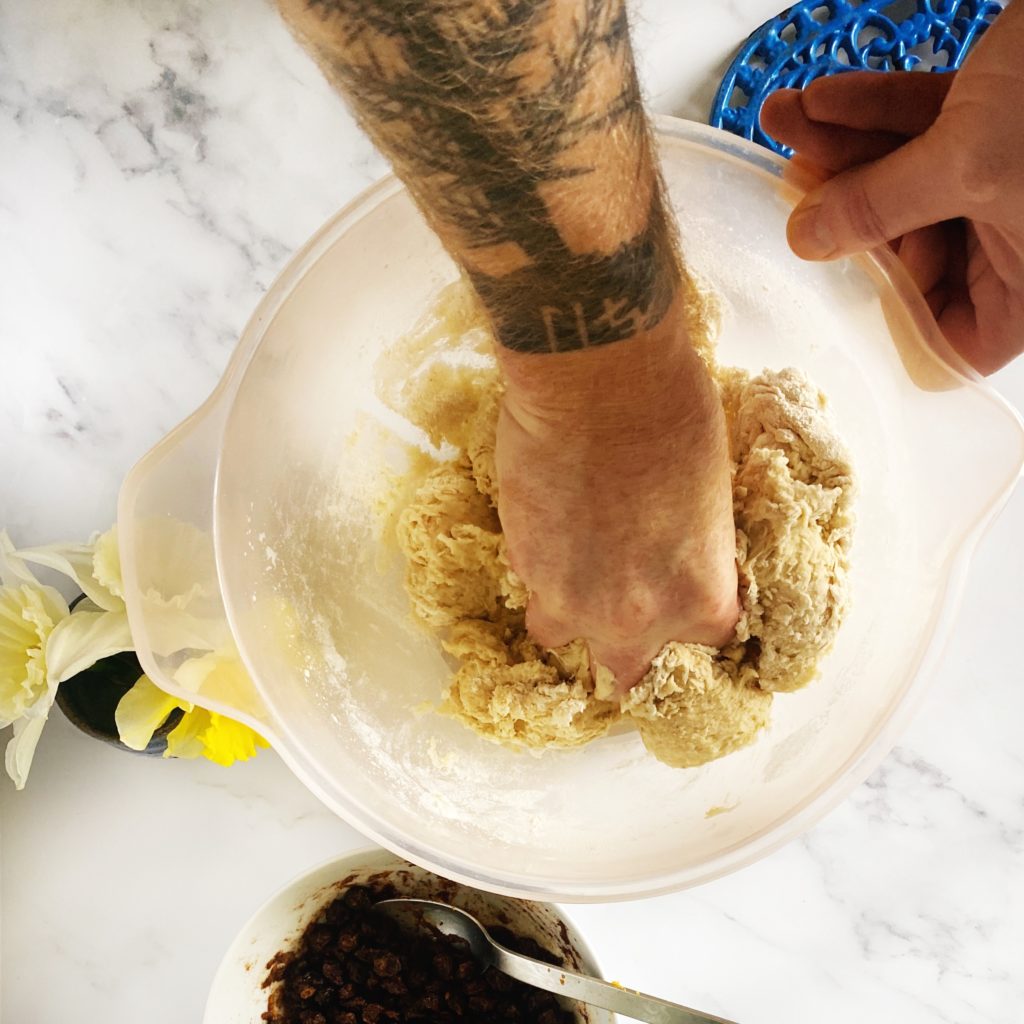
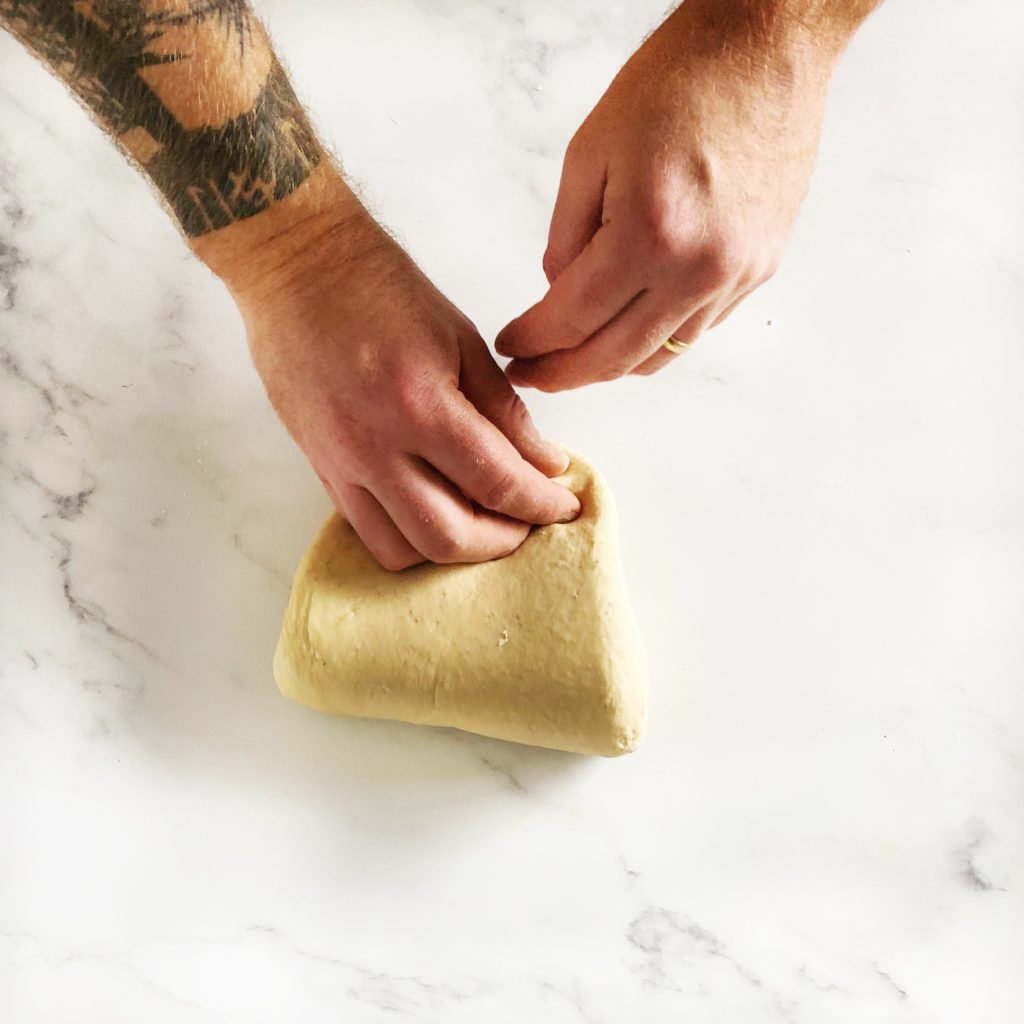
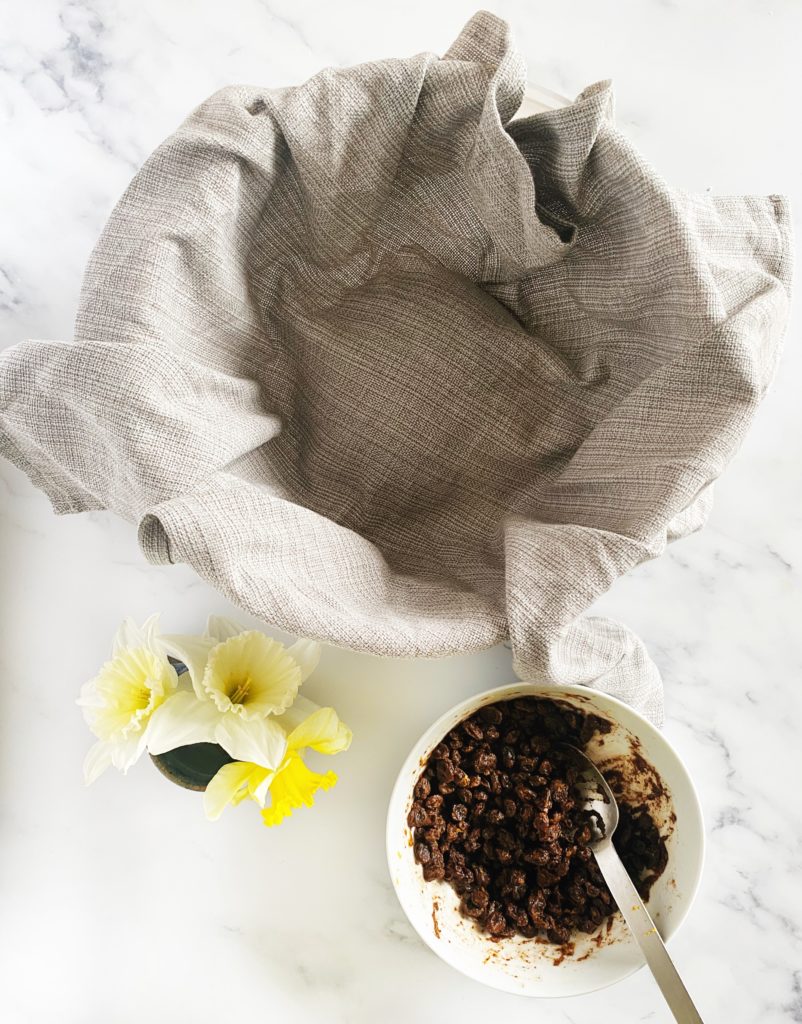
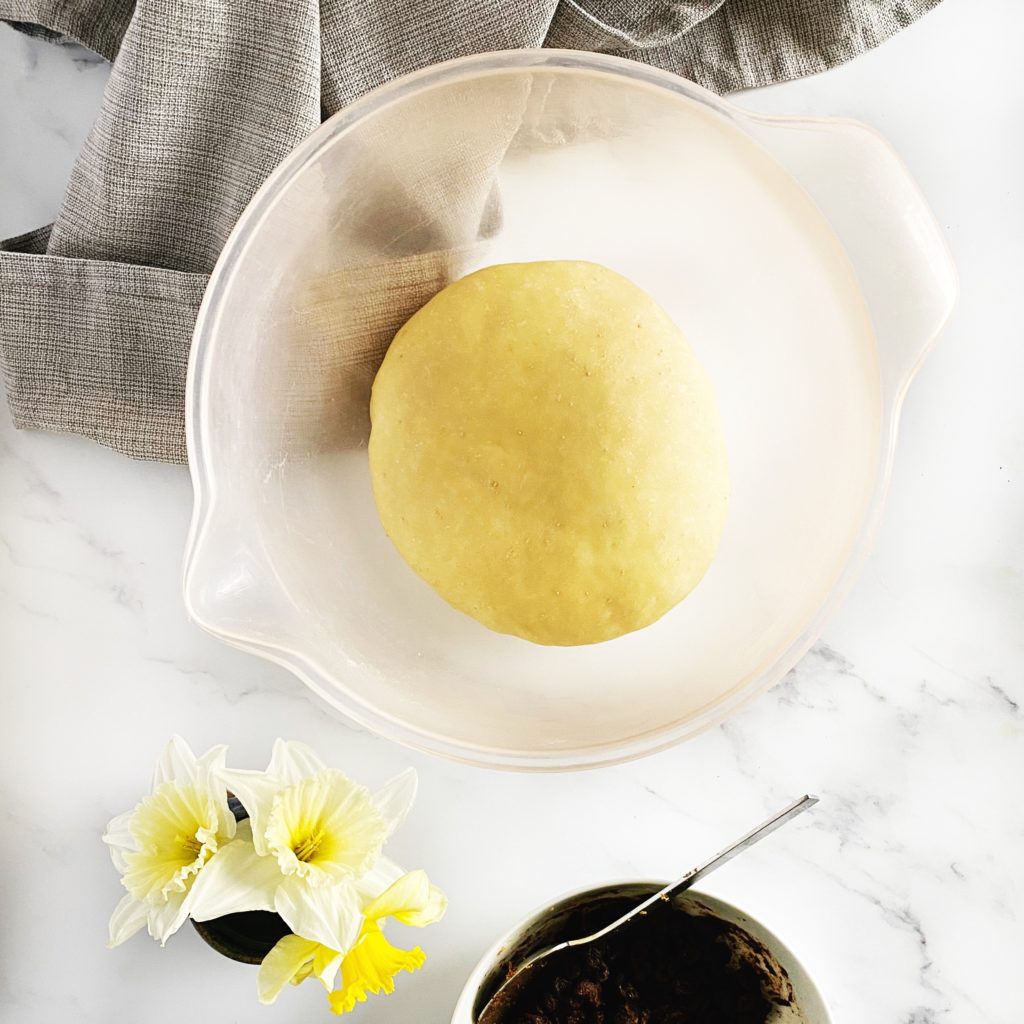
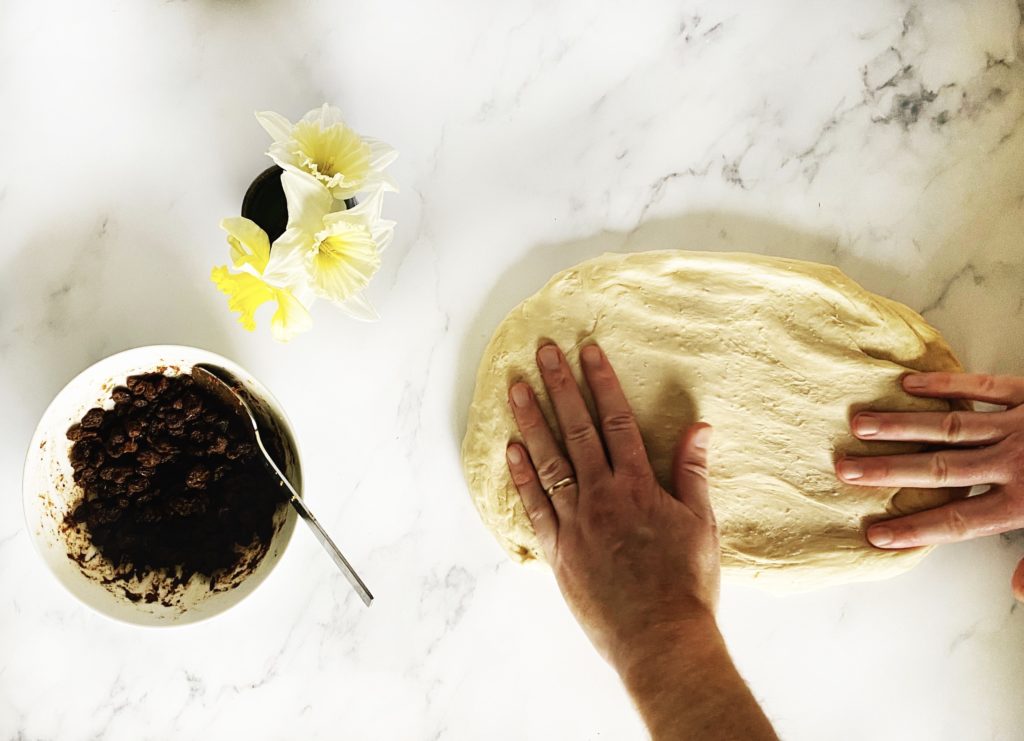
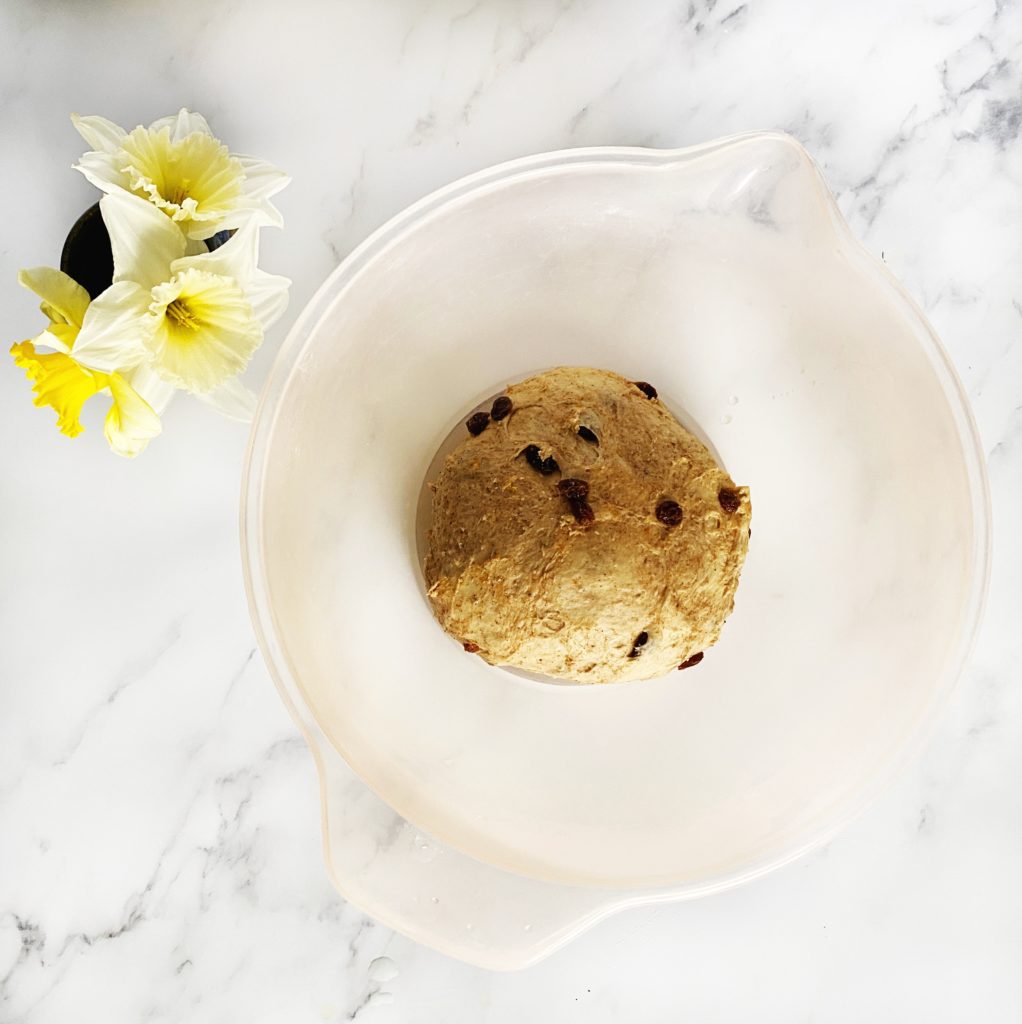
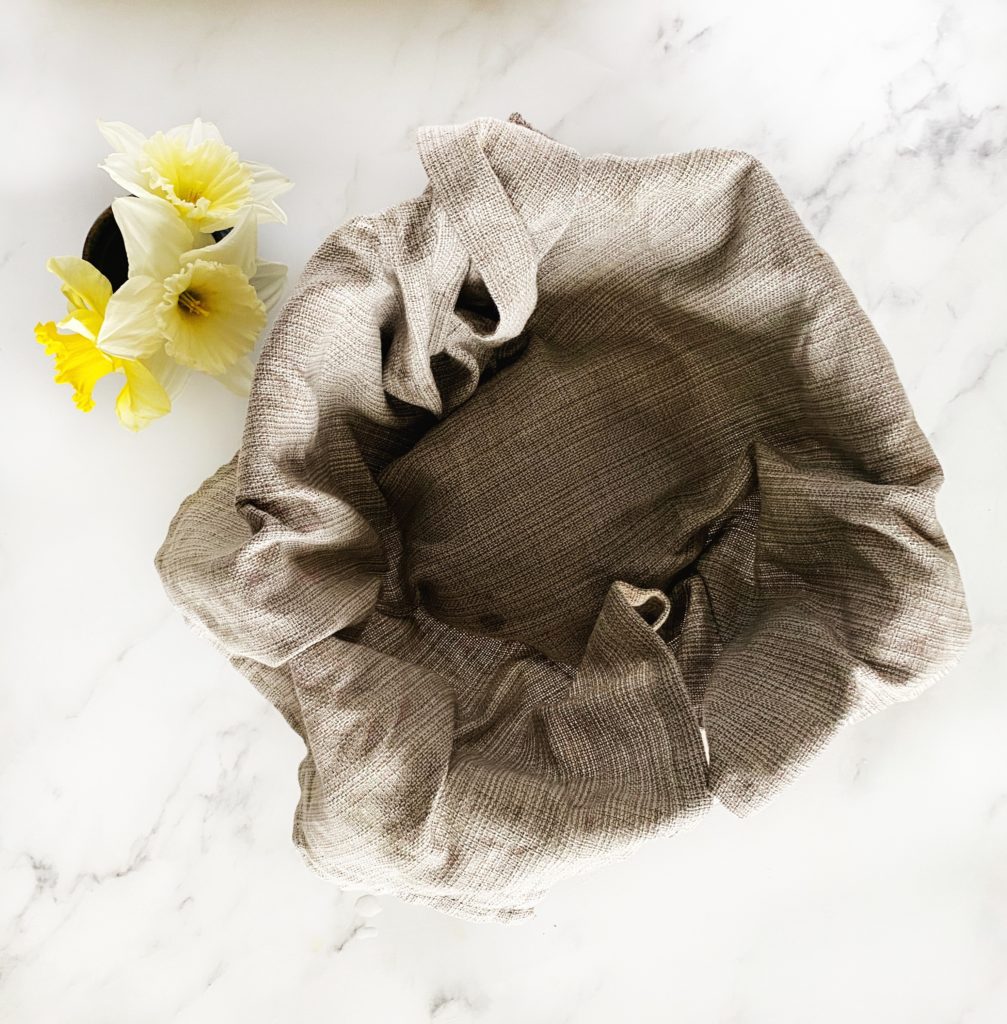
Tip the dough onto a clean work surface then knead well for about 5 minutes until you have a smooth, stretchy ball of dough. Don’t be tempted to add more flour, just keep kneading until it all comes together. Then pop the dough back in the mixing bowl, cover it with a clean tea towel and allow it to rise and double in size. This should take about an hour in a warm place.
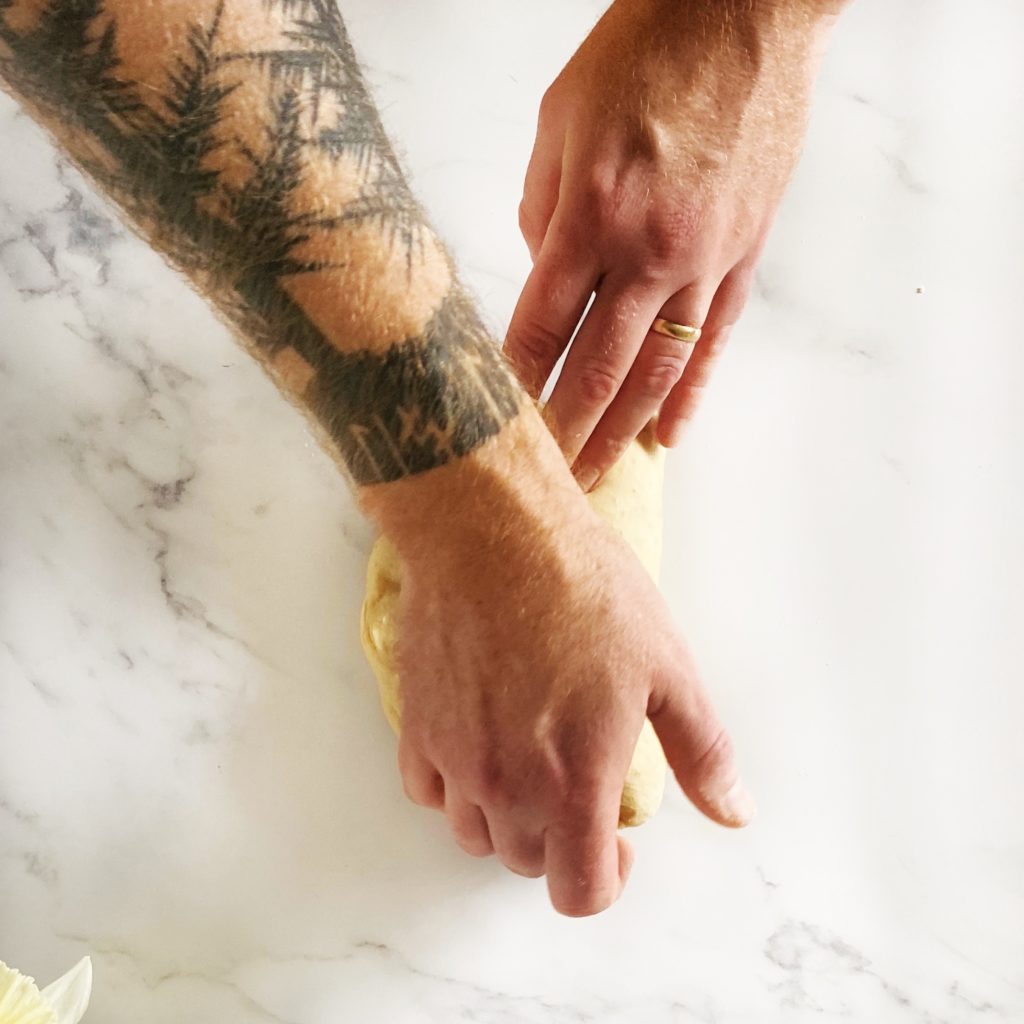
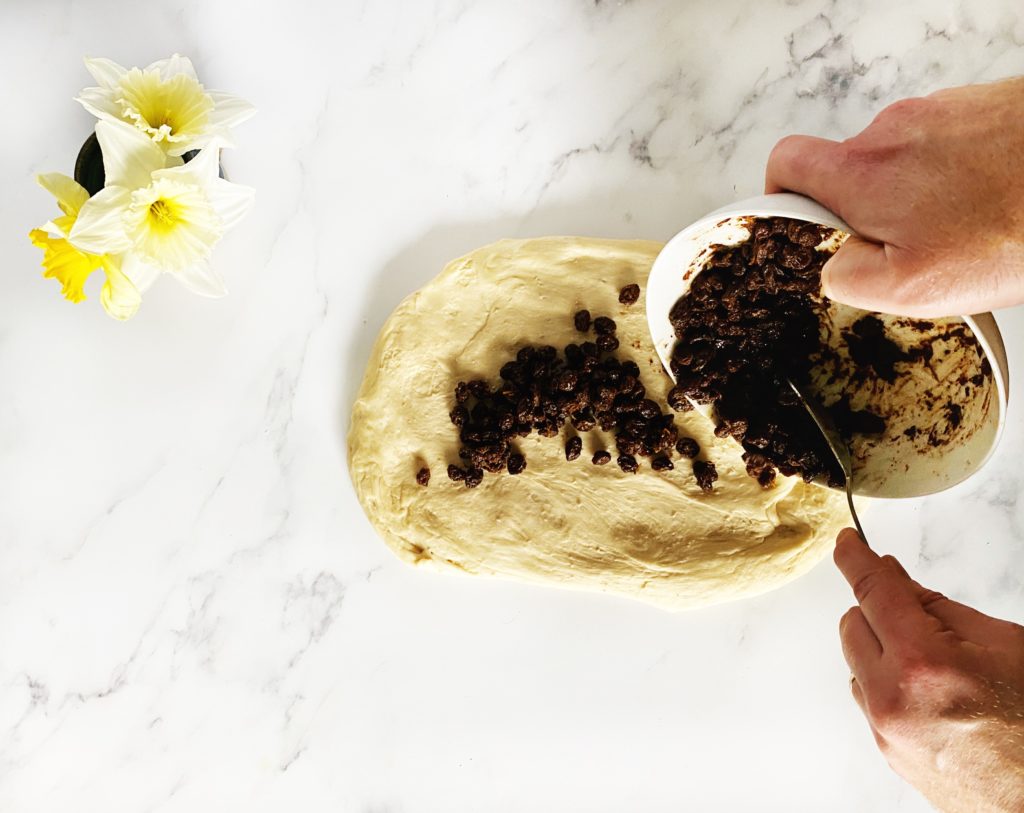
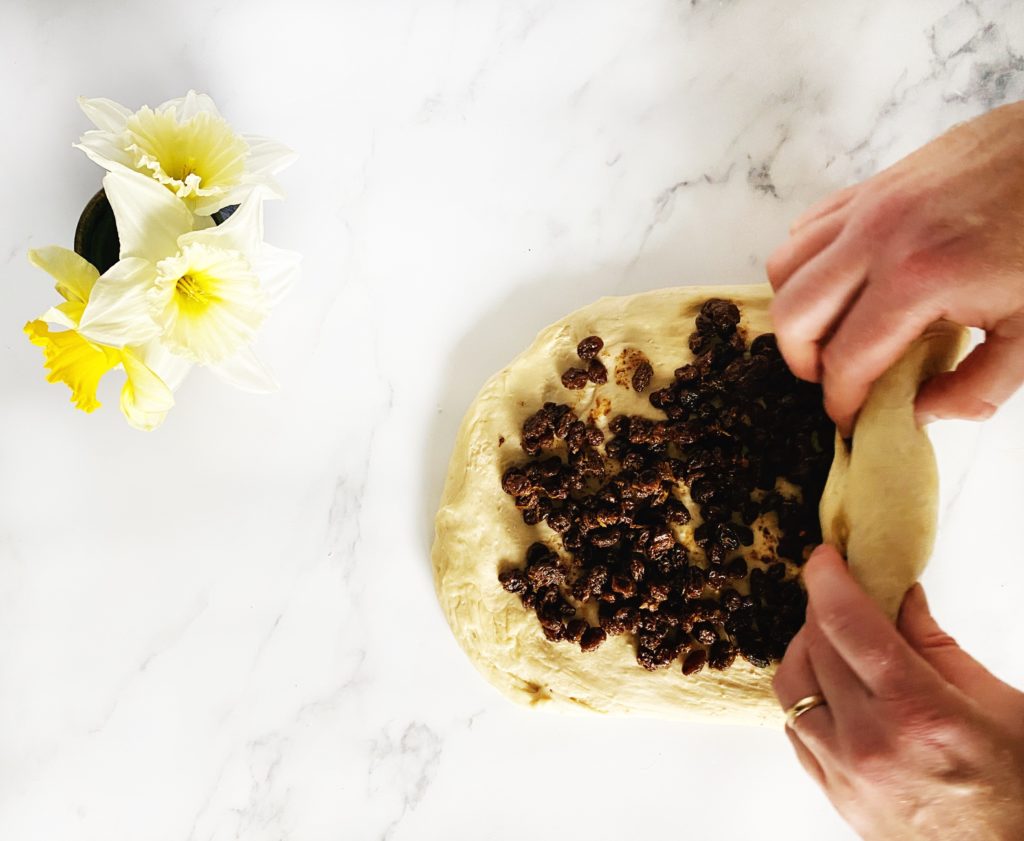
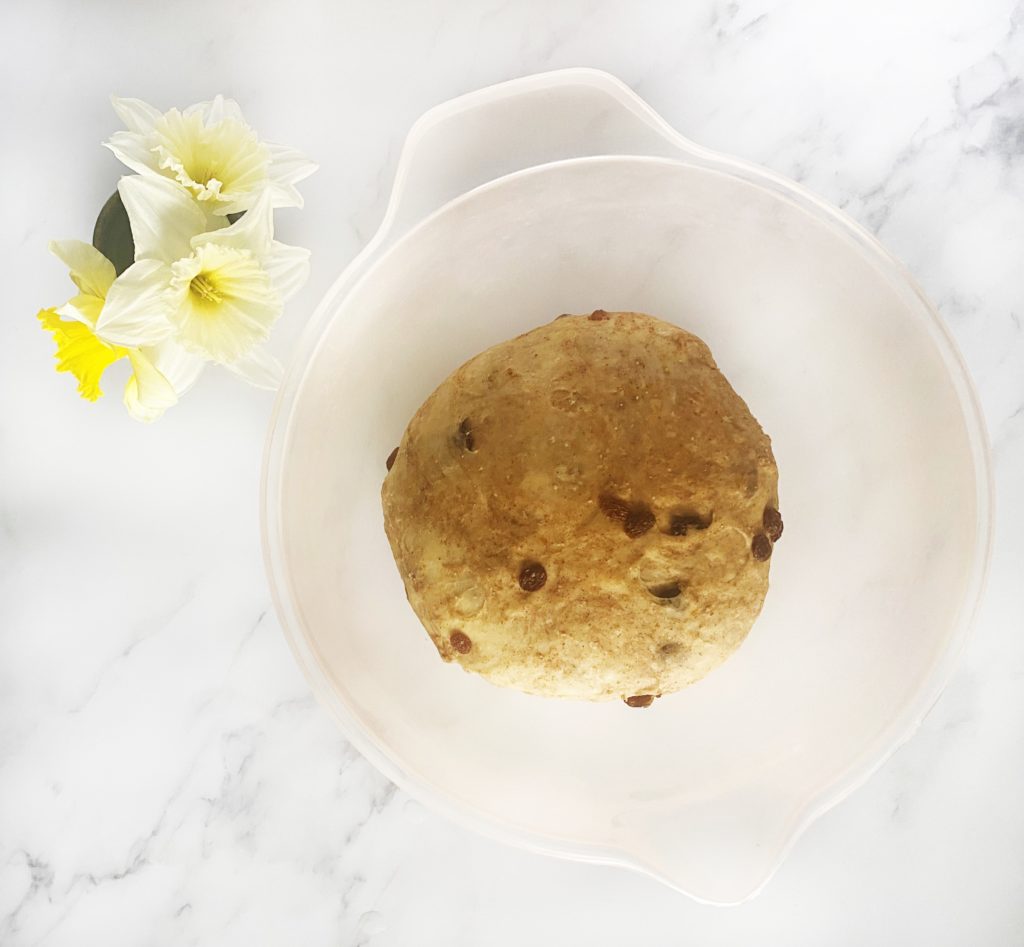
When the dough has doubled in size, stretch it out onto a clean work surface and spread over all of the juicy, spicy sultana mixture. Then roll it up and give the dough an extra knead to incorporate the ingredients. Put the dough back in the bowl to rise again for another hour or so in a warm spot.
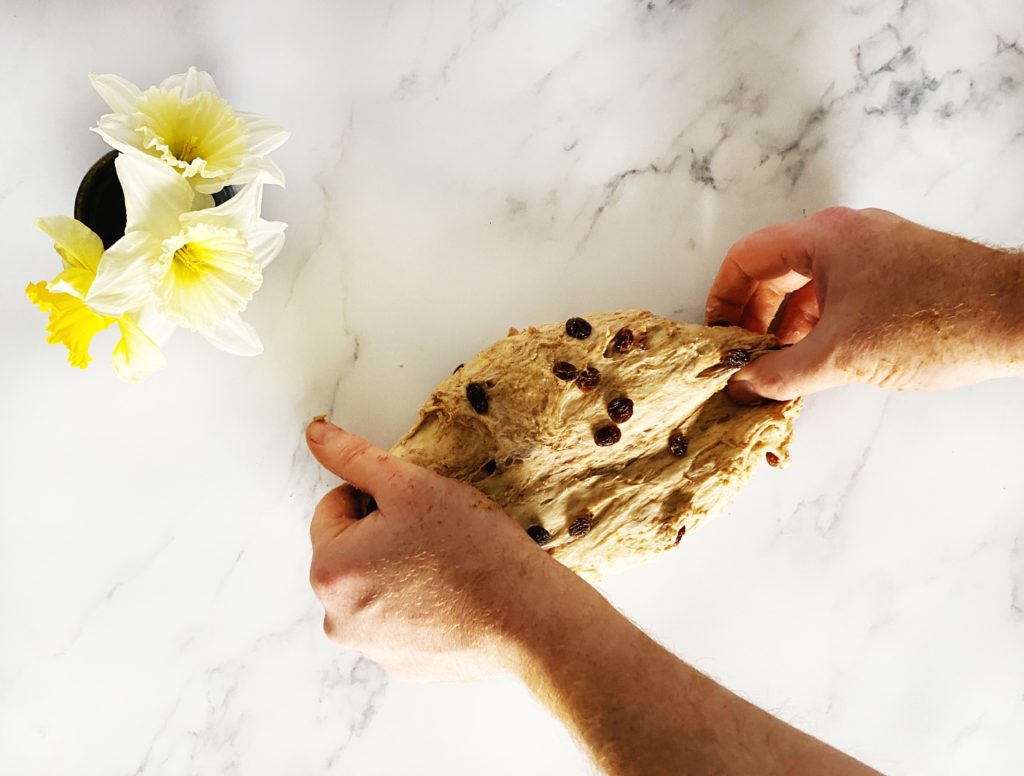
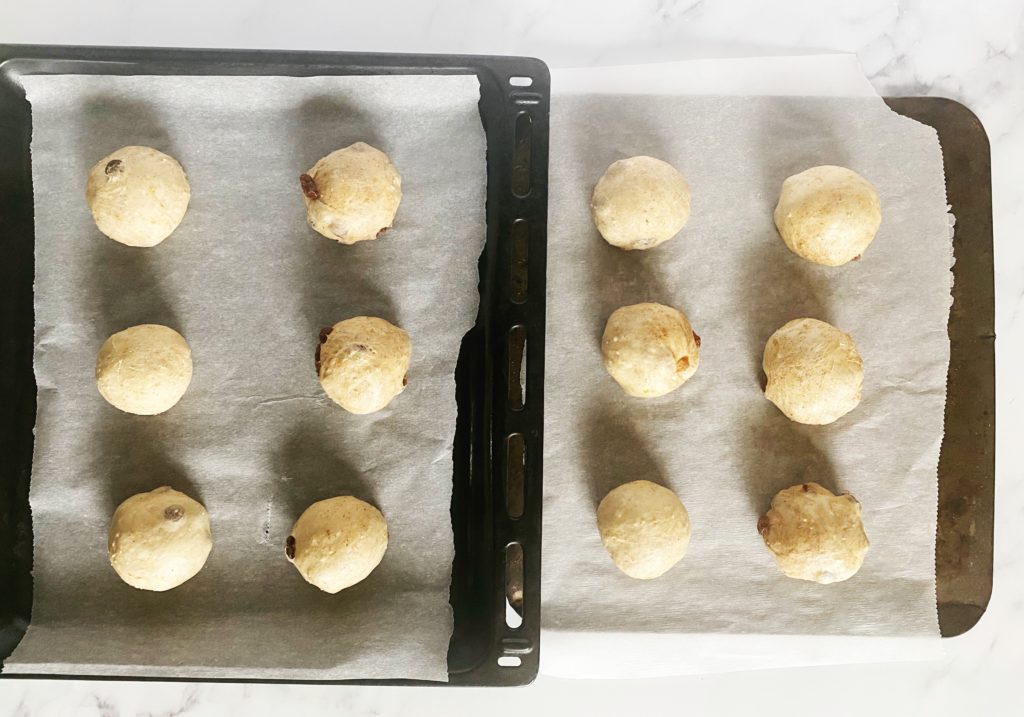
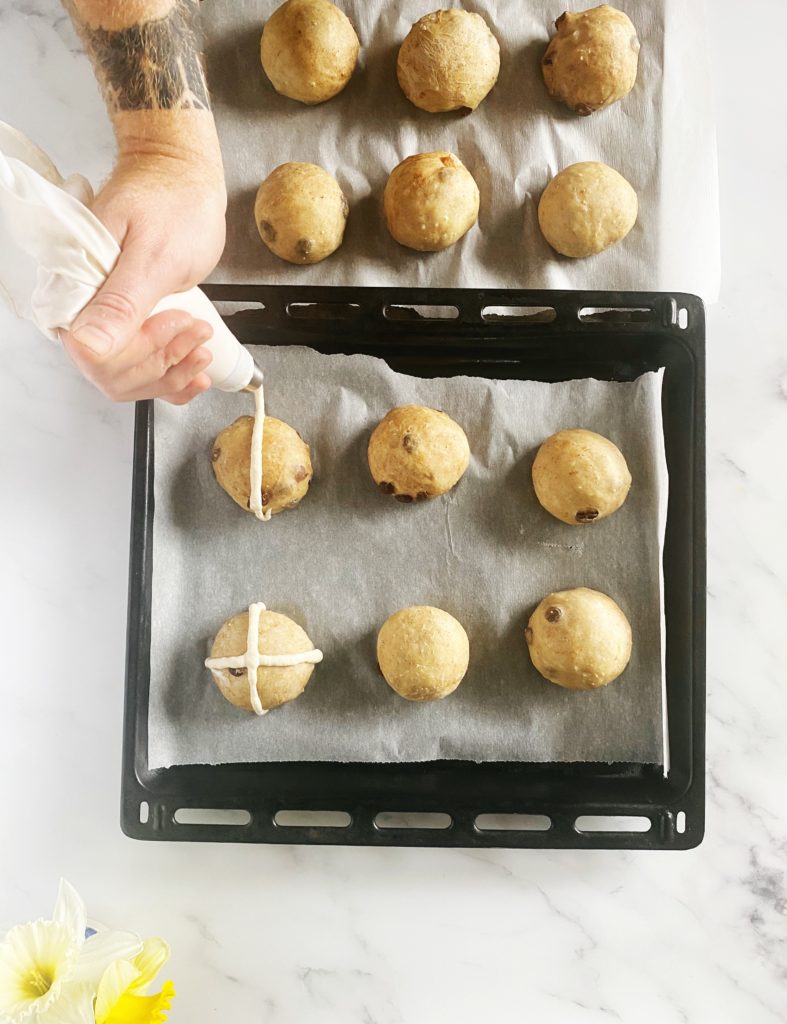
Once the dough has doubled in size again, take it out and divide it in 12 equal pieces. Roll the pieces into neat balls and put them on a lined baking sheets. I space mine out onto two sheets because my oven doesn’t bake evenly so I like to give them room for the hot air to circulate. If your oven is good you can place them together on one large baking sheet, just leave a couple of cm between each one to allow them space to rise. Cover them with the tea towel and allow them to rise for about 45 minutes.
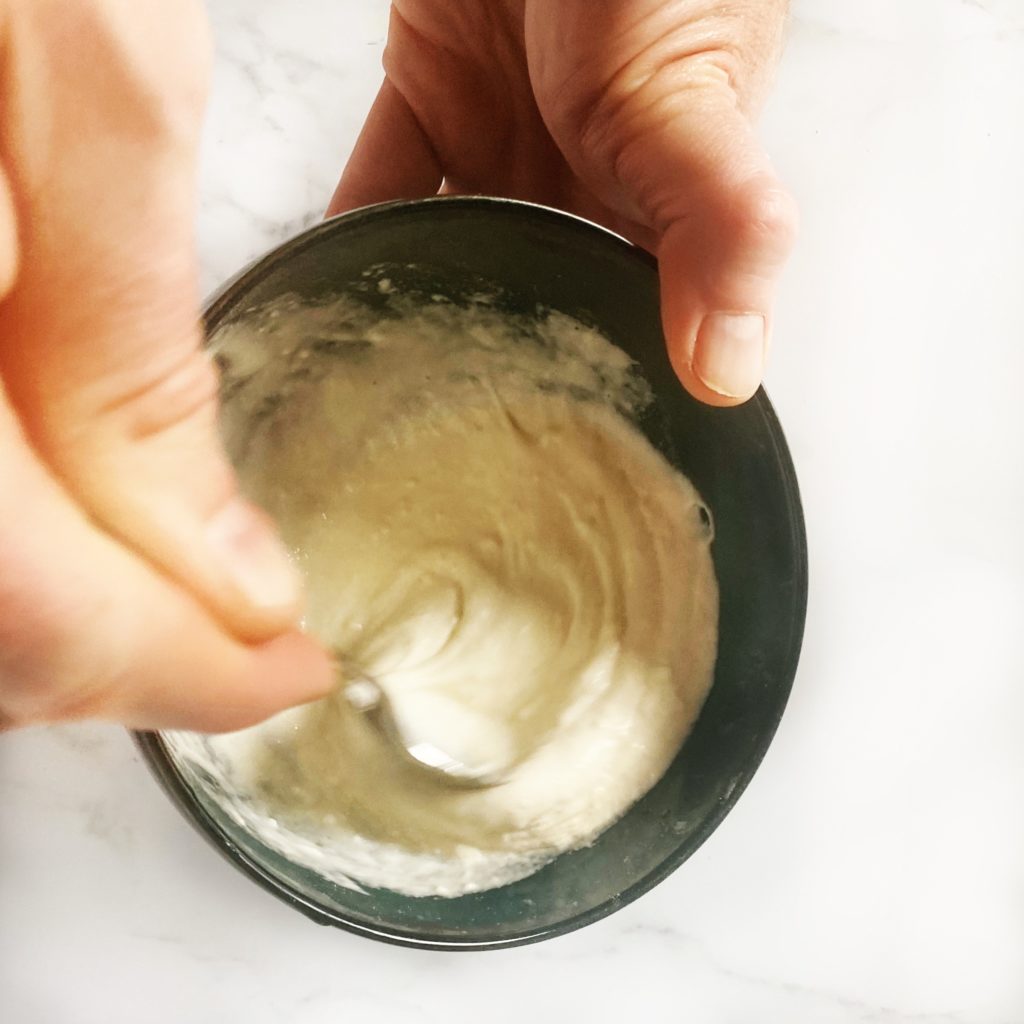
Once the buns have risen, mix about 60g of flour with just enough water to make a paste (aim for the texture of toothpaste). Then spoon the paste into a piping bag and pipe crosses over the buns. You could do other designs too if you like? Signs of spring like eggs, flowers, bunnies or lambs… Then put the buns into a preheated oven at 200C (fan) for 15 to 20 minutes until the buns are golden brown.
*If the buns are looking a bit dry, spray them with a little water just before they go in the oven. Most of the rise will happen in the oven now so you don’t want them to form a crust before having a chance to rise and get fluffy inside.
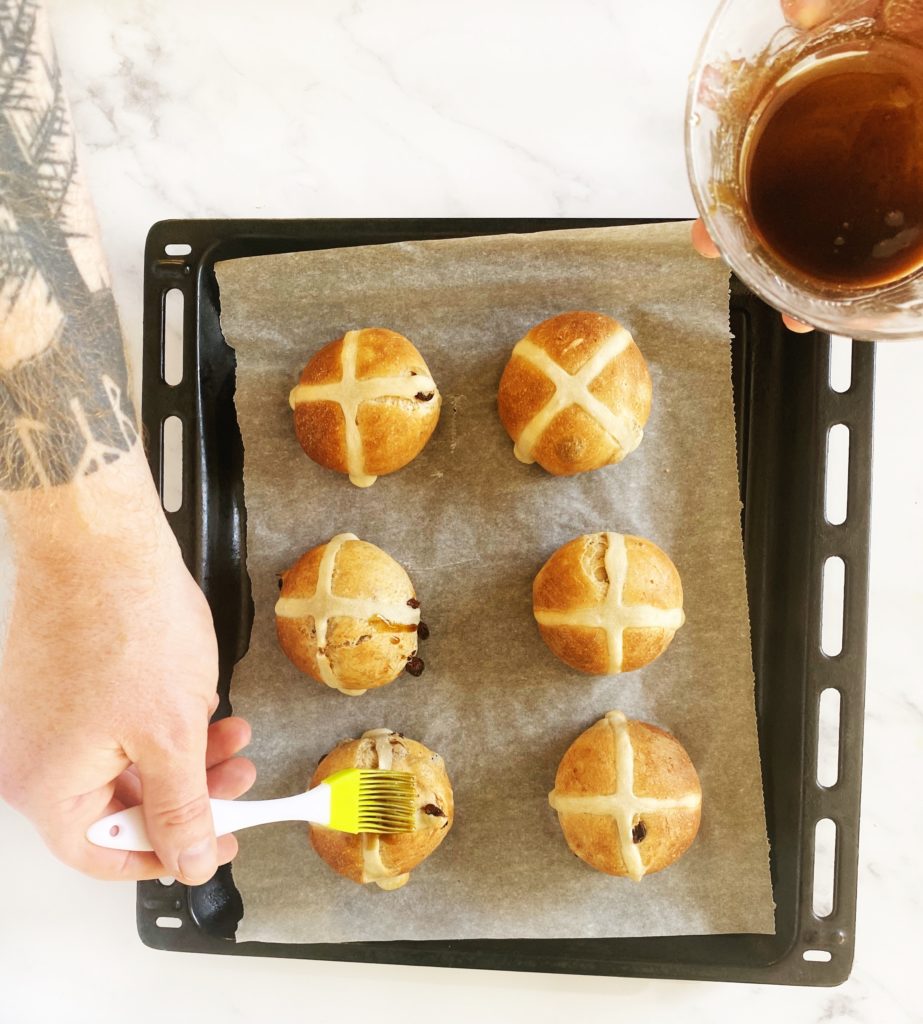
When the buns are cooked, removed them from the oven and brush them with syrup while they are still hot. I simply mix a couple of tbsps of brown sugar with enough boiling water to make a syrup. You could use maple syrup or warmed, sieved apricot jam instead. Then allow them to cool before eating. They are fantastic still warm and fresh from the oven or if you are eating them the next day they are great toasted. Happy Easter!
Easily get 10 portions of fruit and veg into your day with this plant based St Patrick’s Day menu. No green food colouring in sight but lots of vibrant, fun, healthy ideas. Hope you have a fab day off everyone! Let us know what you are cooking to celebrate the day in the comments or over on our friendly facebook page.
Liz x
Breakfast
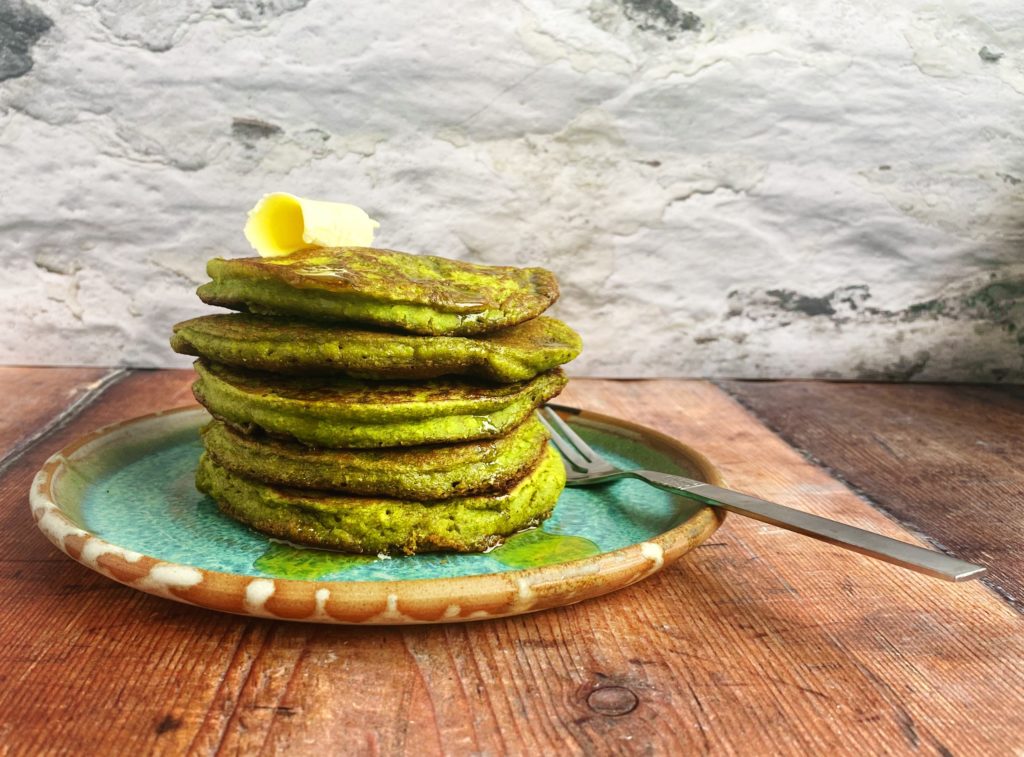
Green Smoothie Pancakes
Is it even St Patrick’s Day if you don’t eat something green? Avoid the food colouring and get out your blender for these sweet (but healthy) pancakes.
Ingredients (makes 10 pancakes)
a couple of large handfuls of rinsed kale (or spinach)
Put all the ingredients except the butter and maple syrup into a smoothie maker and blend until smooth.
Heat a non-stick frying pan to medium then melt some butter and fry the pancakes in small batches for a few minutes on each side until cooked through. It’s better to cook them low and slow so that they are cooked through and not too dark on the outside.
Stack them up and serve simply with butter and a generous drizzle of maple syrup or your favourite pancake toppings.
Lunch
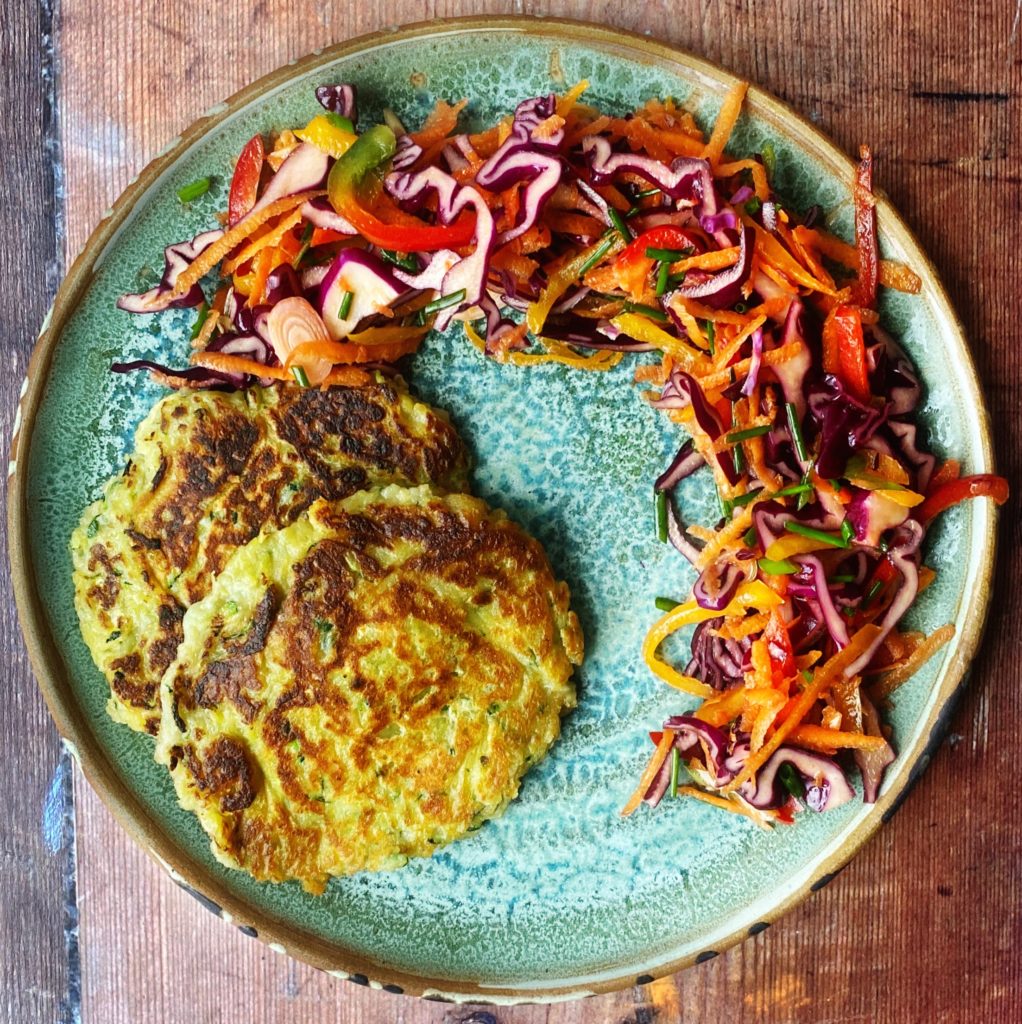
Golden Boxty with Rainbow Slaw
Traditional Irish potato griddle cakes (but with very non-traditional grated courgette in the mashed potato batter instead of grated raw potato) are fried in butter until golden brown. Serve these ‘pots of gold’ with a rainbow slaw of fresh, raw, crunchy veg and a dollop of mayo for the perfect lunch.
mayonnaise to serve (or make your own using my easy aquafaba recipe here)
Method
Start with the slaw. Shred the cabbage, grate the carrot and thinly slice the peppers, spring onions and chives. Mix in a bowl with the juice of half a lemon to start with and the olive oil. Taste and add more lemon juice if you like.
Preheat a frying pan and mix up the boxty batter. Put the mashed potato, grated courgette (or raw potato), flour, milk, vinegar, baking soda and salt in a mixing bowl and stir to combine. You should end up with a batter that’s a dropping consistency. If not, add more milk.
Fry in melted butter on a medium heat for about 5 or so minutes on each side. You can fry them in little fritters or in large rounds the size of the pan. Carefully flip them over when the bottom is golden brown. Add more butter to the pan before flipping if it’s looking a bit dry.
Serve warm with the rainbow slaw and a dollop of mayonnaise.
Supper
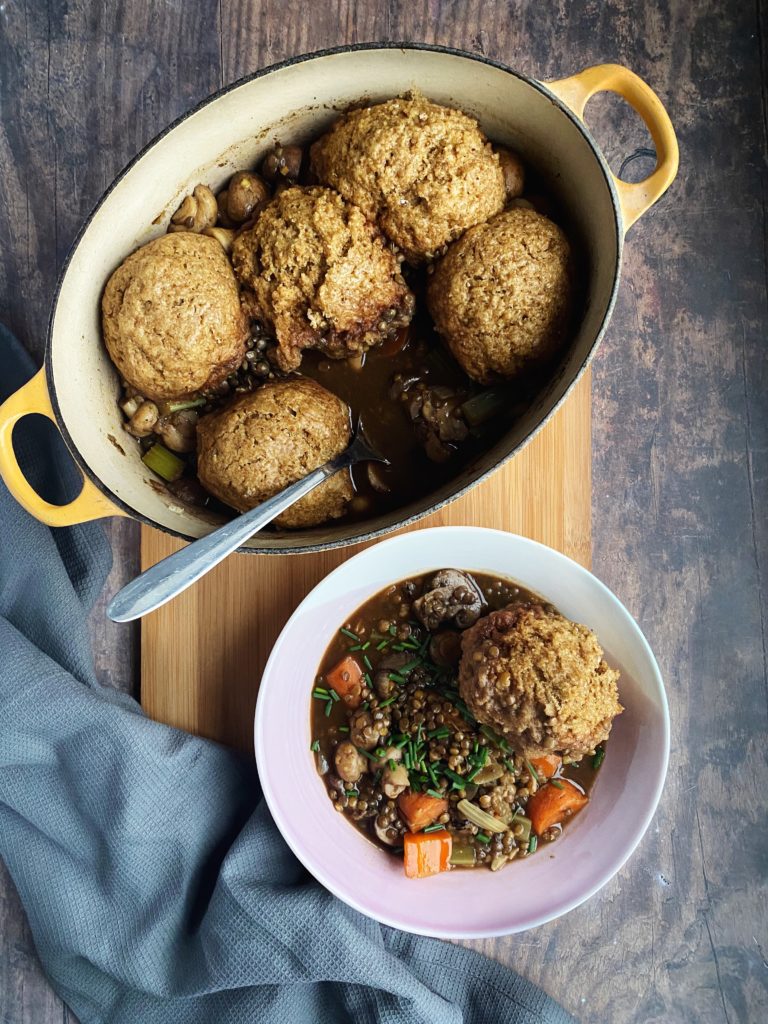
Irish Stew with Soda Dread Dumplings
Meaty mushrooms and bitter Guinness makes this stew rich and delicious and what better way to mop up the juices than with some Irish soda bread? I steam it as dumplings on top here for a hearty one pot supper but you could bake it separately if you prefer and serve it alongside. Looking for a gluten free alternative? Why not make some colcannon (mashed potato with wilted green cabbage or kale and spring onion stirred through) to go with the stew instead and use a gluten free stout in place of the Guinness?
Ingredients (serves 4-6)
2 tbsp sunflower oil
1 large onion
3 carrots
3 sticks of celery
400g mushrooms
4 cloves of garlic
1 mug of green lentils
1 stock cube
1 can of Guinness
2 tbsp dark brown sugar (optional – to counteract the bitterness of the Guinness)
salt and pepper to taste
chopped chives to serve
500g flour (I like 250g plain and 250g wholemeal)
1 tsp salt
2 tsp bicarbonate of soda
300ml oat milk
2 tbsp apple cider vinegar
2 tbsp sunflower oil
Method
Get a large pot on the hob and heat it to the highest setting.
Roughly dice the onion and add it to the pot with 2 tbsp of sunflower oil.
Roughly dice the carrots, celery and mushrooms and add them to the pot next.
Stir occasionally and allow the vegetables to take on some colour and caramelised flavour for around 10 minutes. Then peel, chop and add the 4 cloves of garlic.
Rinse your mug of green lentils and add them to the pot with the can of Guinness, the stock cube and an additional mug of water. Season the stew with salt and lots of black pepper. Give the broth a taste and add some brown sugar to counteract the bitterness of the Guinness if needed.
Then let the stew come up to a simmer while you make the soda bread dough.
Measure the dry ingredients (the flour, salt and bicarb) into a large mixing bowl and mix well to evenly disperse the bicarbonate of soda and salt. Check for lumps and sort them out now before you add the wet ingredients.
Measure the wet ingredients (the oat milk, oil and vinegar) into a measuring jug and give it a stir. This is the plant based alternative for the traditional buttermilk in the recipe. Then add the wet ingredients to the dry and stir well with a wooden spoon to form a rough dough. No need to knead, just stir well to ensure there are no dry, floury bits in the dough.
Use wet hands to form 6-8 balls of dough and place them carefully in the top of the simmering stew. Put the lid on the pot, make sure it’s turned down ow and allow the stew to simmer an the soda bread to steam for about 20-30 minutes.
Check that the lentils are cooked through then serve the hot stew and dumplings with chopped chives on top.
Dessert
Mint Choc Chip Ice-Cream
This ice cream is vibrant green, creamy and sweet…but made with peas and bananas! Don’t be put off by the healthy ingredients, blended frozen banana is a creamy revelation and peas are naturally so sweet. It’s especially good if the banana is frozen when super-ripe. If you eat through your bananas from your weekly delivery then this recipe is a good way to use up those reduced over-ripe bananas at the shops. A win-win for you and for the epic food waste problem the planet is facing. I’ve used cacao nibs instead of chocolate chips because I love their bitter, dark chocolate flavour, but do feel free to substitute with real chocolate chips…especially if you are serving this to children.
optional sweetener of your choice to taste (eg maple syrup)
and a tbsp or so of cacao nibs (or sub with chocolate chips)
Method
Peel and chop as many over-ripe bananas as you like. About one per person. Freeze them overnight on a tray until solid (with gaps between the pieces otherwise they’ll all freeze together and be very difficult to blend).
You’ll need a strong food processor with an S blade attachment. A food processor works better that a jug/smoothie blender for this.
Put the frozen banana chunks and frozen peas into your blender along with fresh mint leaves to taste.
Blend into a frozen, crumbly texture then stop the blender, scrape down the sides and blend again until vibrant green and creamy.
Taste the mixture and add a sweetener or more mint leaves if you like and blend again.
Scrape the nice cream out into a tub and stir through cacao nibs or chocolate chips. Scoop into balls and serve (they will be quite soft at this stage so for quickly) or move to the freezer to firm up until you are ready to serve.
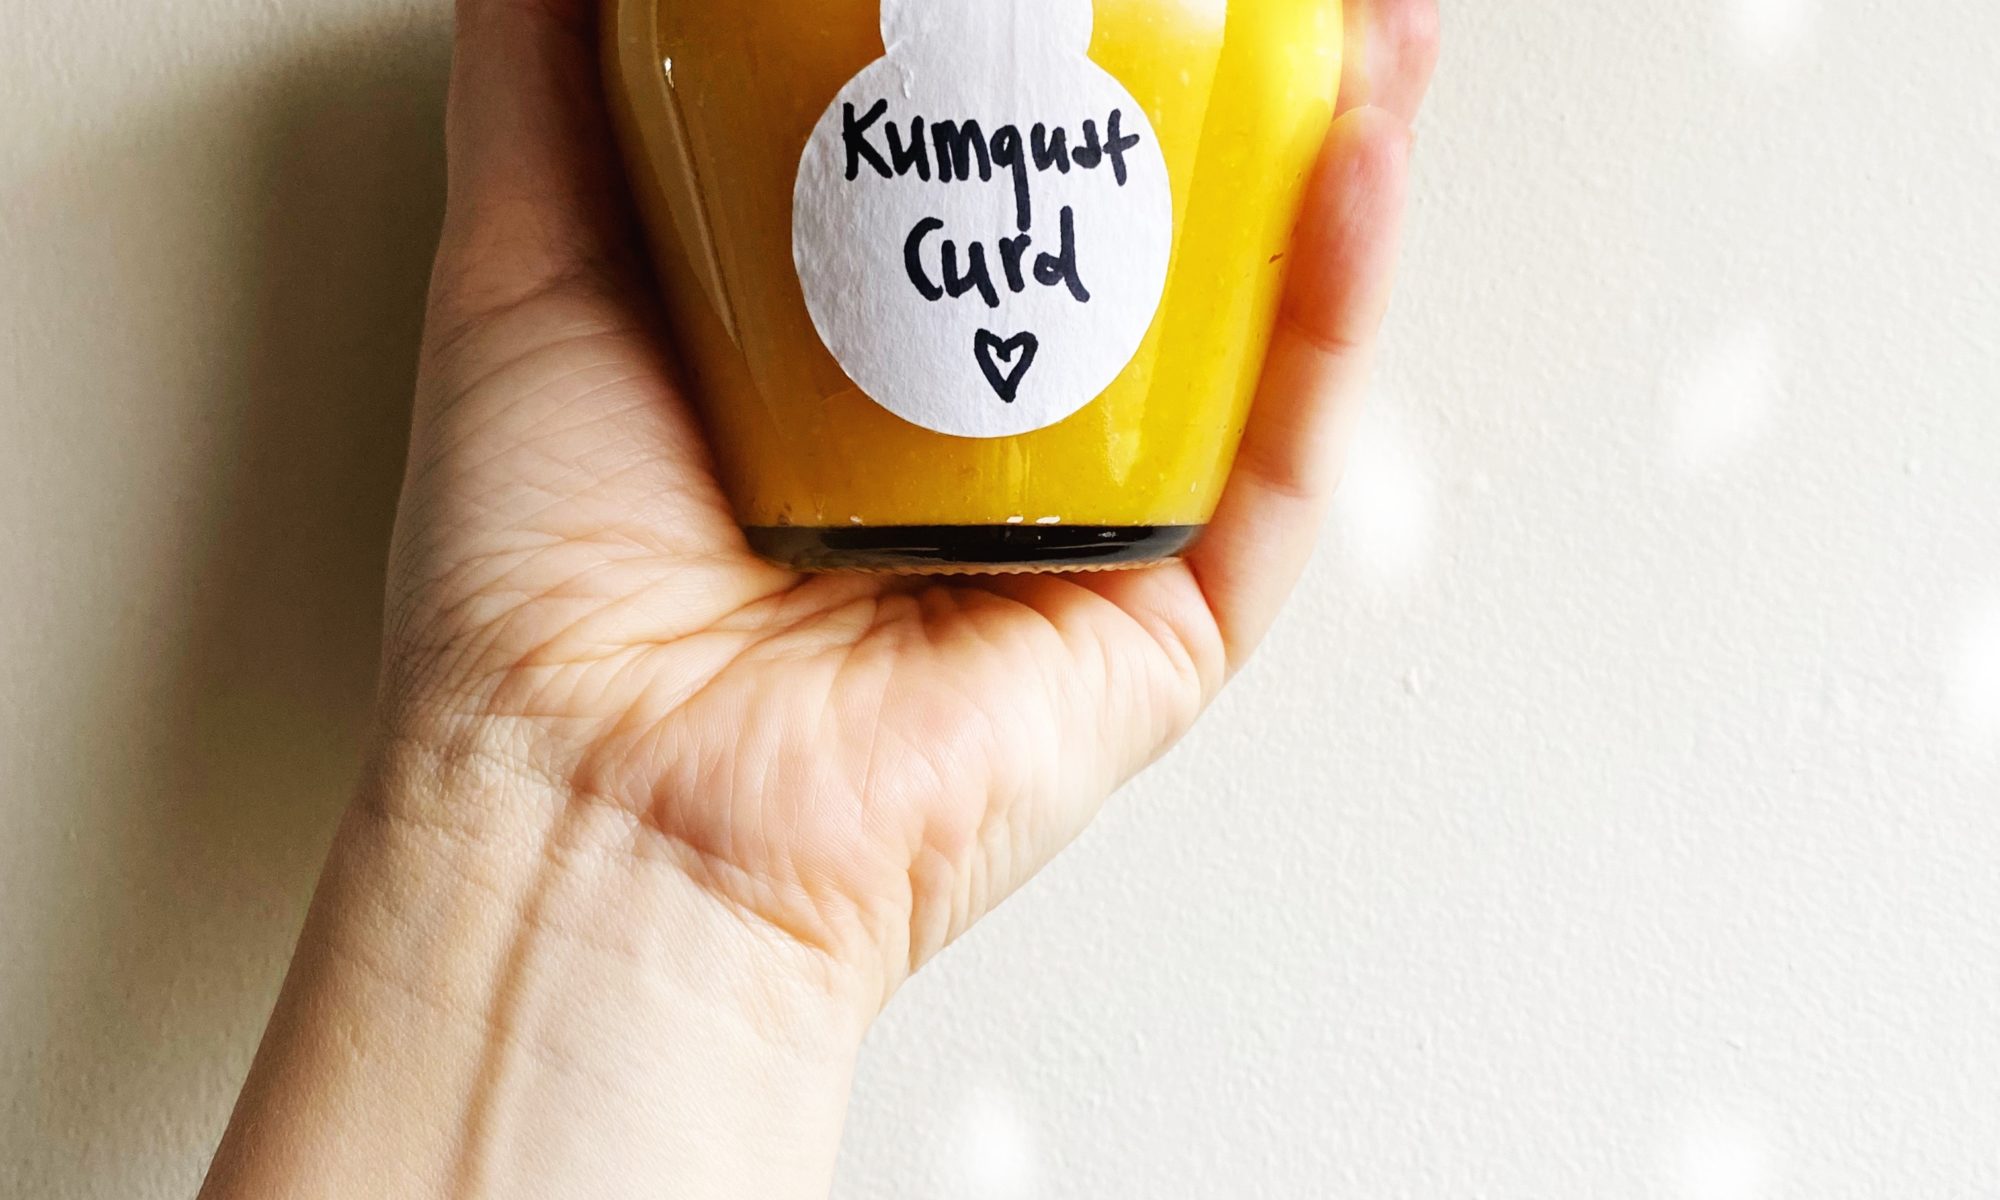
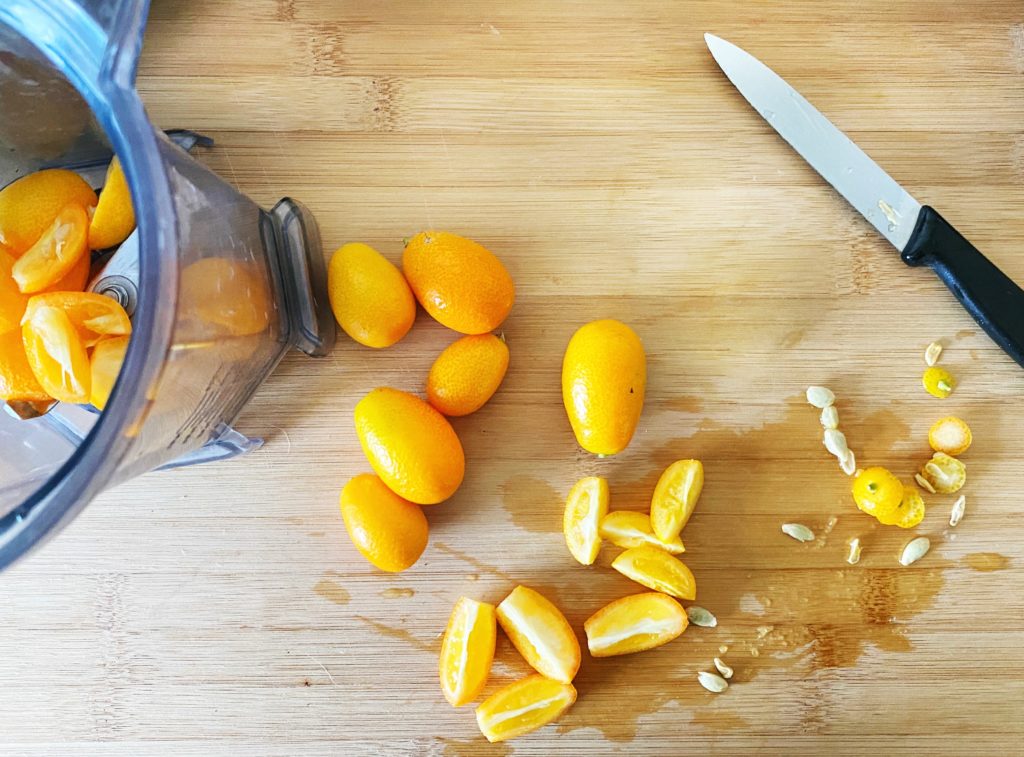
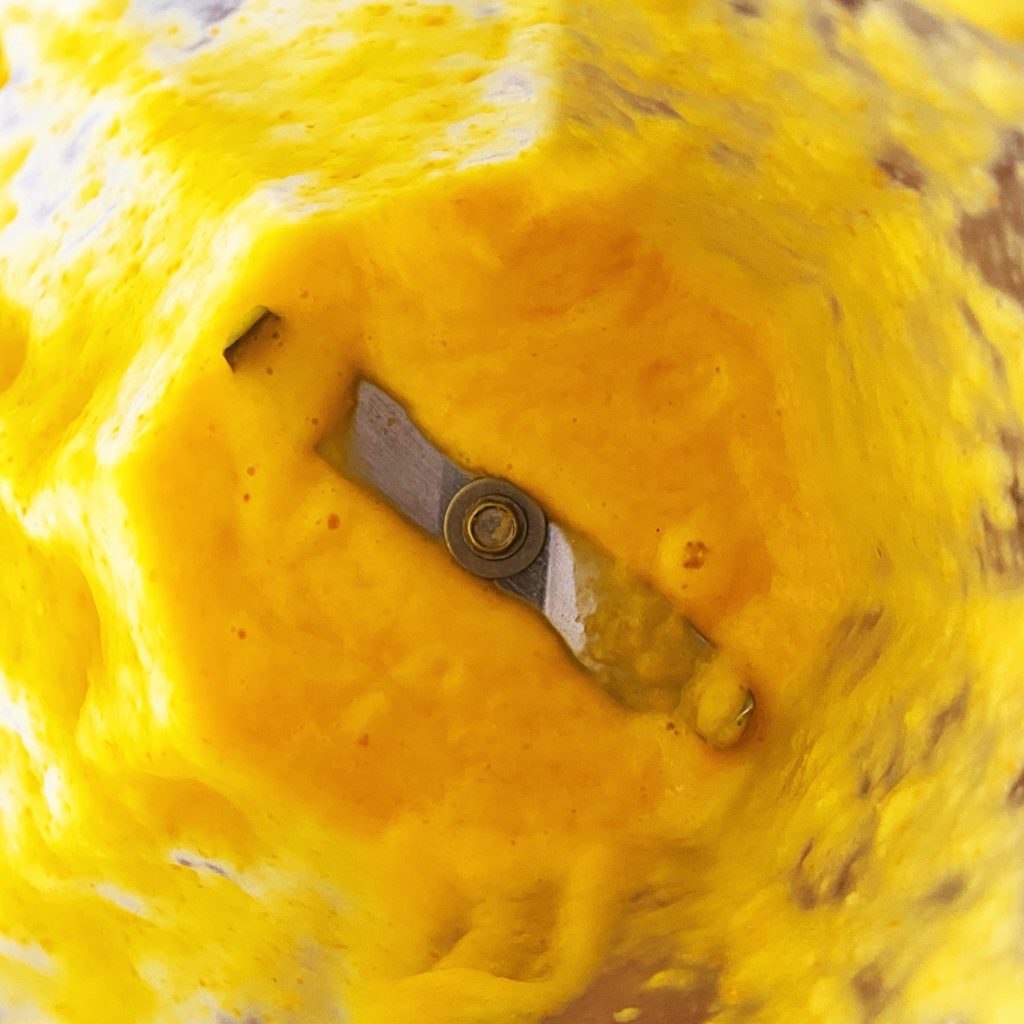
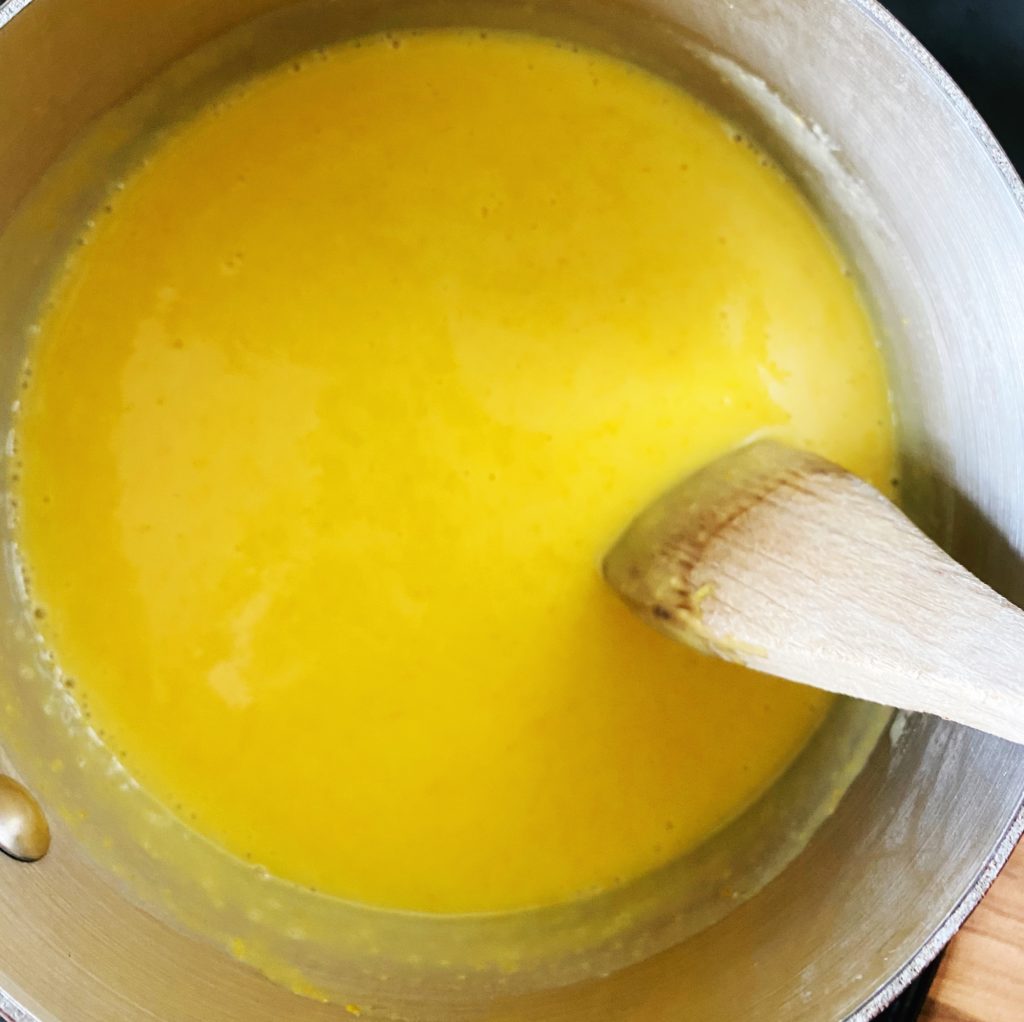
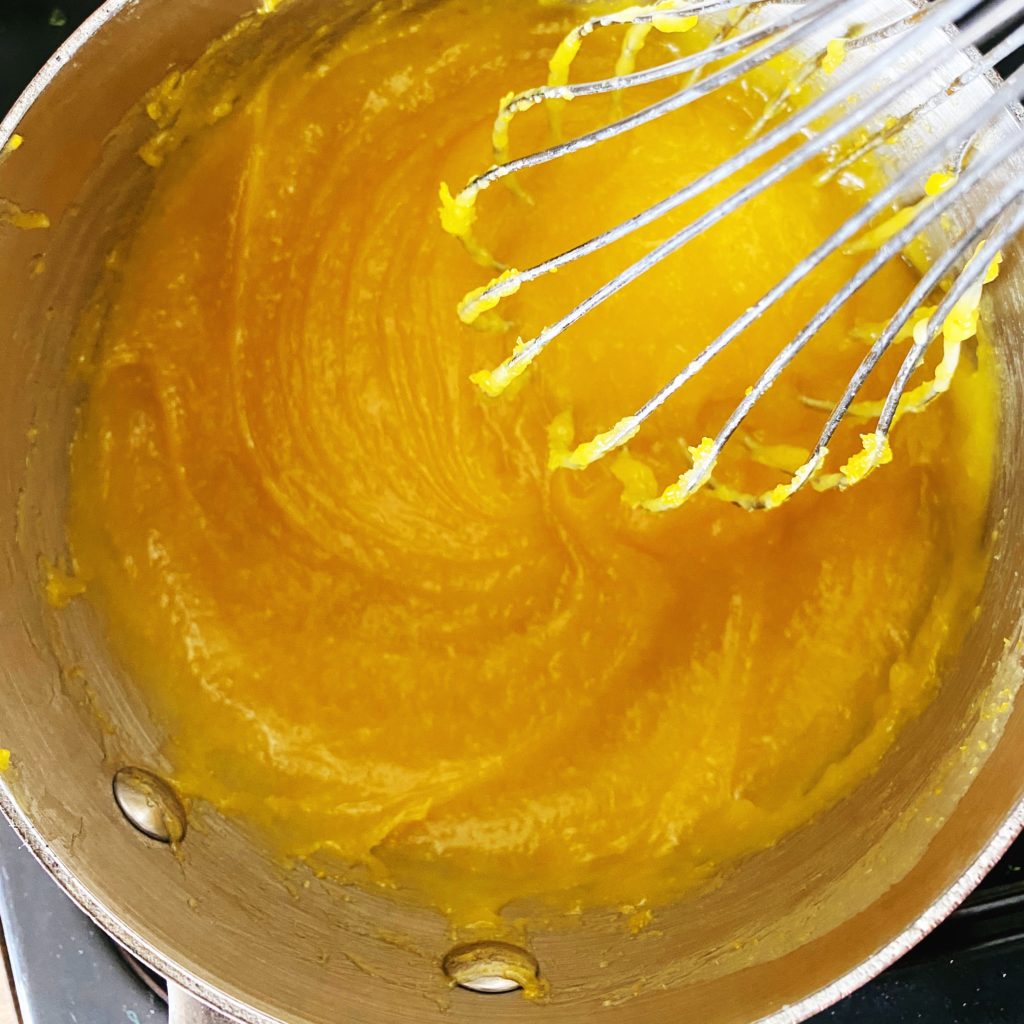
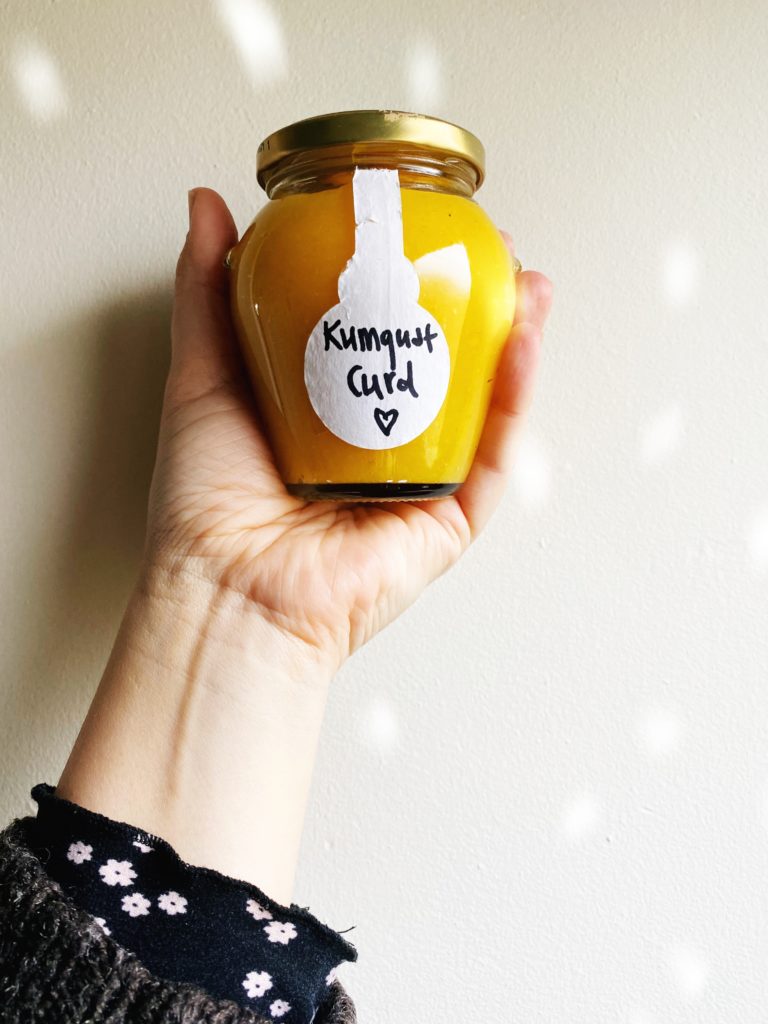
Well here’s a tongue twister if ever I did see one. Kumquat Curd. Try say that ten times in a row without messing up! Have you ever eaten a kumquat? They have very sweet skins and very sour middles. I love using them for curd rather than lemons because all you need to do is remove the seeds, the rest of the fruit can be blended up and simmered into this perfect preserve. No need for zesting and juicing.
This stunning little curd is delightfully sweet and tangy and so simple to make. The perfect use for this tiny citrus. I love curd on toast as an alternative to jam but it also makes the best filling for a cake or topping for a tart. Curd is great sandwiched between shortbread biscuits or rolled up in pancakes. I think a sunny jar of kumquat curd makes the perfect Mother’s Day gift, especially if accompanied by a stack of pancakes in bed and a vase of daffodils!
Illustration from my cookbook which is available to add to your order here.
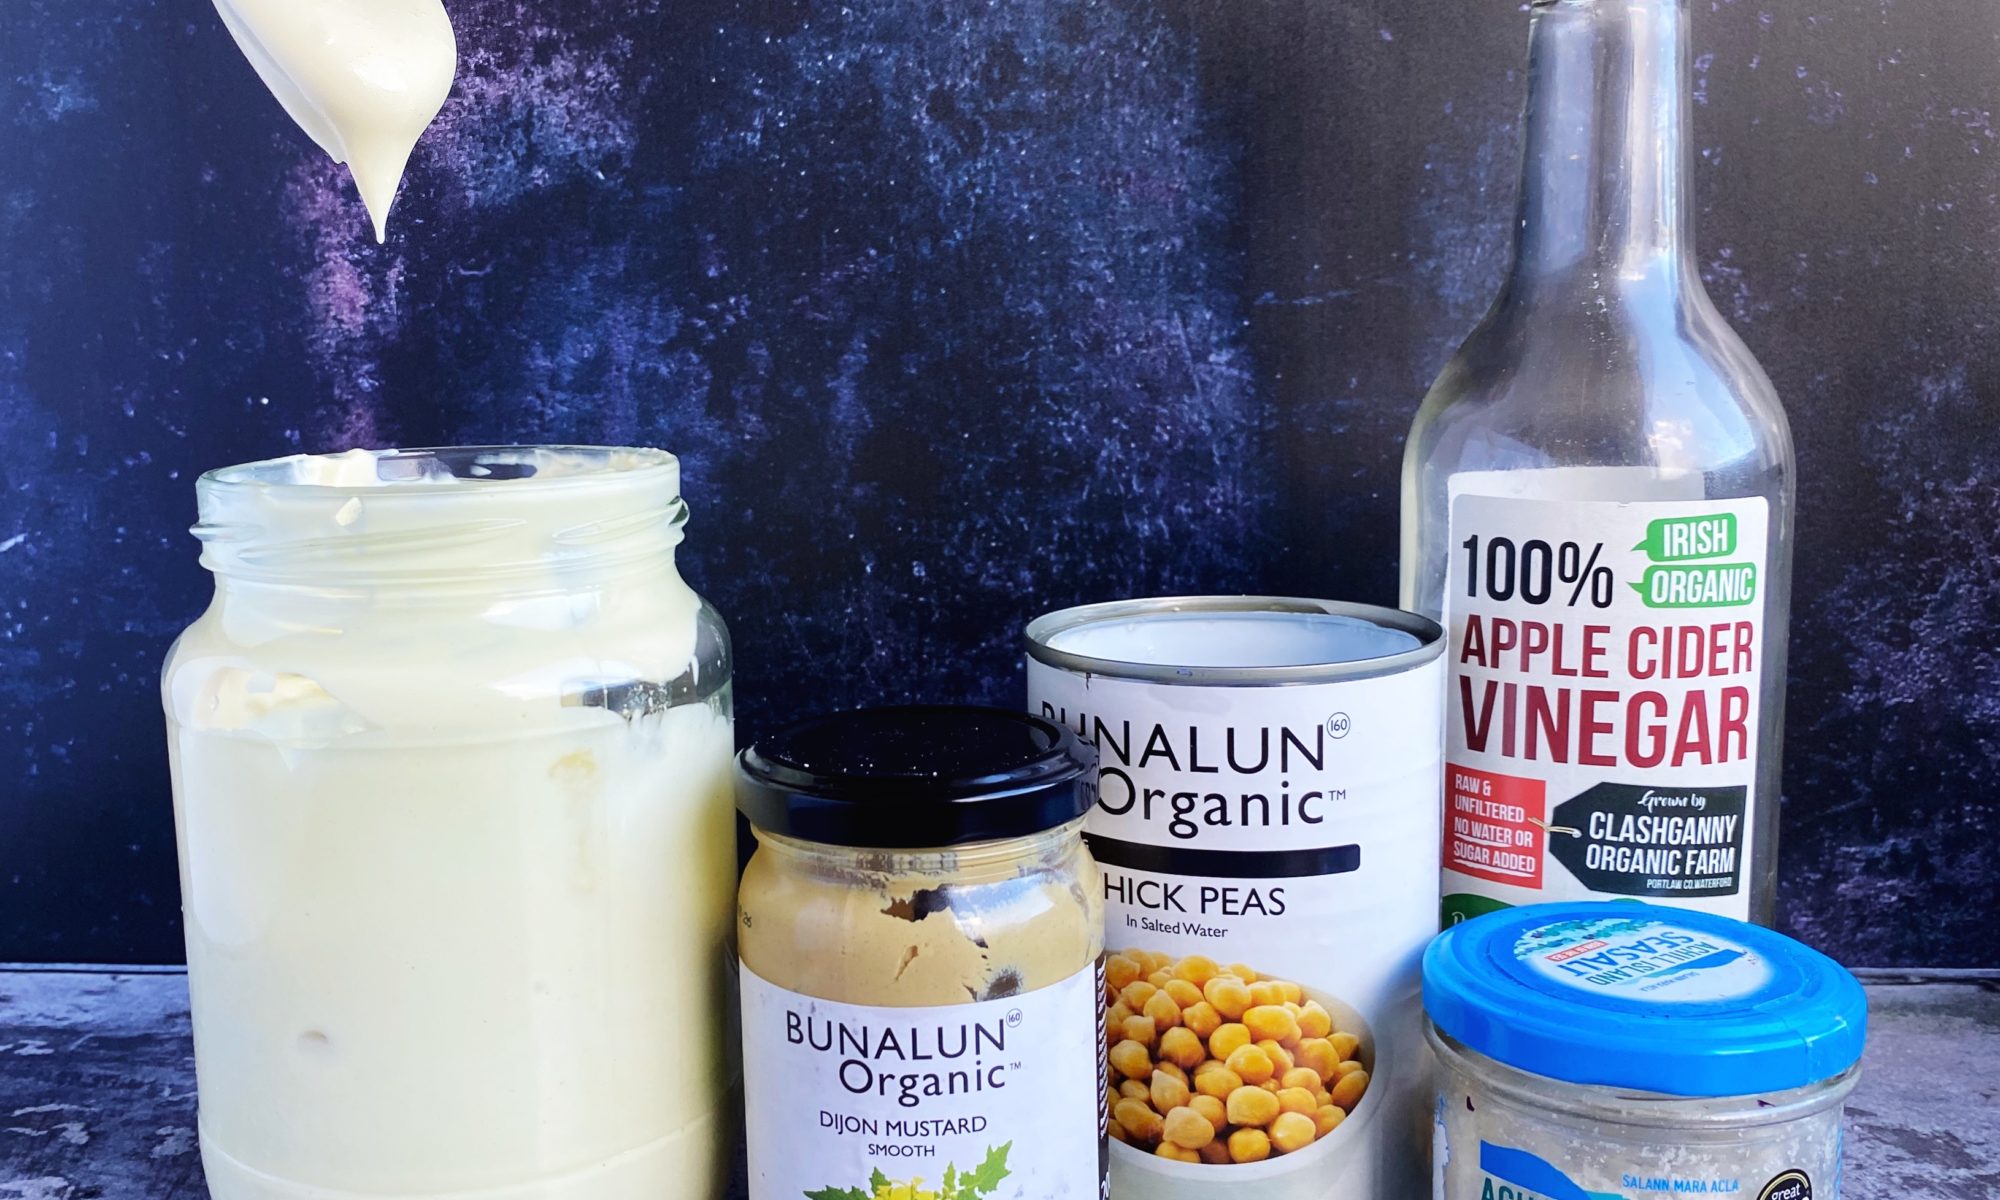
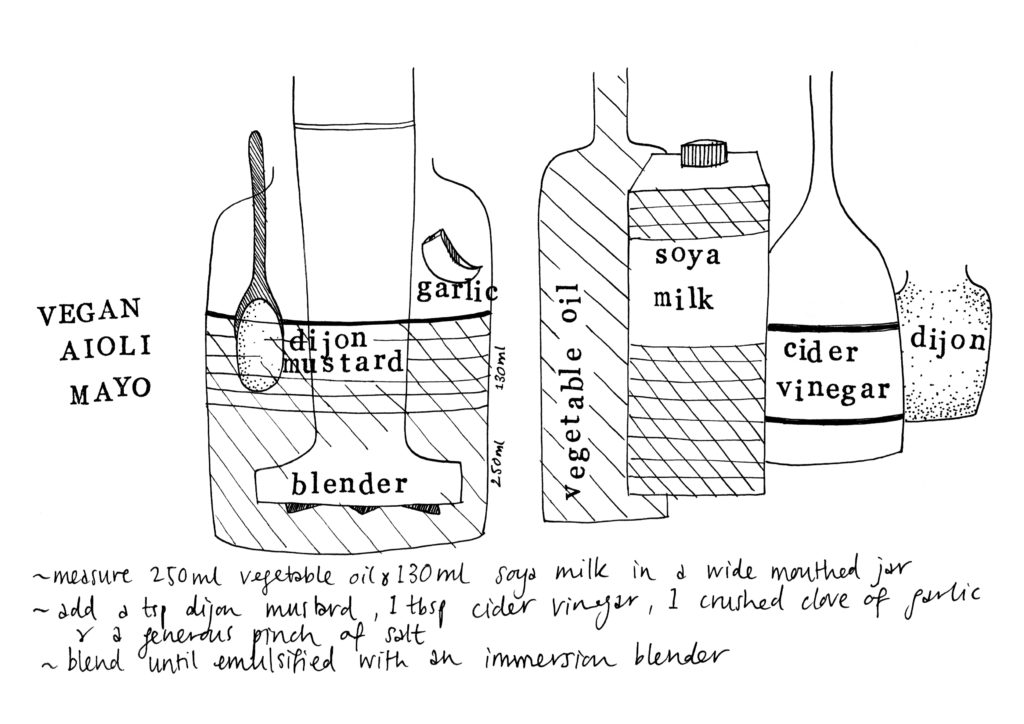
Organic, egg-free mayo is so simple to make with common store-cupboard ingredients. The easiest way is with soya milk as per the illustrated recipe above from my book. But there’s another way if you are intolerant to soy or don’t have soy milk in the house. Aquafaba is the viscous liquid result of boiling beans, the most reliable source is from a tin of organic chickpeas, and it’s truly magic stuff. It makes a brilliant egg white replacement and I use it in lots of cake recipes like this clafoutis. It is used as an emulsifier in this mayonnaise recipe and it works perfectly.
Let us know in the comments or over on our facebook group if you try this recipe. We love to see our recipes recreated in your homes. Liz x
*Get the ingredients from our shop. Just click on any of the bold words and you’ll be taken right to the product so you can easily add it to your cart.
Measure the aquafaba, mustard, salt, vinegar and optional flavourings into a jar or jug in which your immersion blender will fit.
Blend with the immersion blender until frothy.
Add the oil in a slow steam whilst continuing to blend. You may not need to use it all. Stop once your mayonnaise is thick, creamy and glossy.
Taste and adjust the seasoning as you wish with more salt/mustard/vinegar.
Keep refrigerated and use within 2 weeks.
Serving Suggestions:
Add to sandwiches, burgers and wraps.
Stir through shredded cabbage and carrot to make homemade coleslaw.
Dunk potato wedges in it or other roasted veg chips.
Make potato salad. Mix through boiled potatoes, carrot and beetroot with chopped dill and spring onions.
Saffron mayo is especially good with patatas bravas. Roast bite size chunks of potato with olive oil, salt, pepper and smoked paprika. Make a simple tomato sauce (simmer sautéed onion and garlic with a tin of chopped tomatoes and seasoning) and serve the potatoes in small tapas bowls on top of the sauce with chopped parsley and saffron mayo.
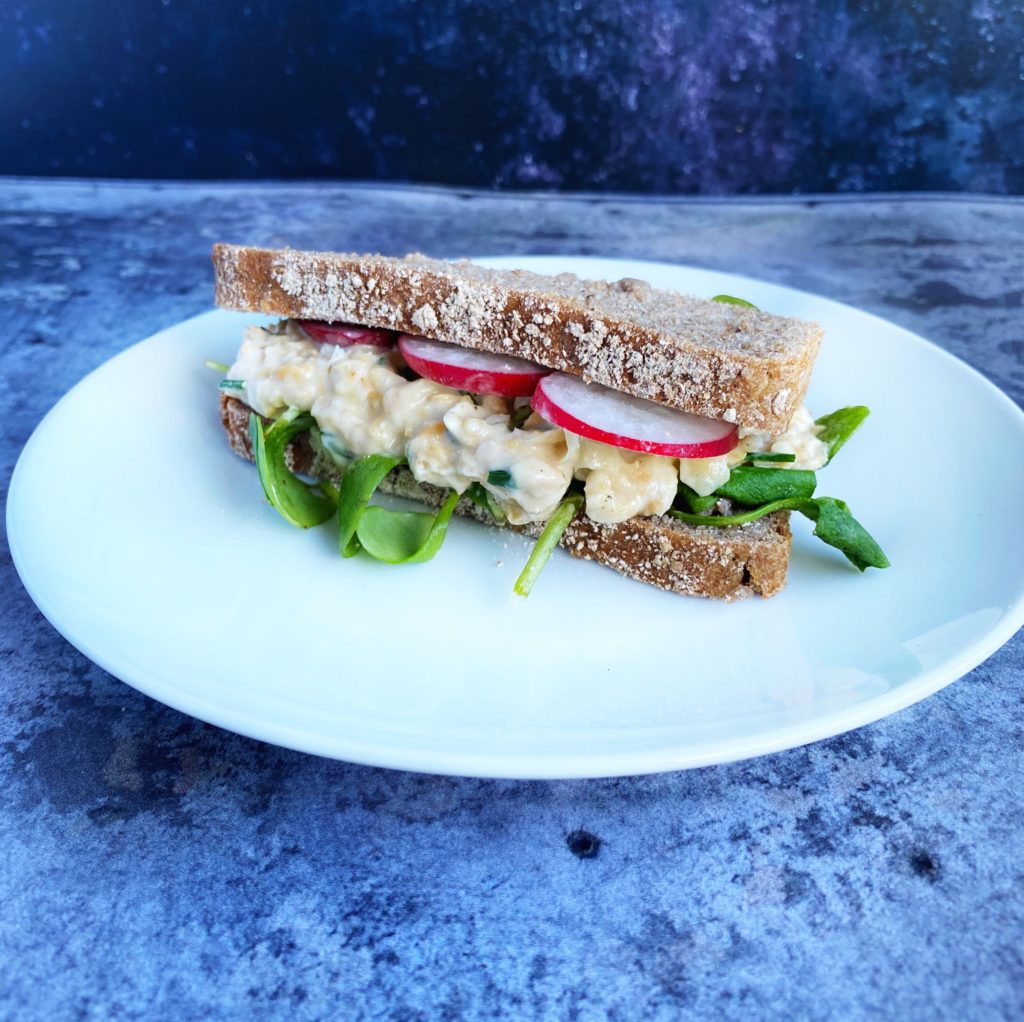
Make a vegan ‘egg mayo’ sandwich. Simply mash the chickpeas from the tin, then stir through some mayo and chopped chives or spring onions, black or white pepper and then pile between two slices of bread with some watercress, rocket or our seasonal winter purslane. It’s great with some crunchy, peppery radish slices too! Get that eggy flavour by sprinkling in some sulphurous kala namak (aka black salt).
Bring a little warm sunshine in your winter kitchen with beautiful, organic blood oranges from Italy.
Blood oranges are in season now and they are unmissable! Add them to your order here to make the most of their short season. They are sweeter and more perfumed than regular oranges and our organic ones are wax free. Zest to make the most of the bright, citrus flavour in their orange oil scented skin before slicing. Stir the zest through this pancake batter or through the polenta cake batter in the recipe below.
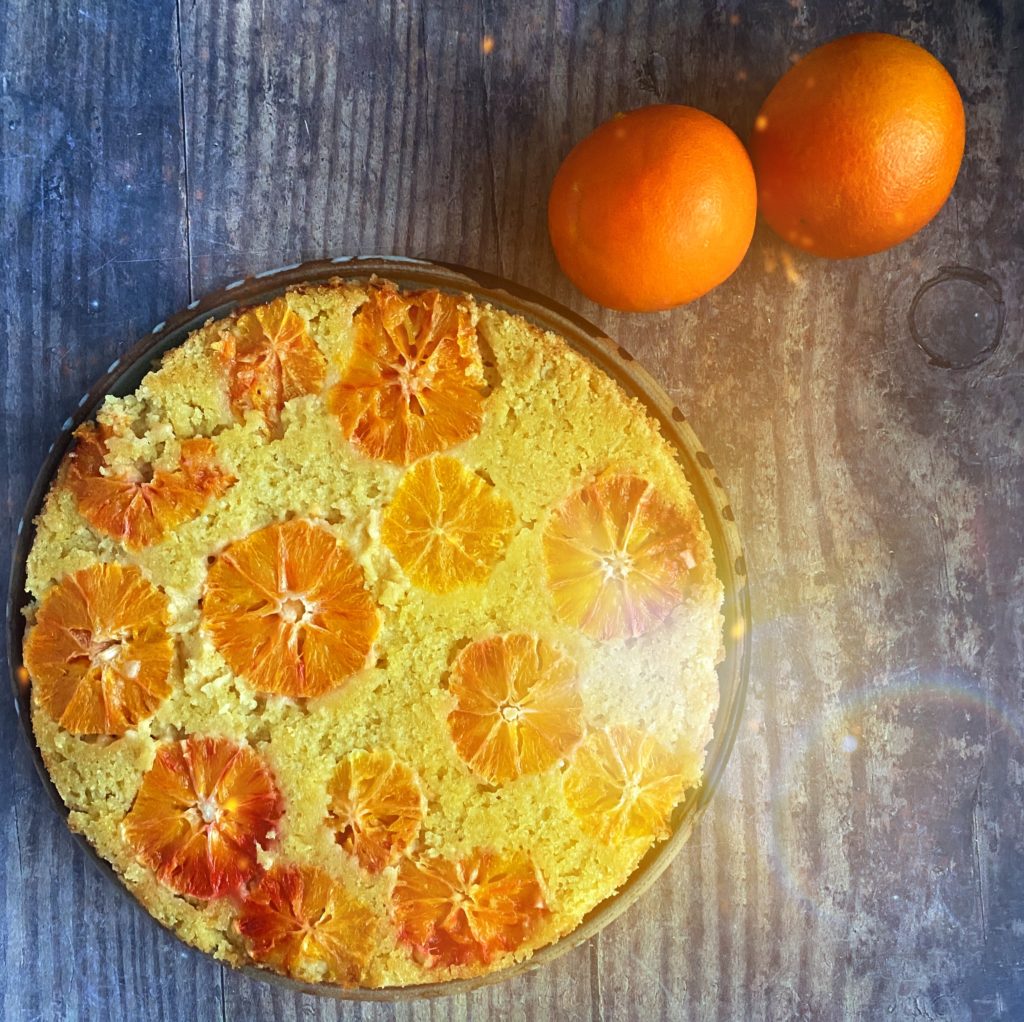
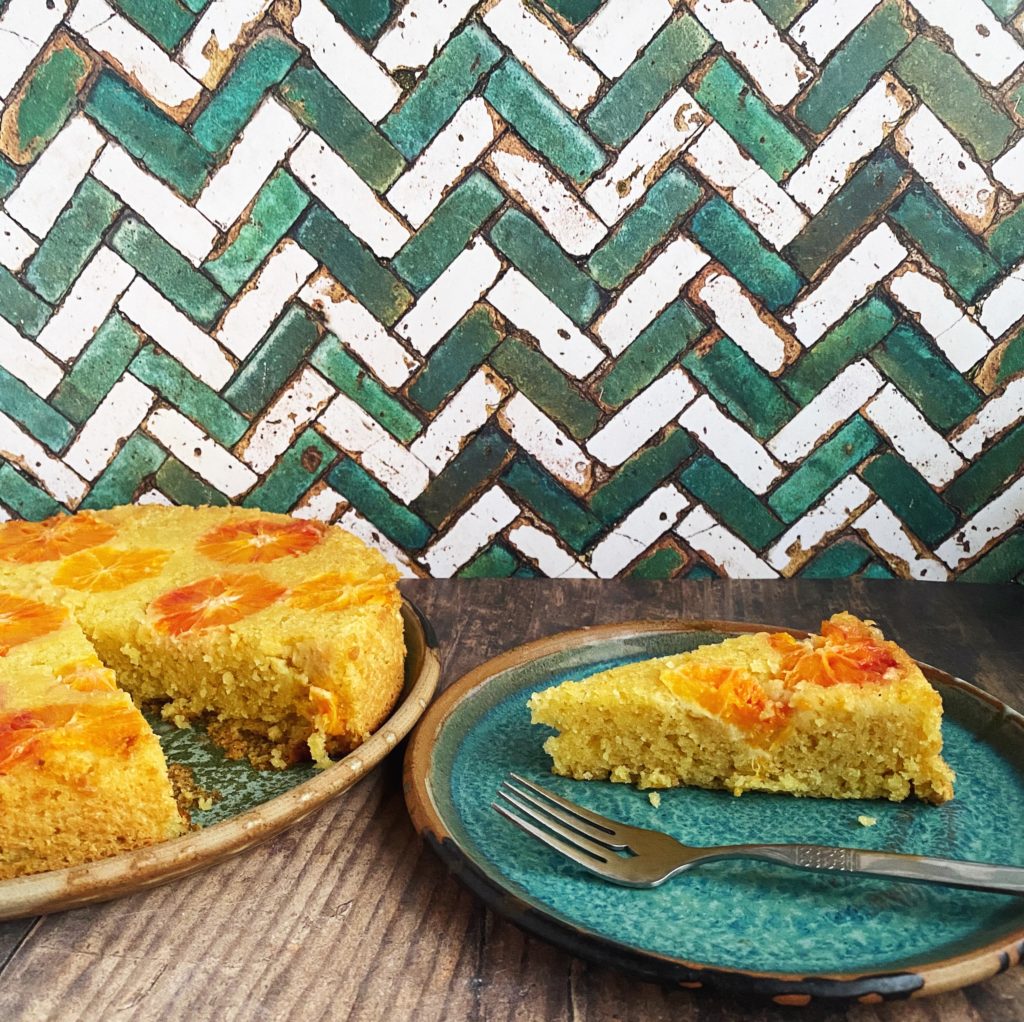
Polenta cakes are naturally gluten free and go so well with citrus flavours. They are moist and moreish with a gorgeous, sunny crumb…possibly my favourite type of cake! This is a riff on a classic lemon polenta cake recipe which is normally baked, then soaked with a zingy lemon syrup. In this recipe, instead of the lemon syrup, I have placed juicy slices of blood orange in the bottom of the cake tin to make the most of their stunning, ombre blush.
Let us know in the comments of over on our facebook group if you make this cake. I’d love to see your photos. Liz x
Preheat the oven to 175C. Butter a 23cm cake tin with the tbsp of butter (preferably a loose bottomed one, but a regular cake tin is fine too).
Zest the oranges into a mixing bowl. Then trim a thin slice off the top and bottom of the oranges, and using a small, sharp knife, slice off the skin and white pith. Then slice the oranges into discs and arrange them in a neat layer in the bottom of the buttered cake tin.
Measure the rest of the ingredients into the mixing bowl with the orange zest and whisk until smooth.
Pour the batter over the layer of orange slices, even it out with a spatular and bake for 30 minutes.
Allow the cake to mostly cool in the tin. Then run a knife around to loosen it from the sides. Put a plate over the cake tin and turn it upside down. Carefully lift the cake tin off the plate and you should be left with a beautiful upside down cake. You may need to pop bits that stick to the bottom of the cake tin back onto the cake.
TIP: if you don’t have ground almonds you can easily make your own. Just blend whole or blanched almonds in a food processor until they resemble a rough flour.
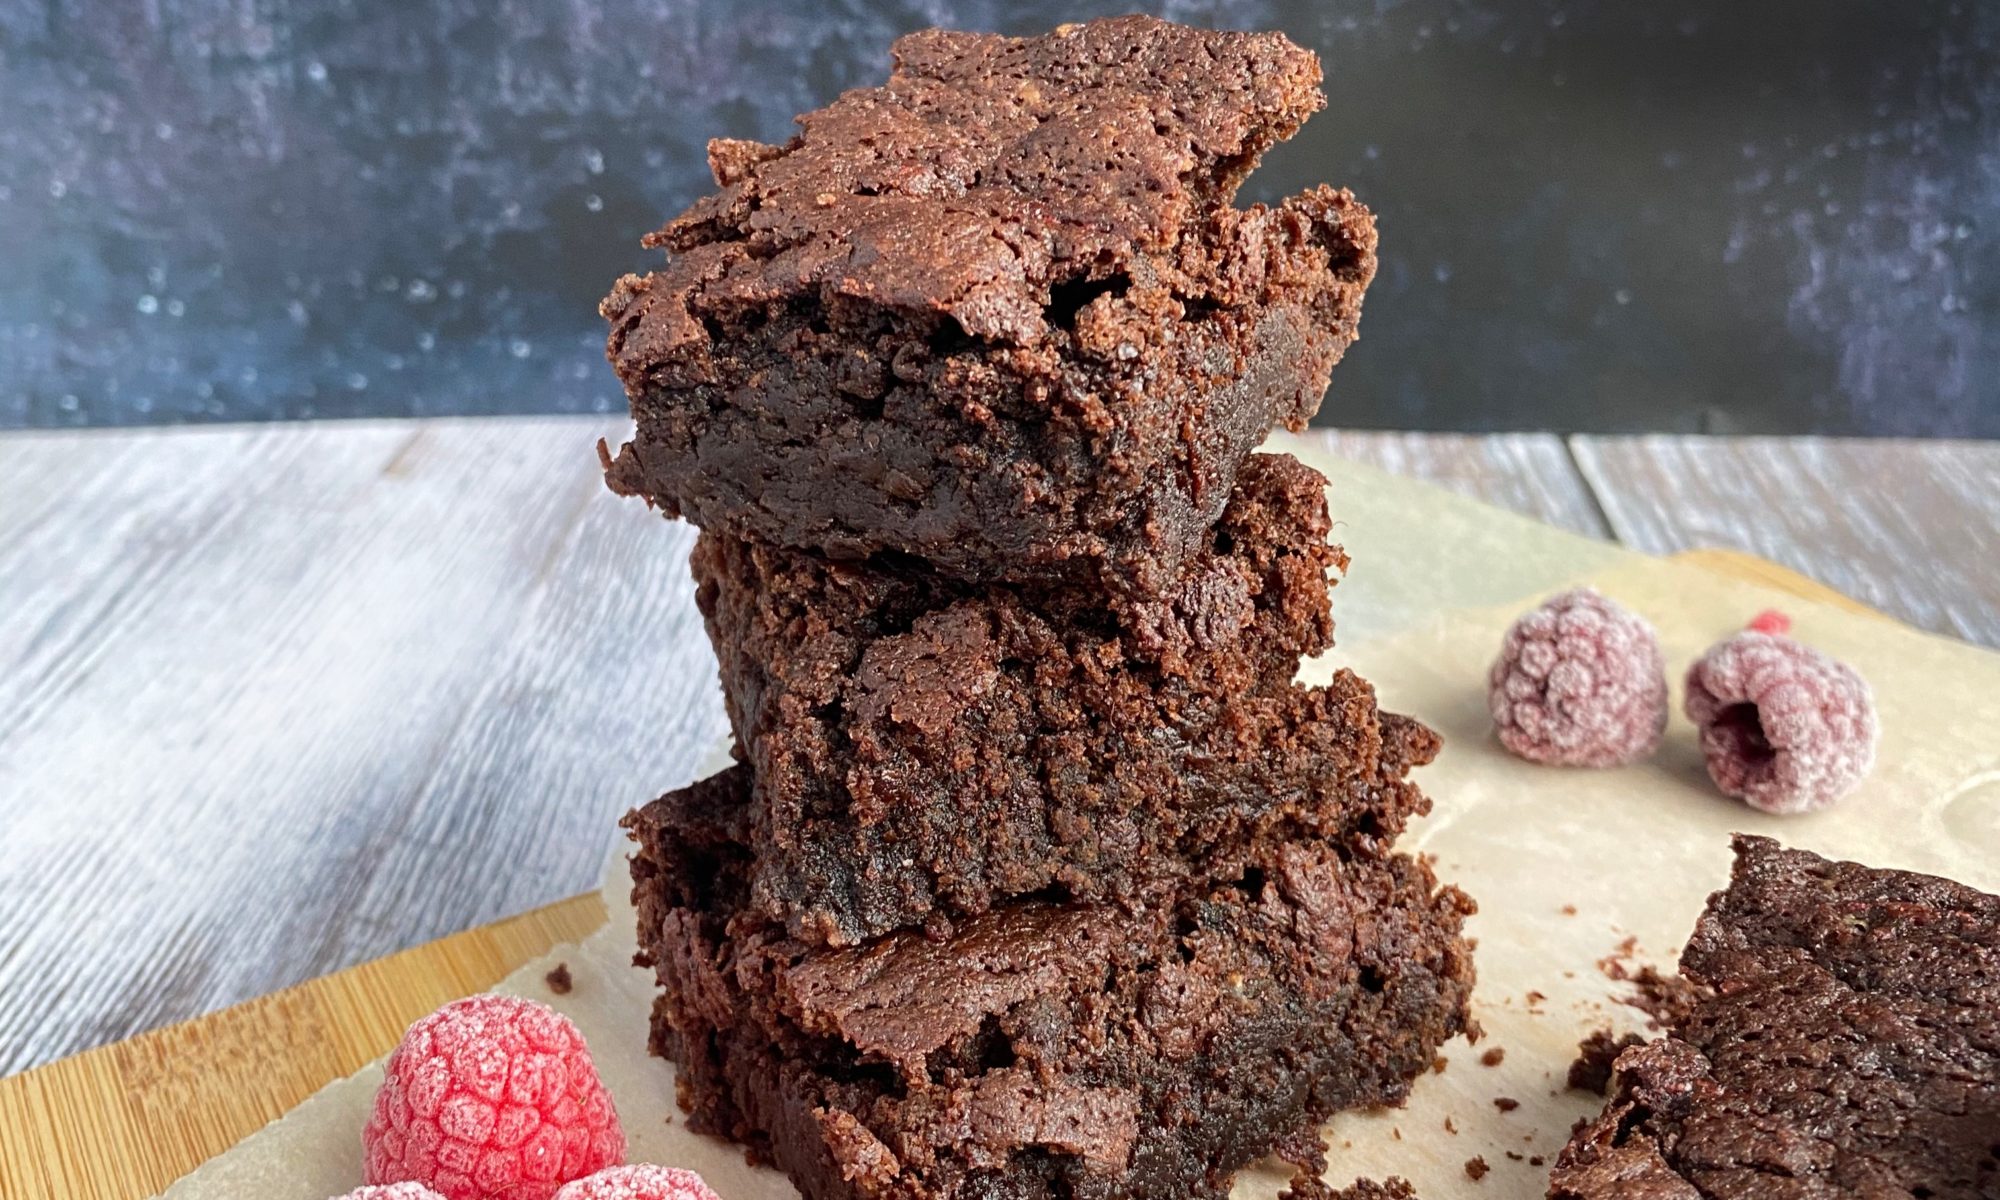
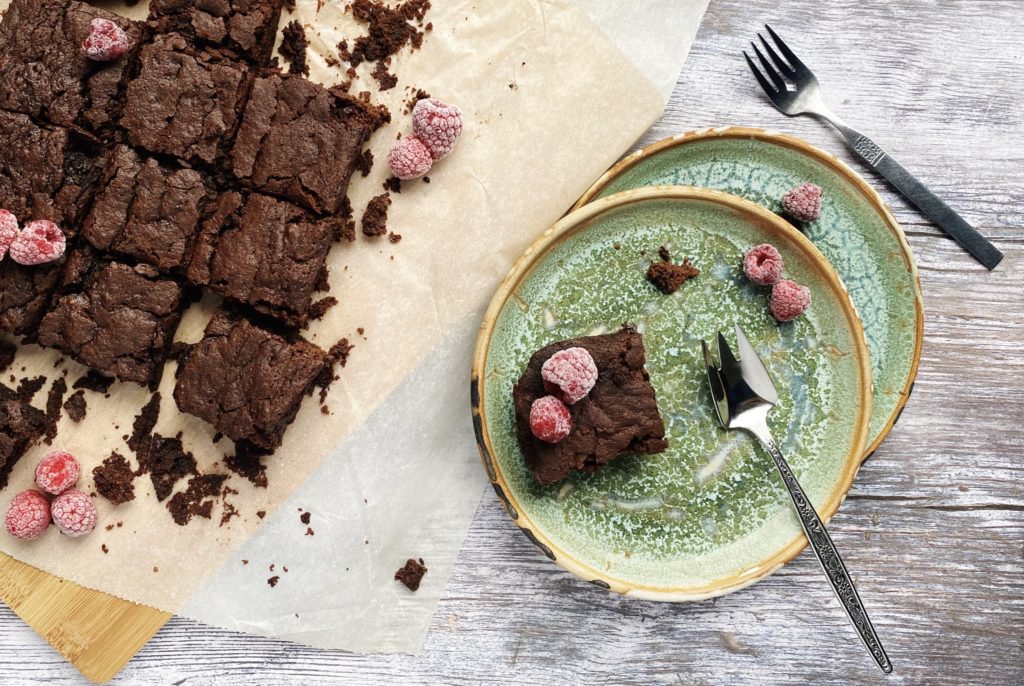
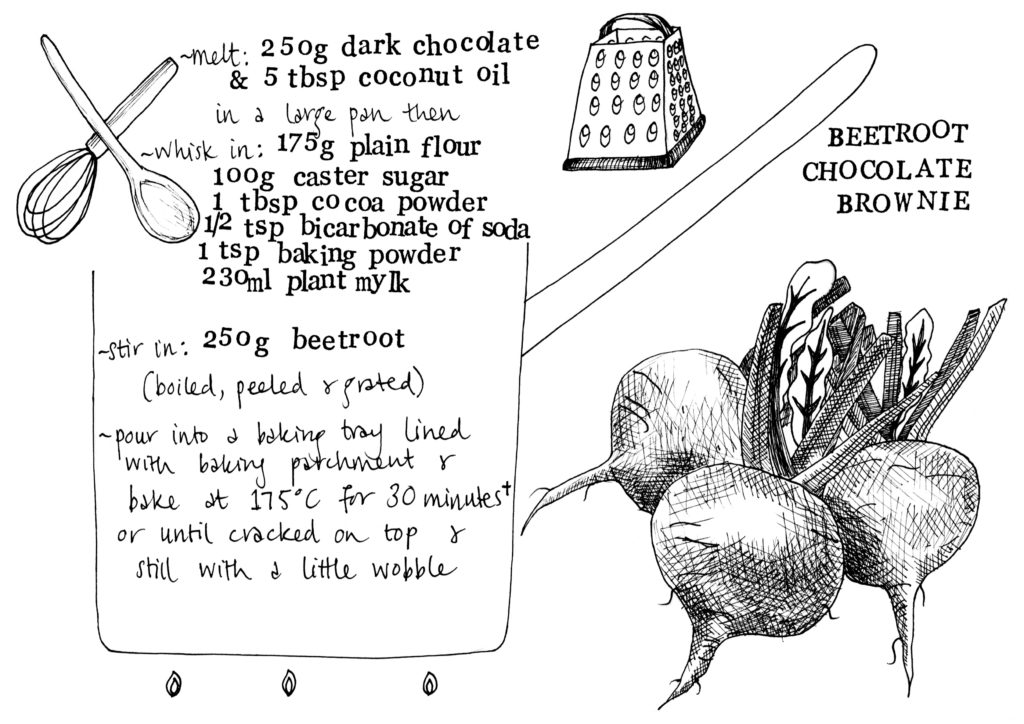
Beetroot in a brownie is nothing new, but it’s still a delicious way to use up those beets in your box – especially if you live in a house of beetrootphobes. Beetroot keeps the brownies extra moist and although you can’t taste them, their earthy sweetness brings an extra quality to the overall flavour that just works really well. My recipe is egg and dairy free and totally adaptable. Leave out the beetroot if you like or replace it with something else. How about some raspberries or cherries? Or some walnuts or hazelnuts? A swirl of peanut butter and some raspberry jam? Let us know over on our community facebook group if you come up with a brownie addition that you’d like to share. Liz x
The recipe illustration from my book which is available to add to your fruit, veg and grocery order here.
Boil about 270g of beetroot (usually around 3 medium sized ones) in plenty of water until cooked through. Then allow the beetroots to cool and slip off their skins using your hands or a small, sharp knife. You should be left with around 250g of cooked beetroot.
Pre-heat your oven to 175C and line a baking dish with baking paper (I use a 25x16cm dish).
Weigh out the dark chocolate and coconut oil into a large pan.
Gently melt the chocolate and oil together on a low heat.
Whisk your favourite milk (I love creamy oat milk) into the pan and all the dry ingredients – the flour, sugar, cocoa, bicarb and baking powder.
Grate the cooked, peeled beetroot straight into the pan and stir well with a wooden spoon/spatular.
Scrape the batter into the lined baking dish, level it out ensuring you get into the corners of the dish, then bake it for 30 minutes or so until it is cracked on top but still has a slight wobble.
Allow the brownie to cool & firm up in the dish to make it easier to slice, you can even chill it in the fridge overnight.
Then carefully move it onto a chopping board, slice it into portions and enjoy!
Here’s a video of the process if you’d like to watch how I do it.
“Cooking from scratch is the single most important thing we can do…to improve our health and general wellbeing.” – “Eat food, not too much, mostly plants.”
Michael Pollan
At Green Earth Organics, we are on a mission to help you Eat More Veg and Cook From Scratch. These two phrases are the cornerstones of good health, not just for us but for our planet too! Cutting down on processed food, ready meals and animal products and preparing and eating lots more whole, organic, fruit, veg, beans, nuts and grains is not only great for our health, it means less packaging, less harmful emissions from factories and animal farms and a lot less unhealthy, unnecessary ingredients.
With our modern, busy lifestyles, it can seem like too much effort to shop for groceries, fruit and veg and get into the kitchen and cook from scratch after a long day at work. It is easy to just take something out of the freezer and microwave it or pop it in the oven. But you owe it to yourselves to cook from scratch. You are worthy of home cooked, healthy food and it will positively impact the rest of your life. It doesn’t have to be complicated to be delicious and satisfying.
So as well as making it easy for you to get the good stuff straight to your door with our weekly veg box subscriptions, we are starting a new weekly series called ‘4 Ways With…’ This series will showcase a seasonal vegetable or other ingredient and demonstrate four simple ways to prepare or cook it. We want to inspire you and give you the confidence to get into the kitchen and whip up a simple but satisfying meal. Follow us on Instagram or subscribe to our YouTube channel to watch the videos each week. Please feel free to comment and share your favourite seasonal recipes with us and the rest of our community. We love to see what you make from our weekly boxes. Liz x
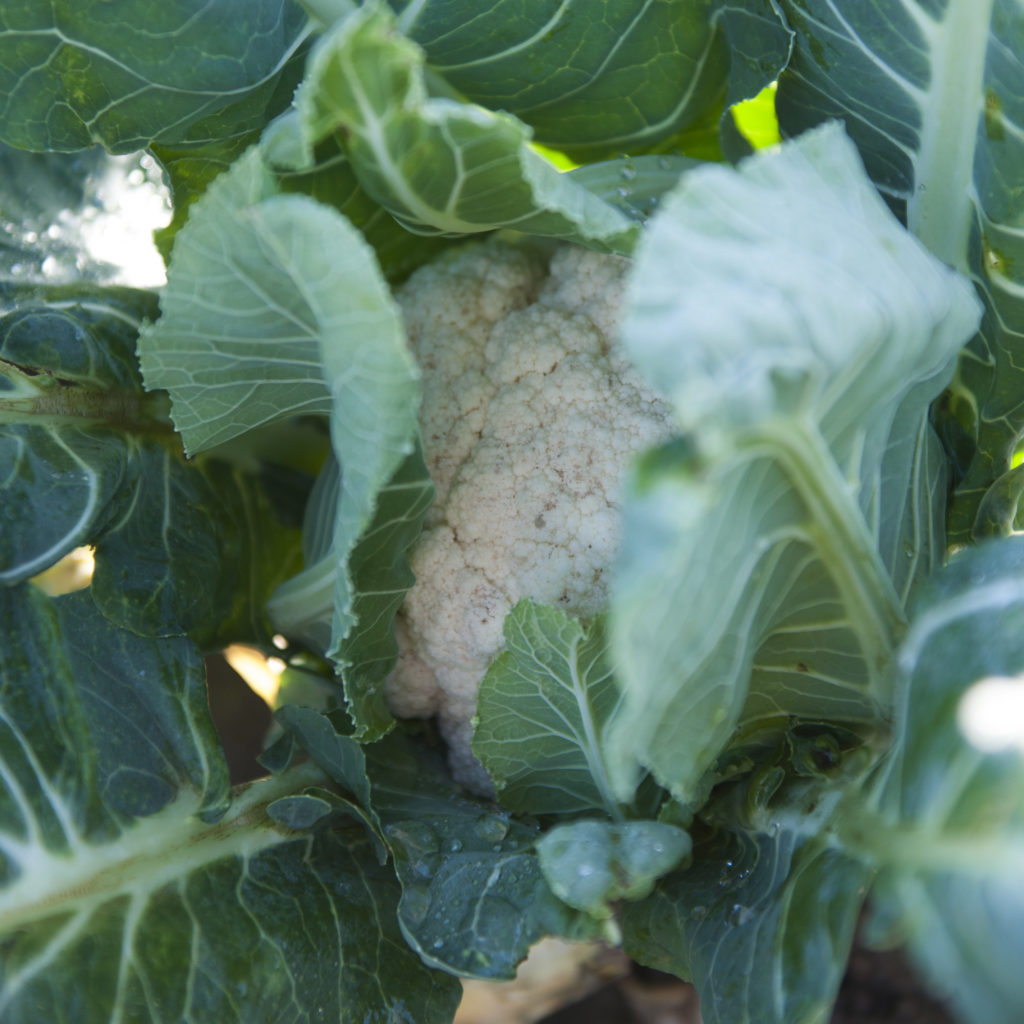
4 Ways With Cauliflower
First up is the humble, but every versatile, cauliflower. Cauliflower has had one of the biggest ‘glow ups’ of all vegetables over the last 10 years. Once simply boiled and relegated to the side of the plate, cauliflower is now the captain of the vegetable patch! Roast it covered in Middle Eastern spices, blitz it into a rice or cous cous alternative, turn it into steaks, batter and deep fry it and transform it into a fried chicken substitute, even use it as a gluten free pizza base! If you’ve got a need for a vegetable to pretend to be something it’s not, cauliflower is your man. And it is delicious. Cauliflower is a bit of a blank canvas and is very good as a vehicle for delicious herbs and spices. It is absolutely fantastic in a curry or to top my baked biryani. Here are just 4 of the many ways I use cauliflower regularly. Vegan Cauliflower Cheese, Winter Tabbouleh, Spicy Roast Cauliflower and Chickpea Salad and Curried Cauliflower Fritters. What is your favourite cauliflower recipe? Let us know below or over on our healthy eating facebook group. Liz x
The recipes shown in the video above are just quick ideas and inspiration for dishes you can create with a cauliflower from your veg box. Below are the same recipes with amounts adjusted for a whole cauliflower in each recipe.
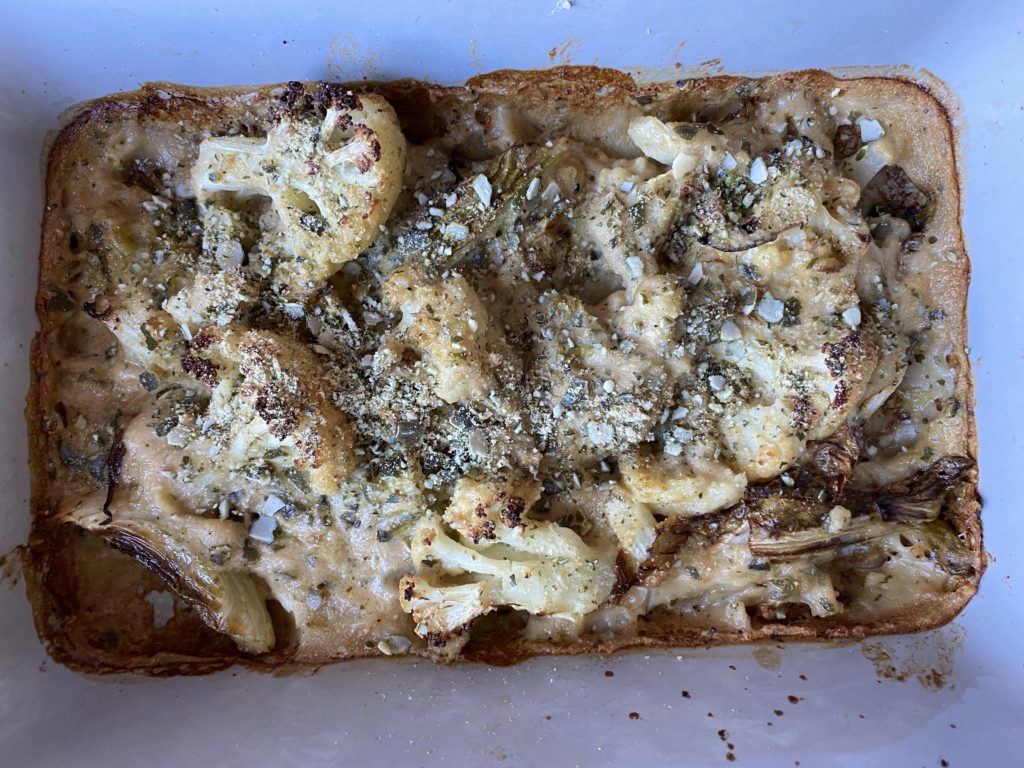
Vegan Cauliflower Cheese (serves 4-6 as a side for a roast)
150g plain flour (gluten free plain flour works too)
Preheat your oven to 200C. Find a large baking dish which will accommodate a whole cauliflower.
Rinse and quarter the cauliflower and break it into florets. Put them in the roasting dish. Add the sliced leaves and cores too.
Drizzle over the olive oil and season the cauliflower with salt and pepper. Mix well to spread the seasoning evenly. Then pop the dish in the oven to roast the cauliflower for 20 minutes.
While the cauliflower is roasting, prepare your vegan béchamel.
Simply whisk together the flour, nutritional yeast, nutmeg, mustard and oat milk. Add a big pinch of salt and some freshly ground black pepper.
Give it another which and pour the uncooked béchamel over the now roasted cauliflower. Return the dish to the oven to cook for a further 15 minutes or until golden and bubbling.
OPTIONAL EXTRAS: you could add a crunchy topping to your cauliflower cheese before you return it to the oven. I like to roughly blend extra proportions of pumpkin seeds and nutritional yeast. You could also use breadcrumbs.
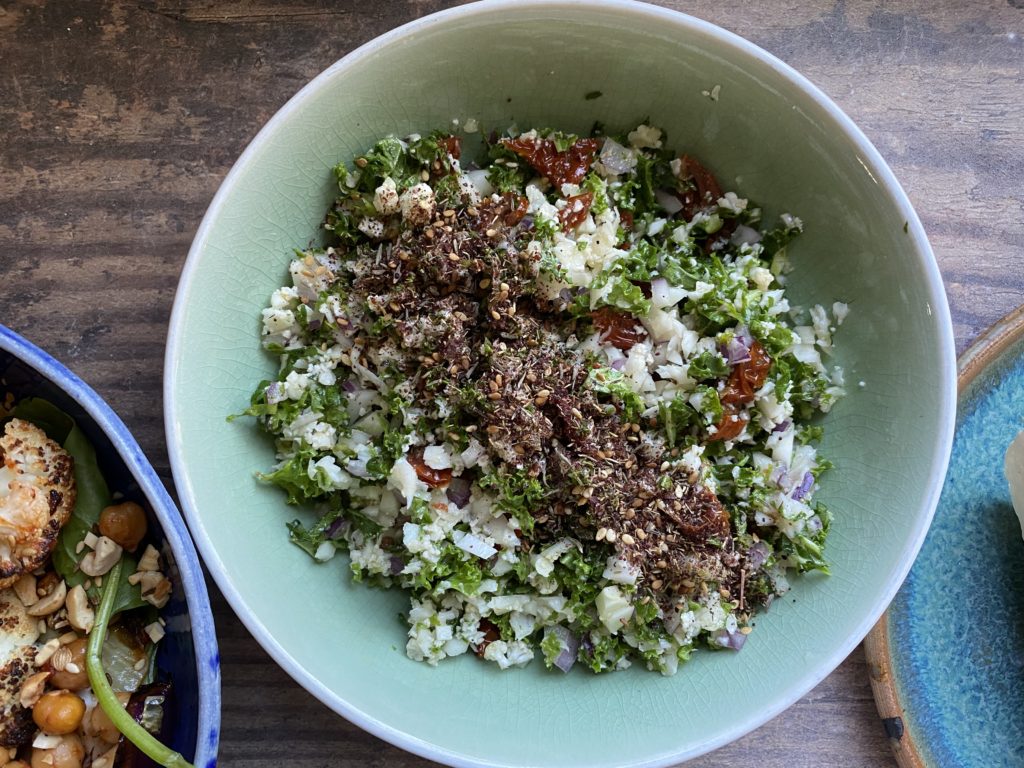
Winter Tabbouleh (serves 6)
1 cauliflower
8 large kale leaves (or use lots of fresh parsley or a mix of the two)
option extras like chopped walnuts, z’atar or dukka
Grate a rinsed cauliflower into a large bowl. You should end up with a rice/bulgar wheat like grain substitute.
Rinse the kale, remove the tough stems and very finely chop the leaves. Add to the bowl of cauliflower.
Finely dice the red onion (or slice the spring onion) and add it to the bowl.
Slice the sun-dried tomatoes and add to the bowl then make the simple dressing.
Mix the juice of the mon with a small crushed clove of garlic, and 4 or so tbsp of oil from the jar of sun-dried tomatoes. Season with salt and pepper and mix the dressing through the tabbouleh.
Serve as part of a salad bowl with some hummus, roasted vegetables and bread or with a tagine-type stew. It’s very good with something crunchy and nutty/seedy on top too. Simply toasted, chopped walnuts or make a dukka (a mix of toasted nuts, sesame seeds, cumin and coriander seeds) or z’atar (a mix of toasted sesame seeds, dried thyme and ground sumac).
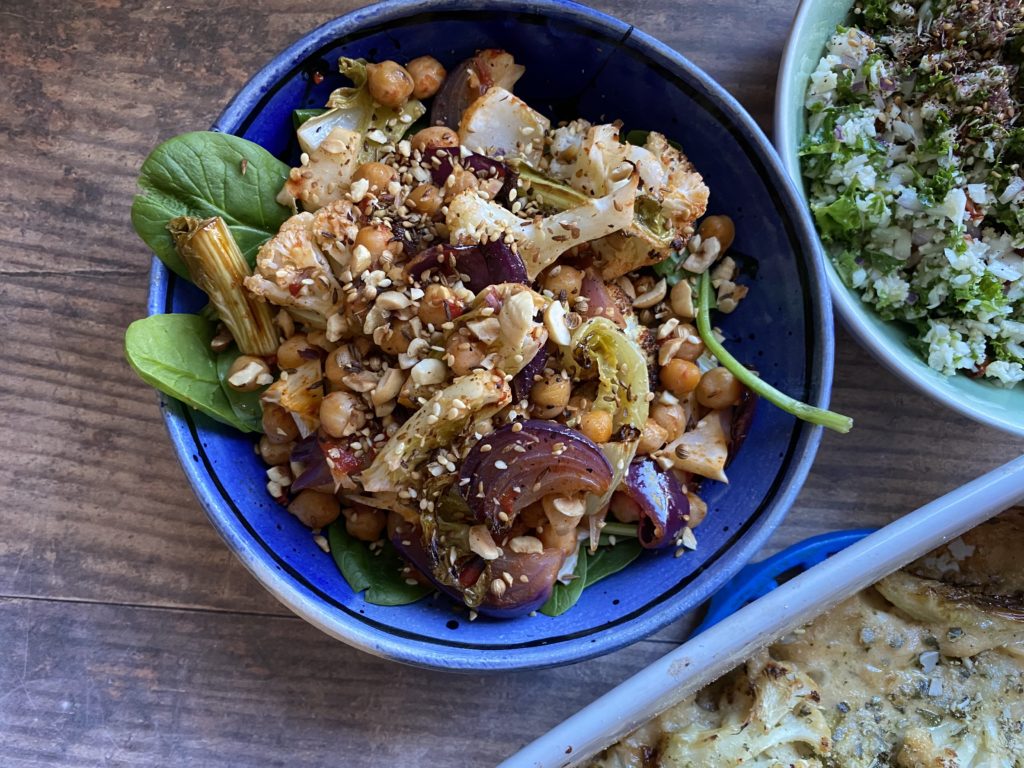
about 6 tbsp of ready made chilli sauce like harissa or sriracha or a mix of your own favourite spices (eg 1 tsp chilli flakes, 1 tbsp cumin seeds, 1 tbsp ground coriander, 1 tbsp smoked paprika and 2 tbsp maple syrup)
Pre-heat the oven to 200C and prepare a large roasting dish.
Rinse and chop the cauliflower (leaves, core and all), peel and slice the onions into thick wedges and drain and rinse the chickpeas.
Put them all into the roasting dish and drizzle over the olive oil. Season well with salt and pepper and add the chilli sauce or your own mix of spices.
Mix well and roast in the oven until the cauliflower is lightly charred and cooked through – around half an hour or so.
Serve warm with salad leaves and a cooling hummus or yoghurt and tahini dip or allow it to cool and keep in the fridge for 4 days for quick salad lunches.
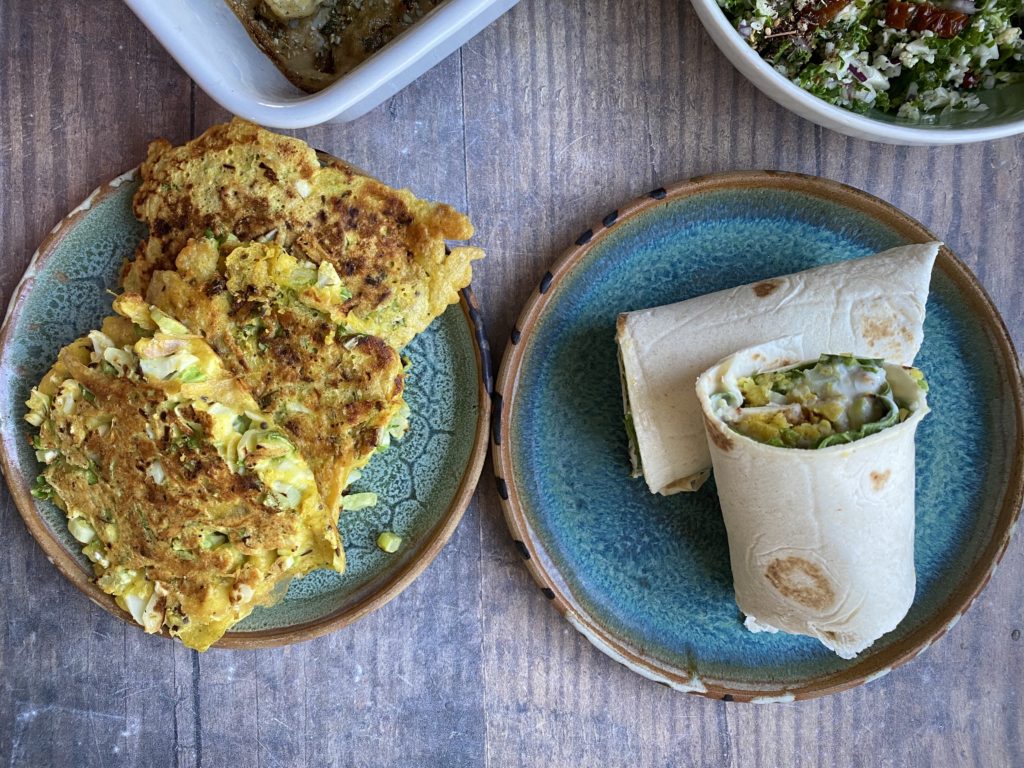
1 tsp each of cumin seeds, brown mustard seeds, chilli flakes, turmeric, salt…some freshly ground black pepper and about 15 fresh curry leaves if you have them
vegetable oil for frying
Start with the gram flour batter. Mix the gram flour and spices with a mug of water.
Chop the cauliflower (leaves, core and florets) into small, pea sized pieces and mix it into the gram flour batter. There should be enough gram flour batter to coat all the pieces. If your cauliflower is very large and the mixture seems dry just make a bit more of the batter.
Heat a frying pan to a medium heat with a generous slick of vegetable oil. Fry spoonfuls of the batter in batches and flip them over once golden brown underneath. Ensure the heat is not too high as if it is the fritters will burn on the outside and be raw in the middle. A medium heat allows the fritters to cook slowly all the way through.
Serve warm as a side to a curry or salad or as a sandwich or wrap filling. I like mine in a wrap with some spinach or lettuce leaves, yoghurt and mango chutney.
Leftover mixture will keep well in the fridge in an airtight box for three days.