Summer Fruit Crumble Slice

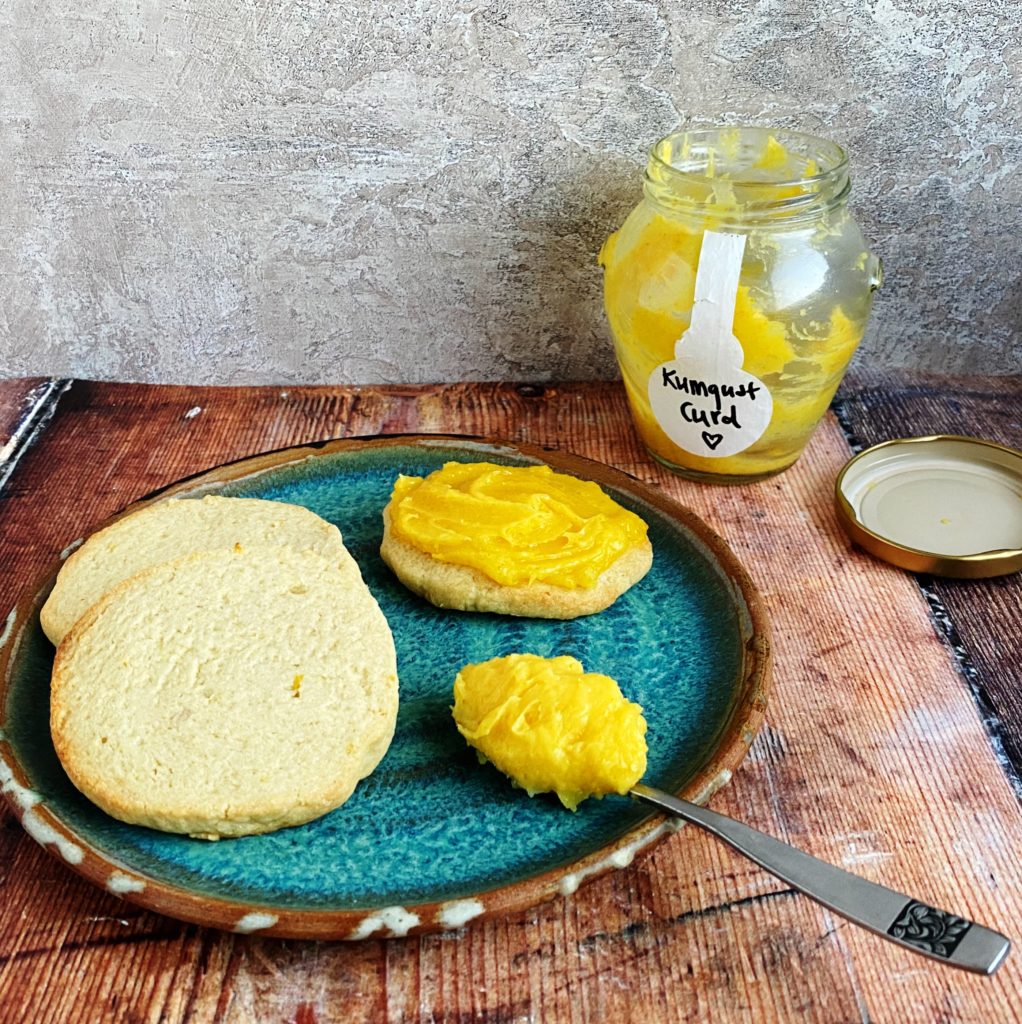
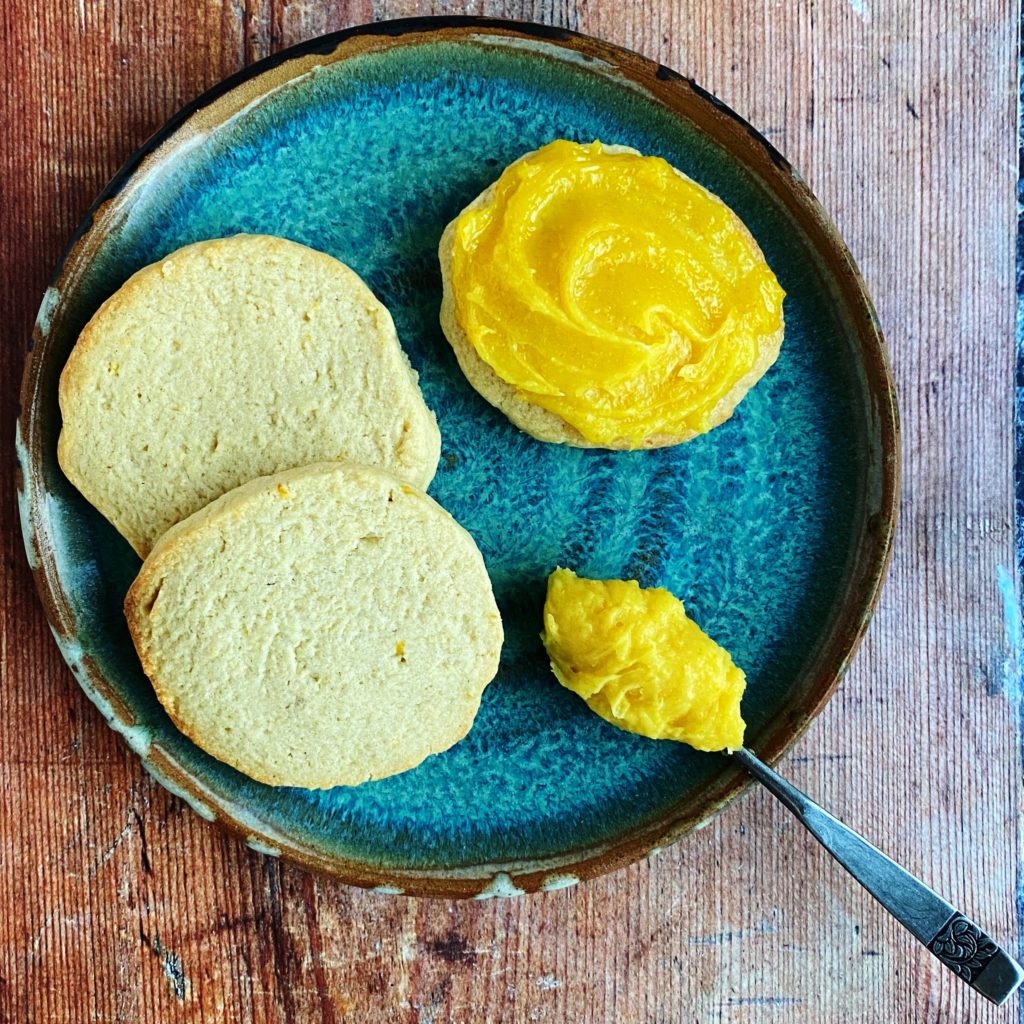
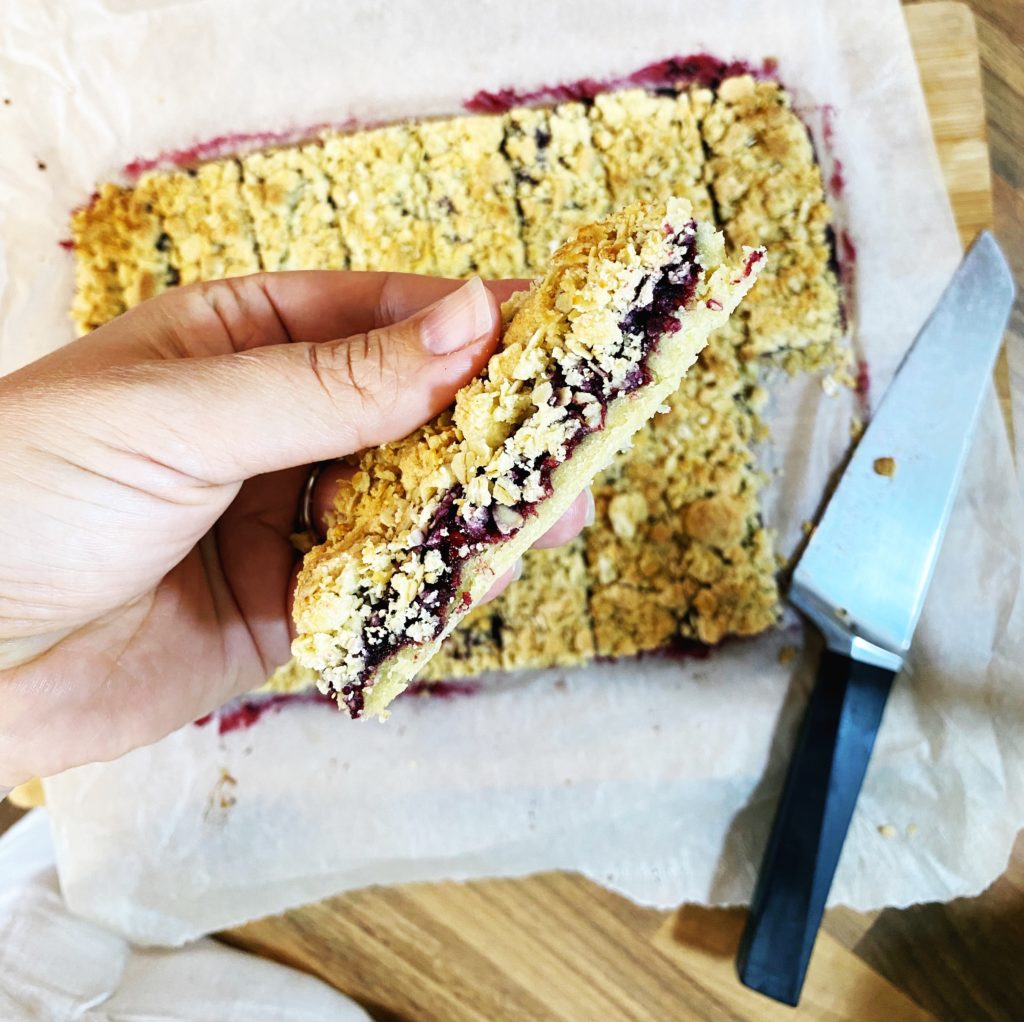
This fruity number is just the thing to pack into a tin and take round to a friends garden to have with a cuppa! Use any summer fruit you like, berries or stone fruit work well, and it’s best to cook the fruit down with a little maple syrup into a rough ‘jam’. Very soft fruit like strawberries, raspberries or plums could just be sliced and sprinkled raw on top of the biscuit layer before adding the crumble mix, but I do find a more jammy fruit layer helps the crumble mix stick to the biscuit a bit better. I tend to cover the dish in the oven with a baking sheet or a layer of baking parchment during the last 15 minutes or so to prevent it from browning too much. 

Liz 

Ingredients

  • 125g caster sugar
  • 250g butter/margarine
  • 375g plain flour
  • 100g porridge oats
  • 150g fruit
  • maple syrup to taste

Method

  1. Start by cooking 150g fruit in a small pan until just soft and starting to collapse. Taste and sweeten with maple syrup or any sweetener you like (if needed). Then put it to one side to cool while you make the biscuit dough.
  2. Pre-heat the oven to 175C and line a deep baking dish with baking parchment. I used a dish approximately 25x35cm but any medium sized baking dish will do. Just bear in mind, if it’s a smaller dish, the biscuit will be deeper so will need longer in the oven.
  3. Weigh out the butter, sugar and flour into a large mixing bowl. Rub it together with the tips of your fingers until you achieve a wet-beach-sand-like texture that comes together into dough when squeezed. A quicker way to do this is to pulse the ingredients together in a food processor with the ‘S’ blade attachment.
  4. Tip roughly 2/3rds of the dough into the lined dish and press it firmly into a neat, even layer. Ensure you get into the corners of the dish.
  5. Add the oats to the remaining 3rd of the dough and mix into a rough crumble.
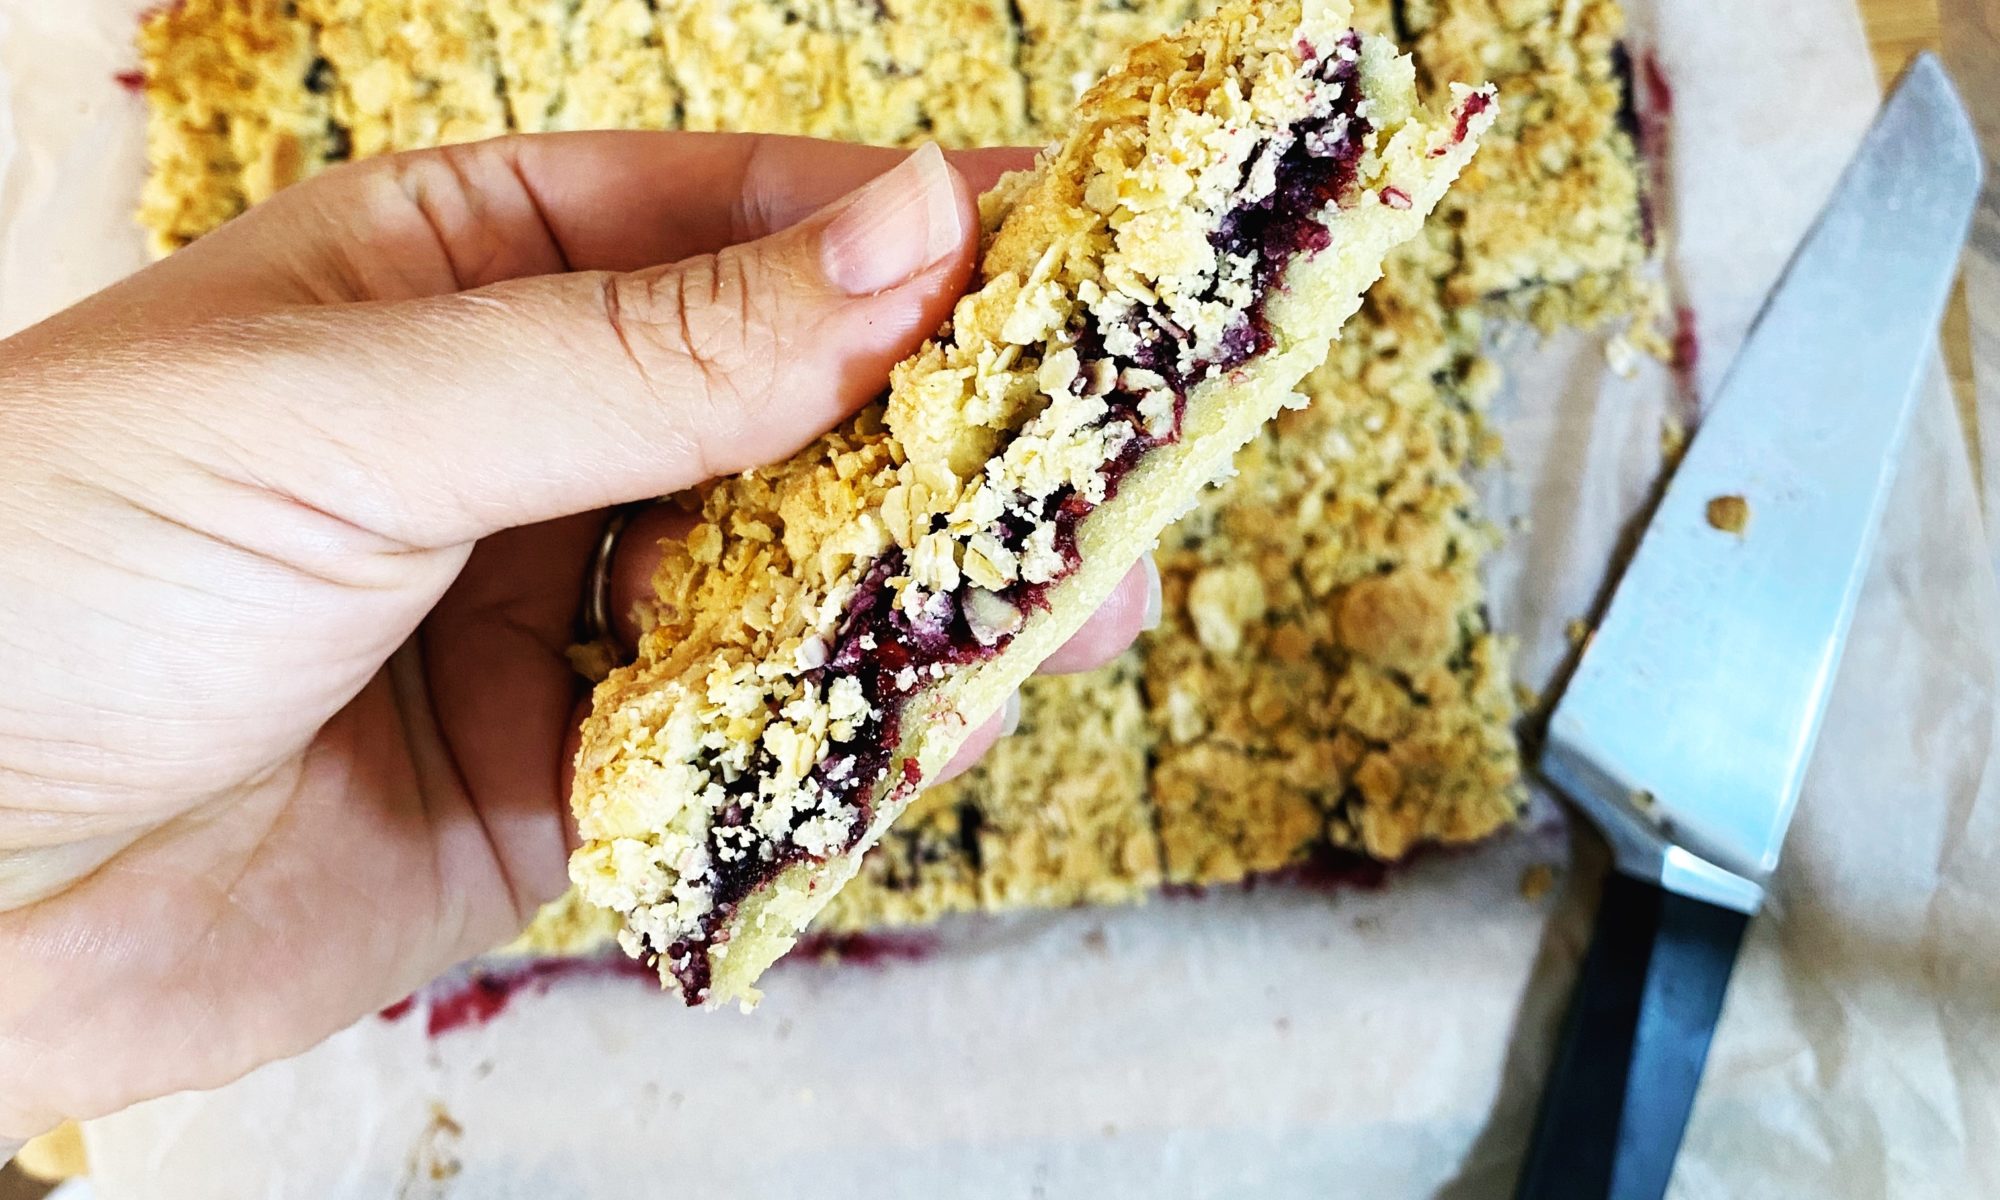
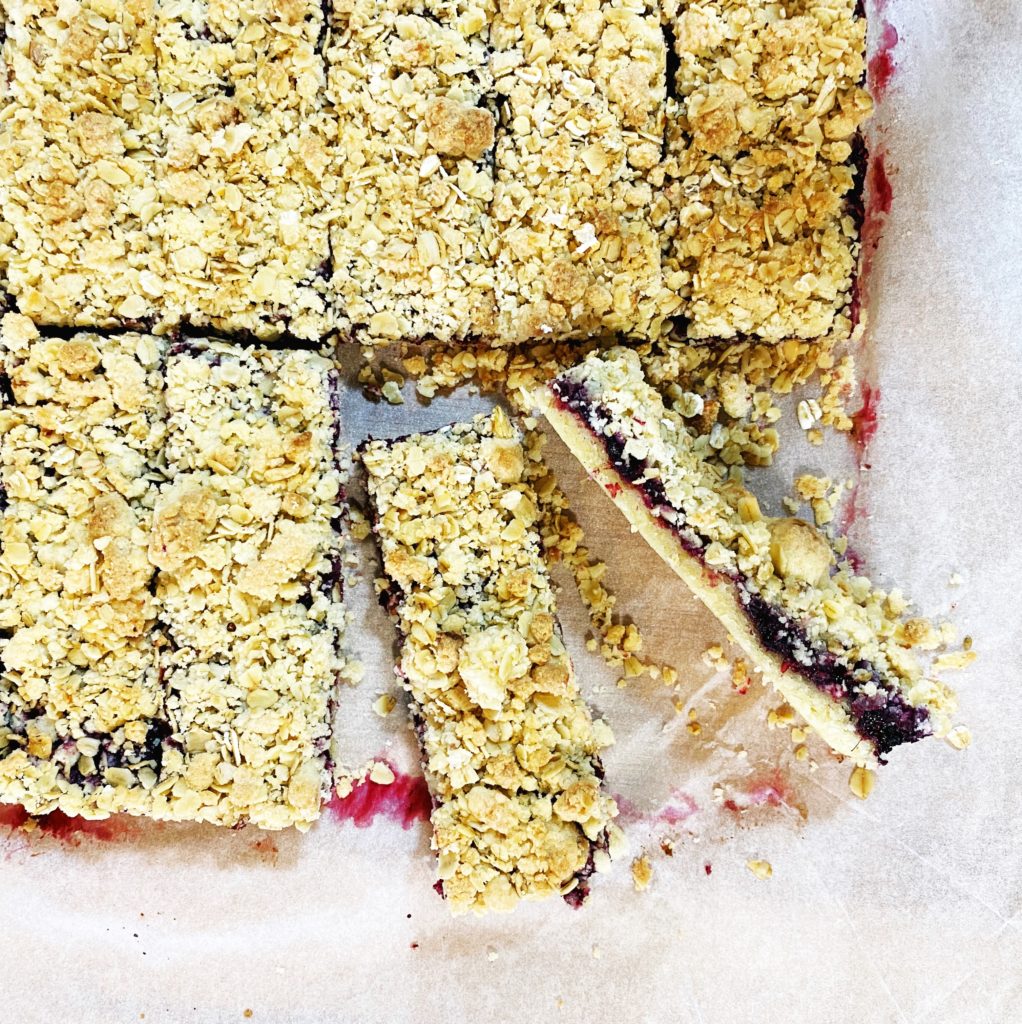
  6. Spoon the fruit onto the biscuit layer and then sprinkle the crumble over the top. Lightly pat the crumble into the fruit.
  7. Then bake for approximately 30 minutes at 175C fan. The time can vary depending on your dish size. I tend to cover the dish with a baking sheet or extra piece of parchment for the last 15 minutes or so to prevent the crumble from browning too much. Just keep an eye on it and see if it needs it or not. No two ovens are alike in my experience!
  8. Remove from the oven and allow the biscuit to cool in the dish. Then carefully transfer it to a chopping board and cut it as you like. 
  9. You should end up with a melt-in-the-mouth shortbread base, a fruity layer and a        buttery, oaty, crumbly layer. Delicious!
  10. The biscuits keep well in an airtight container in the fridge for a week. Enjoy!

Wild Garlic Butter Parathas

Wild garlic is in season now and abundant in the woods around Galway. Do you have any growing near you? It’s one of my favourite things to forage and it’s long, pointed green leaves, white flowers and garlicky aroma are pretty much unmistakable. But, as with all foraging, please make sure you know what you are picking before you head out! Never pull the plant out by its small bulb, simply pinch off the green leaves and leave plenty for wildlife and biodiversity.

This year I made my usual batch of wild garlic pesto along with dehydrating some and turning it into a powder, blending some with salt and dehydrating it to make wild garlic salt, any flower buds that made their way into my bag were pickled and I blended a few handfuls with a couple of blocks of vegan butter which is absolutely incredible! I have used it in baked potatoes, roasted mushrooms, garlic bread and now this, our new obsession – parathas!

Parathas are laminated Indian flatbreads, flakey, buttery and oh so delicious! Here’s my easy recipe which we eat alongside red lentil dal and Indian pickles. Give the recipe a try and let me know what you think! Liz x

Ingredients (makes 8 parathas)

  • 2 mugs of plain flour plus a little extra for dusting/rolling etc (you can use plain flour, strong bread flour or an authentic atta flour)
  • 1/2 tsp salt
  • 1 mug of water (or enough to make a soft dough – different flours have different rates of absorbency so add a little at a time and adjust with more flour/water as needed)
  • Optional extras like a tsp of nigella seeds, cumin seeds, brown mustard seeds, turmeric and black pepper are nice to add if you like
  • butter/wild garlic butter/coconut oil – melted

Method

Start by making your dough. Measure the flour and salt (and optional extra spices – we used nigella seeds this time) into a large bowl and mix to combine.

Add the water and mix into a sticky dough. Then tip out onto a lightly floured work surface and knead well until the dough is smooth and stretchy. Add more flour/water if needed to get the right consistency. Put the kneaded dough back into the bowl and cover it with a damp tea towel. Let it rest in the fridge so that it is easy to roll out – 30 minutes to an hour is normally sufficient.

Then divide the dough into 8 even balls and roll them out into long oblongs.

Melt your butter/wild garlic butter/coconut oil and brush it all over the surface of the dough.

Then roll up the dough lengthways and coil it into a spiral. This way you have created loads of layers of fat in your dough which will make a flaky, layered flatbread.

Sit the coils on a platter covered with a tea towel ready to roll out. Heat up a frying pan to medium-high and melt a little oil or butter in the pan.

Then roll out the first coil on a lightly floured work surface into a thin, layered flatbread. Swirl the fat around the pan to evenly coat the bottom then add the paratha to the pan. Fry until golden brown and starting to blister then flip and fry the other side.

Keep stacked up on a plate covered with a tea towel. Then warm them up in the pan when you are ready to serve. Tear and eat – scoop up dal, chutneys etc. Enjoy!

1, 2, 3 Shortbread!

A classic shortbread biscuit is buttery and tender with a crumbly, melt in the mouth texture. It shouldn’t be soft or chewy like a cookie, but delicately crisp. The simplicity of the ingredients is what makes shortbread so good. The perfect sugar:butter:flour ratio is 1:2:3 and so you can easily work the recipe up or down to make a batch however large you like. The best way to get the right texture is to weigh the ingredients out carefully and not to overwork the dough. Here’s a handy little video which explains it all.

Let us know in the comments or over on our facebook group if you make the recipe. I’d love to see your photos. Liz x

Ingredients (makes 12)

  • 100g caster sugar
  • 200g butter (I use this vegan one)
  • 300g plain flour (I love this spelt one for perfect biscuits and cakes)
  • optional extras – lemon zest, more caster sugar to roll the cookies in…
Bergamot zest shortbread with kumquat curd.

Method

Measure the sugar, butter and flour into a bowl. Add optional lemon zest – I used the gorgeous bergamot lemons we have in season now.

Using the tips of your fingers (so as not to make the dough too warm or melty) rub the flour and sugar into the butter.

When you reach a sort of wet-beach-sand-like texture, tip the mixture carefully onto a clean work surface.

Bring the dough together into a ball. Be careful not to overwork the dough as this can make it tough and chewy rather than tender and crisp. No kneading, just gently bring it together.

Then you need to wrap and chill the dough for at least half an hour. I like to roll the ball into a neat cylinder, the circular ends the size of the biscuits I want. Then wrap it in a sheet of baking parchment on which I’ll cook the biscuits later. Chill in the fridge for at least half an hour to firm up the dough.

Then pre-heat the oven to 175C.

Unwrap the chilled shortbread dough onto a large baking sheet. If you wish, you can roll the cylinder of dough in some extra caster sugar (with added lemon zest or chopped rosemary, or crushed lavender flowers…) to create a sweet, crunchy ring around the biscuits.

Slice the dough into 12 round biscuits and bake them for 8 minutes or until just starting to take on some colour.

Allow the biscuits to completely cool and then store them in an airtight container. Eat within a week. I am loving them with a dollop of my kumquat curd but they are delicious plain too. And just perfect with a cup of Earl Grey tea.