Turkish Pizza

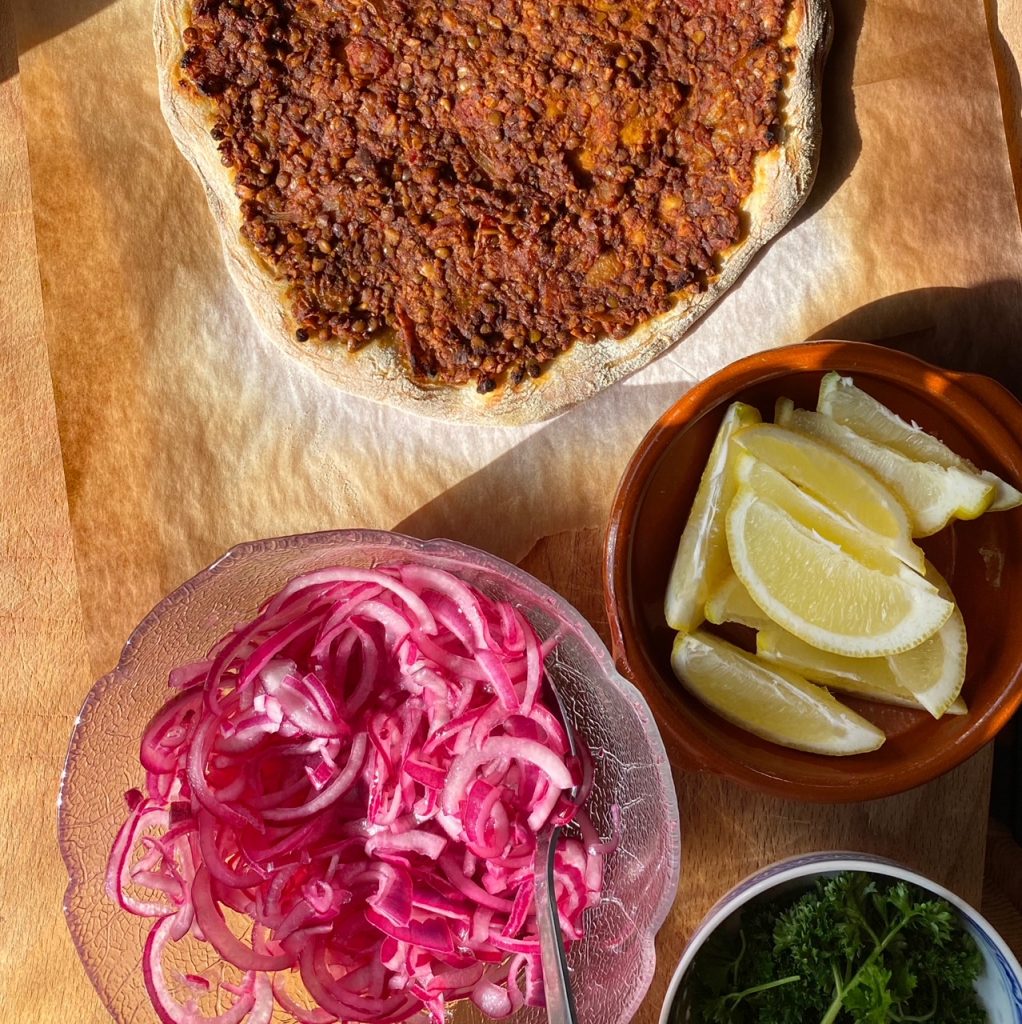
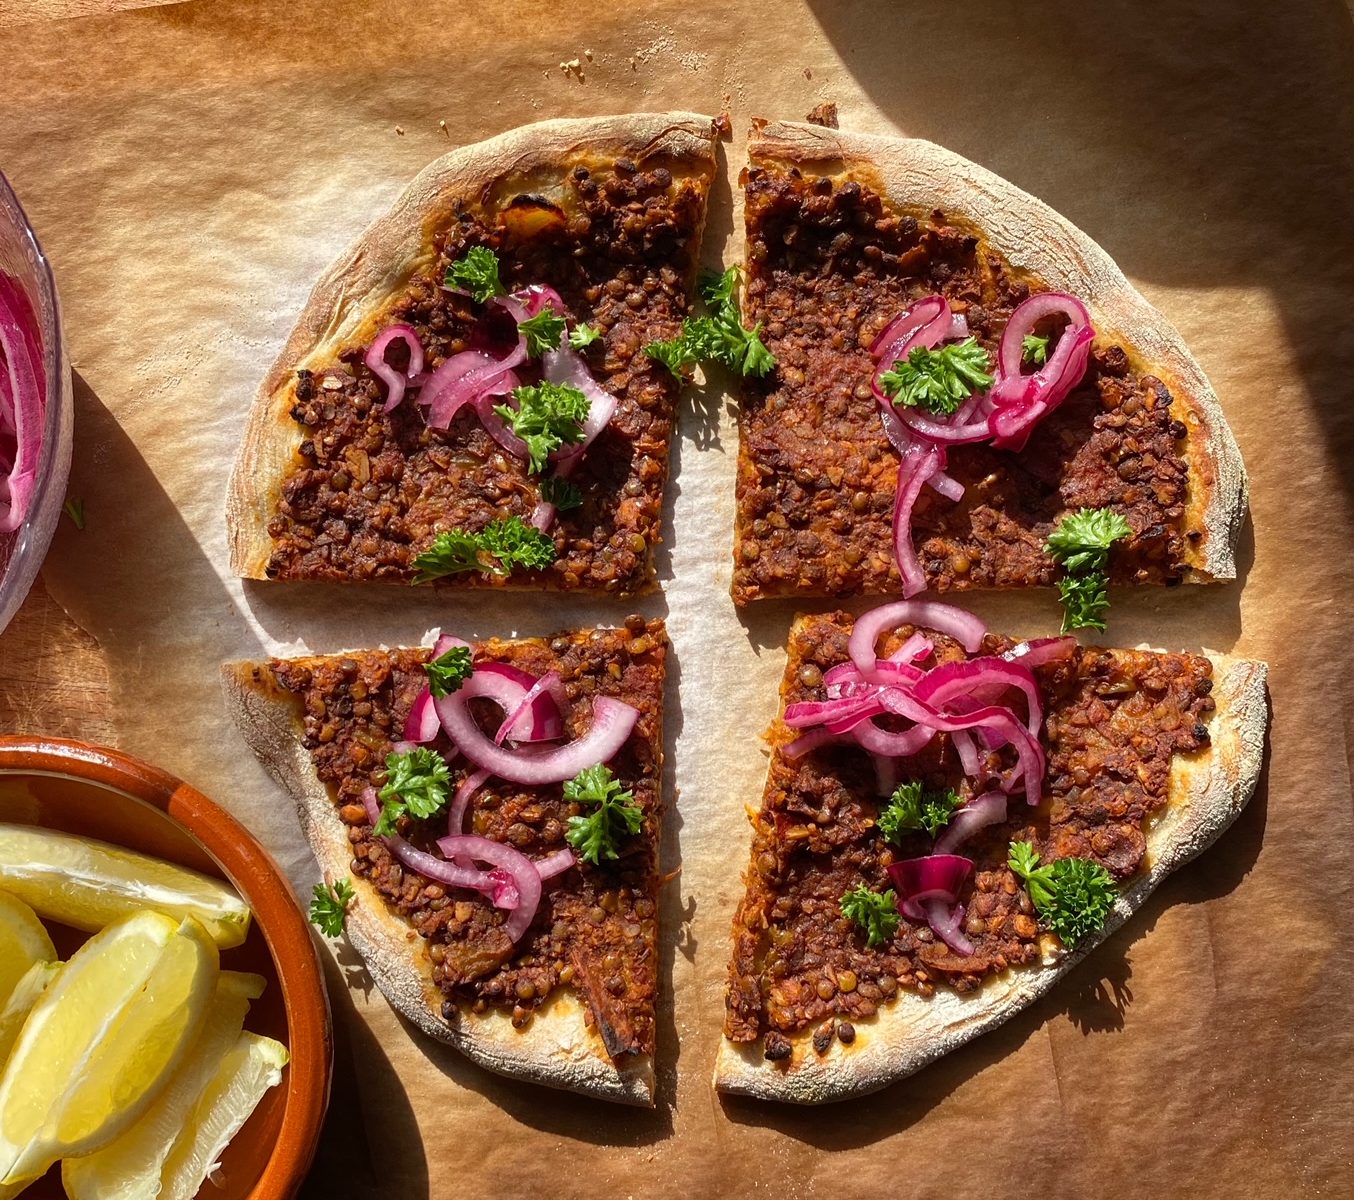
We love this spiced alternative to pizza. You won’t miss the Italian style cheese and oregano, this Middle Eastern style ‘pizza’ is a totally different beast. It’s essentially a pizza topped with a delicately spiced mince mixture (we use nuts and lentils to make a delicious vegan version) which is baked then eaten with a squeeze of lemon, a sprinkle of fresh parsley and some quick pickled pink onions. It’s the perfect summer party food with salads.

Grab all the organic ingredients from our online shop here. We deliver nationwide and are excited to announce we have been able to reduce our delivery charges with our new electric delivery van couriers, Green Way!

Liz x

Ingredients (serves 4)

For the quick pickled onions:

  • 2 red onions
  • 2 tbsp vinegar or lemon juice
  • a large pinch of salt
  • a large pinch of sugar

For the mince:

  • 1 white onion, diced
  • 4 cloves of garlic, sliced
  • 2 tbsp olive oil
  • 1 tbsp smoked paprika
  • 1 tbsp ground cumin
  • 1 tsp ground ginger
  • 1 tsp cinnamon
  • 2 large handfuls of walnuts, crushed/finely chopped (or a mix of any nuts or seeds you like)
  • 2 tins of cooked green lentils, drained (or a mug of uncooked lentils – see method)
  • a tin of chopped tomatoes
  • salt and pepper to taste

Other ingredients:

Method

  1. If you are making your own pizza dough, do that first, otherwise you can use ready made bases or even large flatbreads.
  2. Make the quick pickled red onions before you start on the mince to give them time to turn a gorgeous shocking pink colour. It’s easy! Just finely slice the onions and place in a bowl. Sprinkle with a big pinch of salt and sugar then stir in the vinegar or lemon juice. Let it sit at room temperature to one side while you make the mince and bake the pizzas. Give it another stir every now and then to ensure the ingredients are mingling nicely and marvel as the purple onions soften and turn bright pink.
  3. In a heavy bottomed sauce pan, sauté the diced onion with the olive oil until it softens and starts to colour. Add the garlic and spices and stir until fragrant. Then add the chopped nuts, lentils and tomatoes (if you are using uncooked lentils, add 2 mugs of water to the mixture too). Then season to taste with salt and pepper and simmer until the mixture is rich and thick. You may need to add a splash of water every now and then to get the texture right. Simmer for 10 minutes if you are using cooked lentils, and about 20 minutes for uncooked (or until the lentils are cooked through). Taste and tweak the seasoning if needed with more salt or pepper.
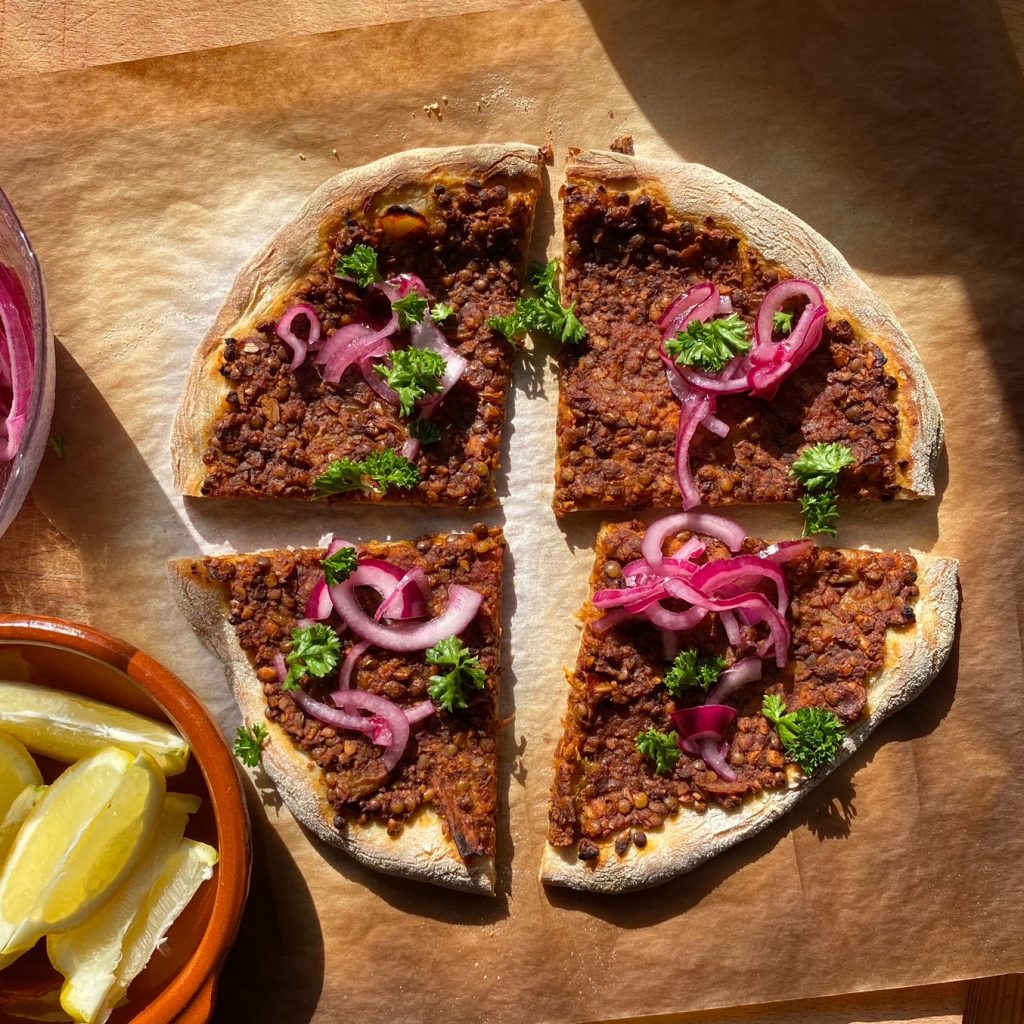
  4. Pre-heat the oven to the highest temperature to imitate a pizza oven. Then shape your pizza dough and spread with a thin layer of the mince mixture. Bake until cooked to your liking then serve in slices .
  5. Each slice should be topped with tangy onions, fresh parsley and a good squeeze of lemon. I like to add a sprinkle of pomegranate seeds too and devour with a fresh cucumber and tomato salad. Enjoy!

Smoothies for Heart Health

Smoothies are such a delicious and efficient way to inject a lot of nutrients into your diet in a quick and easy glass. As a parent, I love giving my kids homemade smoothies, then I know they are getting plenty of top quality, dense nutrients without even realising it. They’re not going to eat a spoon of chia seeds any other way really are they?

Taking care of our heart health is so important at all ages, but is not something we often consider when we are younger. Unfortunately heart disease is the biggest killer in Ireland and although it mainly affects people over 40, it’s important to take care of our hearts from a young age. As well as moving our bodies more and quitting smoking and stress, there is a lot of good food we can include in our diets to boost the health of our hearts. We’ve been curiously reading a lot on the subject recently and found 5 main food groups which boost heart health – leafy greens, whole grains, healthy fats, legumes and antioxidant rich food – and so we have been writing recipes with these groups in mind this week. Here are two smoothies which will really boost your nutrient intake and help you take care of your hearts.

Why not try adding a smoothie to your diet each day to boost your heart health?

Liz x

Blueberry Cacao Smoothie (per person)

This smoothie is a stunning deep purple, which is a sure sign you’re getting lots of the antioxidant anthocyanin, but tastes like chocolate milk thanks to the cacao powder (which is packed with flavonoids that have been shown to help lower blood pressure, improve blood flow to the brain and heart, and aid in preventing blood clots). Blend:

  • 1/2 a frozen banana (rich in potassium to help lower blood pressure)
  • 1 pitted date (for natural sweetness and also fibre, potassium and other minerals)
  • 1 handful of frozen blueberries (powerful antioxidants, fibre and vitamins)
  • 1 tsp cacao powder (flavonoids)
  • 1 tsp chia seeds (rich in fiber, antioxidants, minerals and heart-healthy omega-3 fatty acids)
  • 5 hazelnuts (healthy fats, magnesium and fibre)
  • 2 tbsp porridge oats (healthy wholegrain which reduces your ‘bad’ cholesterol levels)
  • 1/2 glass oat milk (or your choice of milk – or substitute with ice for a colder smoothie)

Green Smoothie (per person)

A virtuous green smoothie doesn’t have to taste like pond water. This one is creamy and sweet, full of the amazing benefits of leafy greens and healthy fats. Blend:

  • 2 kale leaves (for fibre, nitrates, potassium, vitamin K, magnesium and more)
  • 1 pitted date (for natural sweetness and also fibre, potassium and other minerals)
  • 1 tsp linseeds (essential omega-3 fatty acids)
  • 1 brazil nut or a tbsp tahini (healthy fats, fibre and selenium)
  • 1/2 a frozen banana (rich in potassium to help lower blood pressure)
  • 2 tbsp porridge oats (healthy wholegrain which reduces your ‘bad’ cholesterol levels)
  • 1/2 glass of oat milk (or any milk you like – or ice cubes if you like your smoothie extra cold)

Orange, Rosemary & Black Pepper Almonds

This aromatic, sweet and salty snack is the perfect nibble alongside a glass of wine or whilst watching a Christmas film. We stock organic almonds in compostable bags if you’d like to make your own. It’s easy to do and the flavour combination is just perfect! You might want to double or triple the batch and give some jars away as festive gifts.

Liz x

Ingredients

  • 500g whole almonds
  • the zest of a large orange (or use a few clementines)
  • 4 tbsp rosemary leaves
  • 2 tsp salt
  • 2 tsp coarsely ground black pepper
  • 2 tbsp olive oil
  • 4 tbsp maple syrup or honey

Method

  1. Preheat the oven to 175C and line your largest roasting tray with baking parchment.
  2. In a large mixing bowl, combine all the ingredients. Taste an almond and add more of any ingredient if you like, perhaps you’d like it extra peppery?
  3. Spread the almonds onto the lined baking tray in a single layer. Bake for 15 minutes or so until the nuts are beautifully toasted. Remove the tray from the oven every 5 minutes to stir the nuts and ensure they are not burning. Keep a close eye on them, once they start to toast they go very quickly!
  4. Allow the nuts to cool completely on the tray before storing them in an airtight container. They should stay fresh for a couple of weeks. Enjoy with a glass of wine and other delicious nibbly bits or gift wrap and share with your loved ones.

Energy Bites

Energy bites do what they say on the tin. They are jam packed full of good ingredients – oats, nuts (or seeds) and dates – which give you a boost of energy and get you through the afternoon slump, power you up that hill on your hike or keep hunger at bay in the car on your way to your staycation. This base recipe is really handy to have in your repertoire. Make it your own by using your favourite nuts or seeds, replace the dates with apricots or raisins, add cacao powder or dried spices like cinnamon or ginger for different flavours, coat them in melted chocolate or roll them in sesame seeds or desiccated coconut. It’s fun to play around with flavours here.

Did you know, many of our grocery products like oats, nuts and dates are packed plastic free? We are always working on adding more plastic free products to the list too so keep checking back. Please share your favourite energy ball combinations with us on our facebook community group

Liz x

Ingredients (makes 20)

  • 1 &1/2 mugs of porridge oats
  • 1 mug of nuts (or seeds, or a mix)
  • 1/2 mug of pitted dates
  • a pinch of salt
  • a drizzle of maple syrup or honey
  • optional extra ingredients to taste (like melted chocolate, desiccated coconut, sesame seeds, cacao powder, cinnamon, ginger…)

Method

  1. Measure the oats, nuts, dates and salt into a food processor with the ’S’ blade attachment. (If you are making this in a blender, then divide it into smaller batches).
  2. Pulse the ingredients together, stopping frequently to stir and scrape down the sides. You are aiming for an even, sticky, crumbly mixture.
  3. Scrape the mixture into a large bowl. This is where you can stir in some extra flavours or textures if you like. Some cinnamon or ginger? Make it chocolate flavoured by adding some cacao powder? 
  4. Now test the stickiness of the mixture by picking up a small handful and squeezing. If it sticks together easily you don’t need the syrup – this depends on the freshness and variety of the dates. Otherwise add a small drizzle of maple syrup and stir. Test again and add more syrup until you get the right consistency.
  5. Then squeeze and roll the mixture into little balls. If they are sticky enough you can roll them in seeds or desiccated coconut for extra flavour and fun. 
  6. Another fun option is to dunk them in melted chocolate and sit them on a tray in the fridge to set. While the chocolate is wet, you can sprinkle the bites with seeds or some flakey sea salt or anything you like to make them even more special.
  7. Otherwise they are fabulous naked, just the way they are! 
  8. Pack in an airtight container in the fridge and eat them within the week.

Buddha Bowls

Buddha bowls are all about balance. A vibrant bowl brimming with a diverse selection of grains, pulses, greens, vegetables, nuts or seeds and delicious dressings. They are a brilliant way to build a balanced lunch or dinner from some easily prepped boxes and jars of ingredients in your fridge. To me, they are the ultimate quick-but-satisfying working lunch, and a delicious way to pack in your 30 recommended ‘plant points’ per week. Buddha bowls are basically salads dialled up to 11 and in my old life running a cafe they were always the best sellers.

Here’s my flexible ‘recipe’ of what I happened to include in this week’s buddha bowl prep. But please just use it as a basic framework, the joy of Buddha bowls is making them your own using what you have and getting creative in the kitchen. Share your amazing Buddha bowl pictures with us over on our community facebook group. We love to see what you’ve made with our wonderful organic produce (and we all need a bit of inspiration sometimes).

Liz x

Ingredients

  • VEGETABLES for roasting (eg sweet potato, cauliflower, squash, beetroot, swede, parsnips, onion, carrots, peppers, aubergine, courgettes, tomatoes… whatever comes in your box)
  • GREENS (eg kale, broccoli, sprouts, salad leaves, spinach, chard, cabbage…)
  • GRAINS and/or PULSES (eg quinoa, chickpeas, beans, lentils, pasta, rice, barley, buckwheat, amaranth, millet, cous cous…)
  • NUTS/SEEDS (eg toasted sunflower seeds, dukka, za’atar, furikaki, mixed nuts…)
  • DRESSINGS (eg lemon juice and olive oil, vinaigrette, tahini sauce, pesto, harissa, soy-lime-sesame, mayonaise… try and match your dressing to the other ingredients in your bowl)
  • optional extra PROTEINS (eg hummus, tofu, tempeh, falafel, cheeses…)
  • extra TOPPINGS for flavour and texture (eg ferments, pickles, olives, sun-dried tomatoes, capers, chopped fresh cucumber/tomato/radish/scallions, herbs, sprouts, microgreens…)

Method

***Be realistic about how much food to prepare. Bear in mind that prepared food will stay fresh in airtight boxes in the fridge for 3 days so only make 3 days worth of food at a time.***

Start with roasting VEGETABLES. I like to divide mine into two trays – harder, slower cooking vegetables like roots and winter squashes in one and softer, faster cooking ‘med veg’ like peppers, tomatoes, courgettes in another.

Scrub and chop your chosen vegetables and put them into roasting trays with a little olive oil and seasoning (I like to keep the seasoning neutral with just salt and pepper at this stage so I can play with flavours when I plate up).

Roast in a hot oven until the vegetables are soft. Allow them to cool completely them pack them into boxes in the fridge.

Meanwhile cook some GRAINS/PULSES. I often cook a batch of orzo pasta (once your pasta is cooked, drain and rinse with cold water and toss with some olive oil to keep it fresh) and a batch of quinoa to get us through a few working lunches. You could skip this bit of prep and cook your grains on the day though if you’ll have time? Some warm rice with ready roasted veg and dressings is a brilliant lunch.

Or just use ready cooked tins of beans or lentils – I do this often, simply open, drain and rinse a tin of chickpeas/beans/lentils and serve with the prepped veg and dressings for the speediest lunch. We sell a range of organic tinned pulses which you can add to your veg order here.

Quinoa is very easy to cook, just like rice. Measure out a small mug into a fine sieve, give it a rinse then pop it into a small pot with two scant mugs of water. Bring to the boil with the lid on, then immediately turn to the lowest setting and let it simmer until it has absorbed all the water and released its little tails. Let the quinoa cool down before storing in an airtight container in the fridge.

Cook a big batch of GREENS. Purple sprouting broccoli and kale are my favourite at the moment and I just steam fry them in a pot with a little seasoning until they are tender. If I get salad leaves in my weekly veg box I’ll make sure I use those first as they don’t last more than 2 or 3 days.

Make a couple of DRESSINGS to keep things interesting. I love a simple vinaigrette (mix 1 tbsp of vinegar or lemon juice with 3 tbsp extra virgin olive oil and add other seasonings like 1 tsp of mustard, a tiny bit of maple syrup, a pinch of salt and pepper…) or a creamy tahini sauce (mix 3 tbsp of tahini with the juice of half a lemon, a splash of water and seasoning like a pinch of salt and garlic powder). I also like to make harissa, pesto, chilli jam, aioli etc so whatever sauces/dressings I have to hand will get used in my buddha bowls.

Prepare NUTS/SEEDS, PROTEINS and extra TOPPINGS. Have a look at my tamari toasted seeds recipe here. Or simply use mixed nuts or seeds to add crunch and extra nutrition to your bowl. Keep a selection of ferments (sauerkraut, kimchi, fermented onions…), olives, pickles, sun-dried tomatoes etc to add another layer of flavour and texture to your bowls. There is already loads of protein going on in all the ingredients above, but if you like you can add even more protein to your bowls by adding a dollop of hummus, some slices of cheese, avocado, tempeh, tofu and so on.

Once you have filled your fridge with a selection of ready cooked delicious ingredients, then it’s a simple matter of building your bowl when you are hungry. I like to try and keep the flavours in a way that vaguely makes geographical or cultural sense. So I’ll have pasta, pesto, roasted med veg, olives, greens.. one day, then roasted roots, tahini dressing, chickpeas, harissa, hummus… another day. Rice, kimchi, greens, furikaki and tempeh another day. It doesn’t always work out like that with perfectly matching flavours, there have been some ‘interesting’ fusions happening, but certainly never a dull bowl!

Salad Bag Pesto

One of the most common ingredients that get wasted are salad leaves. The mixed bags of salad leaves really don’t stay fresh long, really they should be eaten within 3 days. So if you don’t get around to eating a salad, perhaps the weather changed and you were more in the mood for a hot meal, there are a few ways you can use them up in a different way. Whatever you do, don’t throw that bag of slightly sad looking leaves away! Salad leaves can be blended into a soup in place of spinach or watercress or make this very flexible salad bag pesto! If you have any fresh herbs around the place, chuck some of those in too.

Read more about food waste in my blog post on the subject here. Liz x

Ingredients

  • mixed salad leaves (and odds an ends of fresh herbs if available)
  • sunflower and pumpkin seeds (or any nuts or seeds you like)
  • lemons
  • garlic
  • olive oil
  • salt
  • nutritional yeast (or odds and ends of cheese)

Method

I’ve deliberated not given amounts as pesto is a very fluid recipe. You can taste and adjust it as you go. You should aim to have around half the volume of the mixture as nuts or seeds. So if you have about a mug full of salad leaves that need using, toast about half a mug of nuts or seeds.

Toast the nuts or seeds in a dry frying pan to bring out their flavour. Allow them to cool.

The put them in a food processor. I used a blender because my food processor is broken – it works ok but I prefer a food processor for pesto because I don’t want the mixture to be too smooth in the end.

Add a crushed or grated glove of garlic, a shake of nutritional yeast, a big pinch of salt and all the salad leaves.

Then add lemon juice (you can add the zest of the lemon too if you like, or save it in the freezer for something else). Start with a small amount of lemon juice, you can always add more later.

Add a very generous amount of olive oil. A quality extra virgin olive oil is best for pesto.

Pulse the mixture, scrape down the sides and pulse again until you reach a loose, rough paste. Add more olive oil as you go if needed.

Taste and adjust the seasoning with more salt of lemon juice as you like. Then store in a clean jar in the fridge. To make it last longer, cover it with a thin layer of olive oil to protect it from the air. Use it up within a week.

Pesto is not just for pasta! Use it for a dip, stir it into hummus or mayo, spread it into wraps or sandwiches, toss it through roasted veg or steamed greens, dollop it on your grainy salads…

Granola

Granola recipe illustration from my book, available to add to your fruit, veg and groceries order here.

Shop bought granola is delicious, but usually quite expensive and stored in a plastic wrapper. So if you are wanting to save money and avoid plastic packaging, making your own is the solution. Often shop bought granola is surprisingly high in sugar too! My recipe is sweetened with just date syrup (or if I can’t find date syrup I just blend dates and water into a smooth sauce and use that – in fact it’s better this way as you keep all the good fibre of the dates in the granola too). We sell oats, nuts, seeds and dried fruit in plastic free or compostable packaging and this recipe blows any shop bought one I’ve tried out of the water. Store it in an airtight container like a large glass jar and it should stay fresh and crunchy for at least 1 month…that’s if you don’t eat it all up before then! Liz x

Ingredients

Method

Pre-heat your oven to 150C and prepare a couple of large baking dishes or the bottom of your grill tray. Line them with re-usable or compostable baking parchment.

In a large bowl, measure out your oats, spices, salt, nuts and seeds. Do not add the dried fruit yet! Give the dry mixture a good stir to evenly disperse the spices and salt before adding the oil and date syrup.

Add the oil and date syrup/sauce and stir well to coat all the dry ingredients.

Spread the granola out onto your lined trays into a thin 1-2cm layer.

Bake the granola in the oven. Take it out every 10-15 minutes and stir to ensure the granola gets evenly baked.

Once it’s nice and crunchy and tastes perfectly toasted, remove the granola from the oven and stir through all the dried fruit.

Allow the granola to completely cool down in the trays before storing it in an airtight container.

Enjoy with your favourite milk or yoghurt or sprinkle it on top of ice cream or smoothie bowls, or just eat it dry as a snack!